UIKit: Task App Quickstart
This quickstart provides step-by-step instructions for using UIKit to create a task app in Xcode, which consists of the following:
Prerequisites
- Ditto account and access credentials
- iOS 13 (or later)
- macOS 11 (or later)
For instructions on creating your account and obtaining your credentials, see Onboarding.
Creating a New App in Xcode
Click File, and then select New Project.
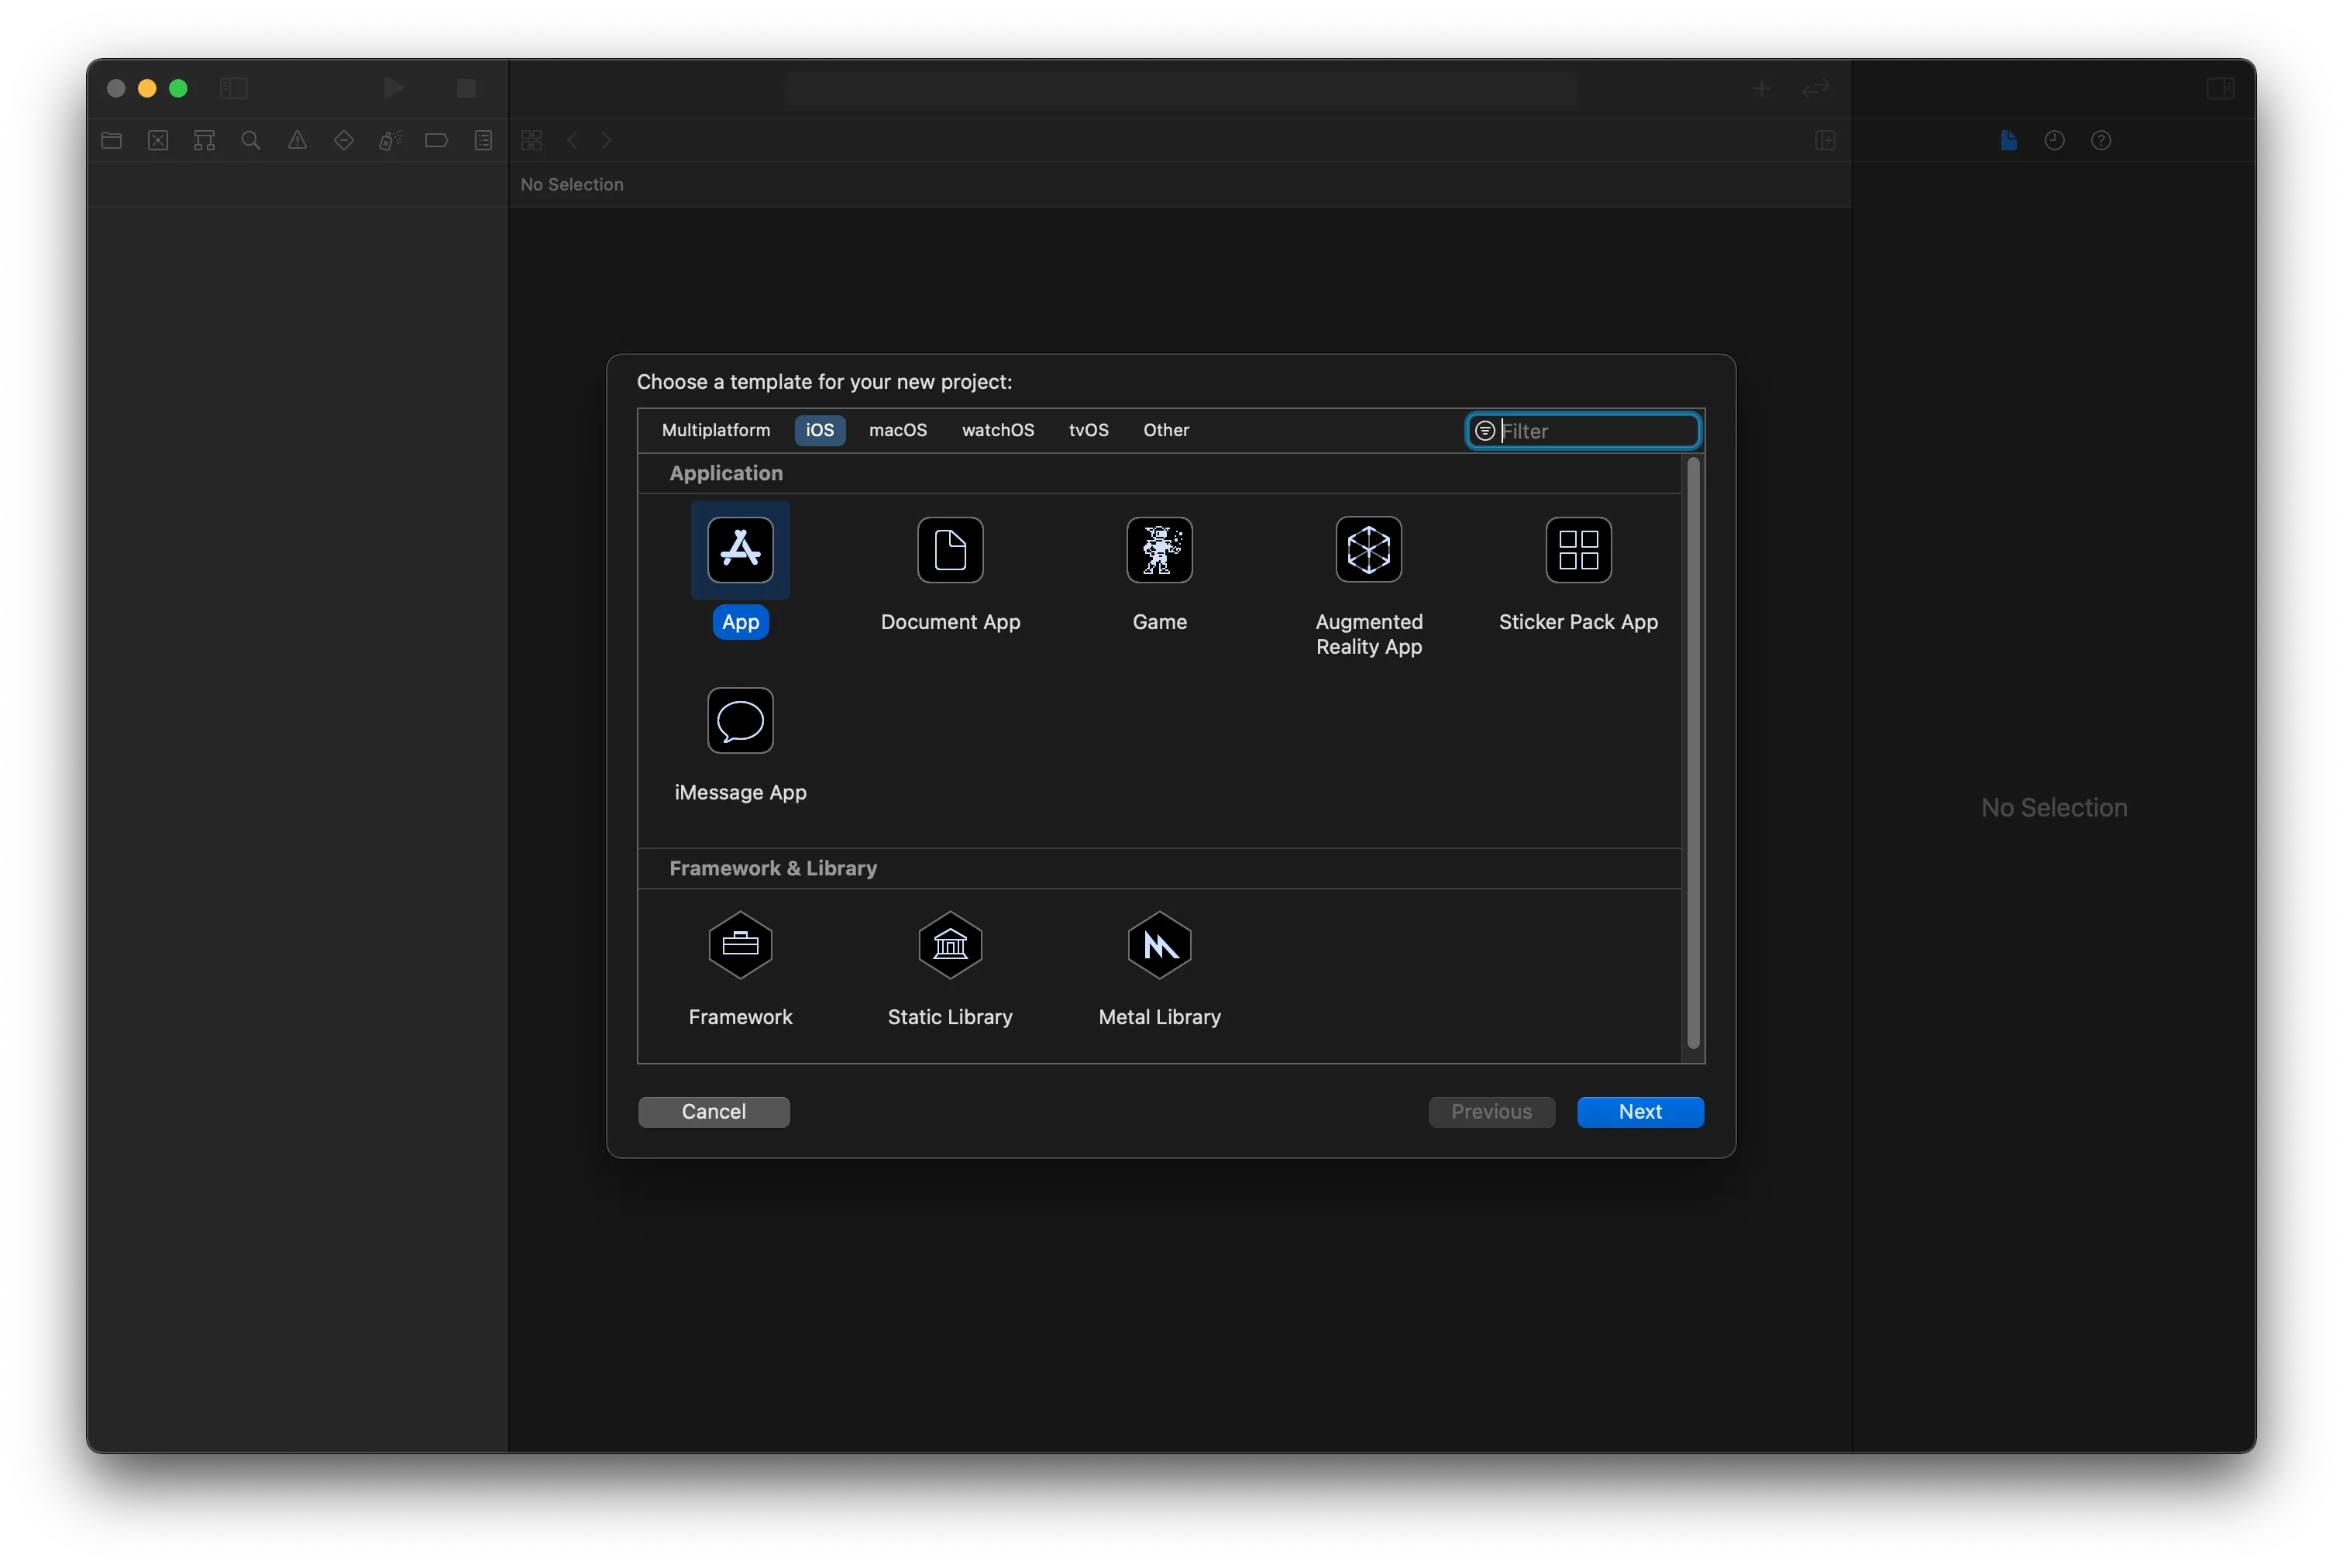
In the Choose a template for your new project modal, select App and then click Next.
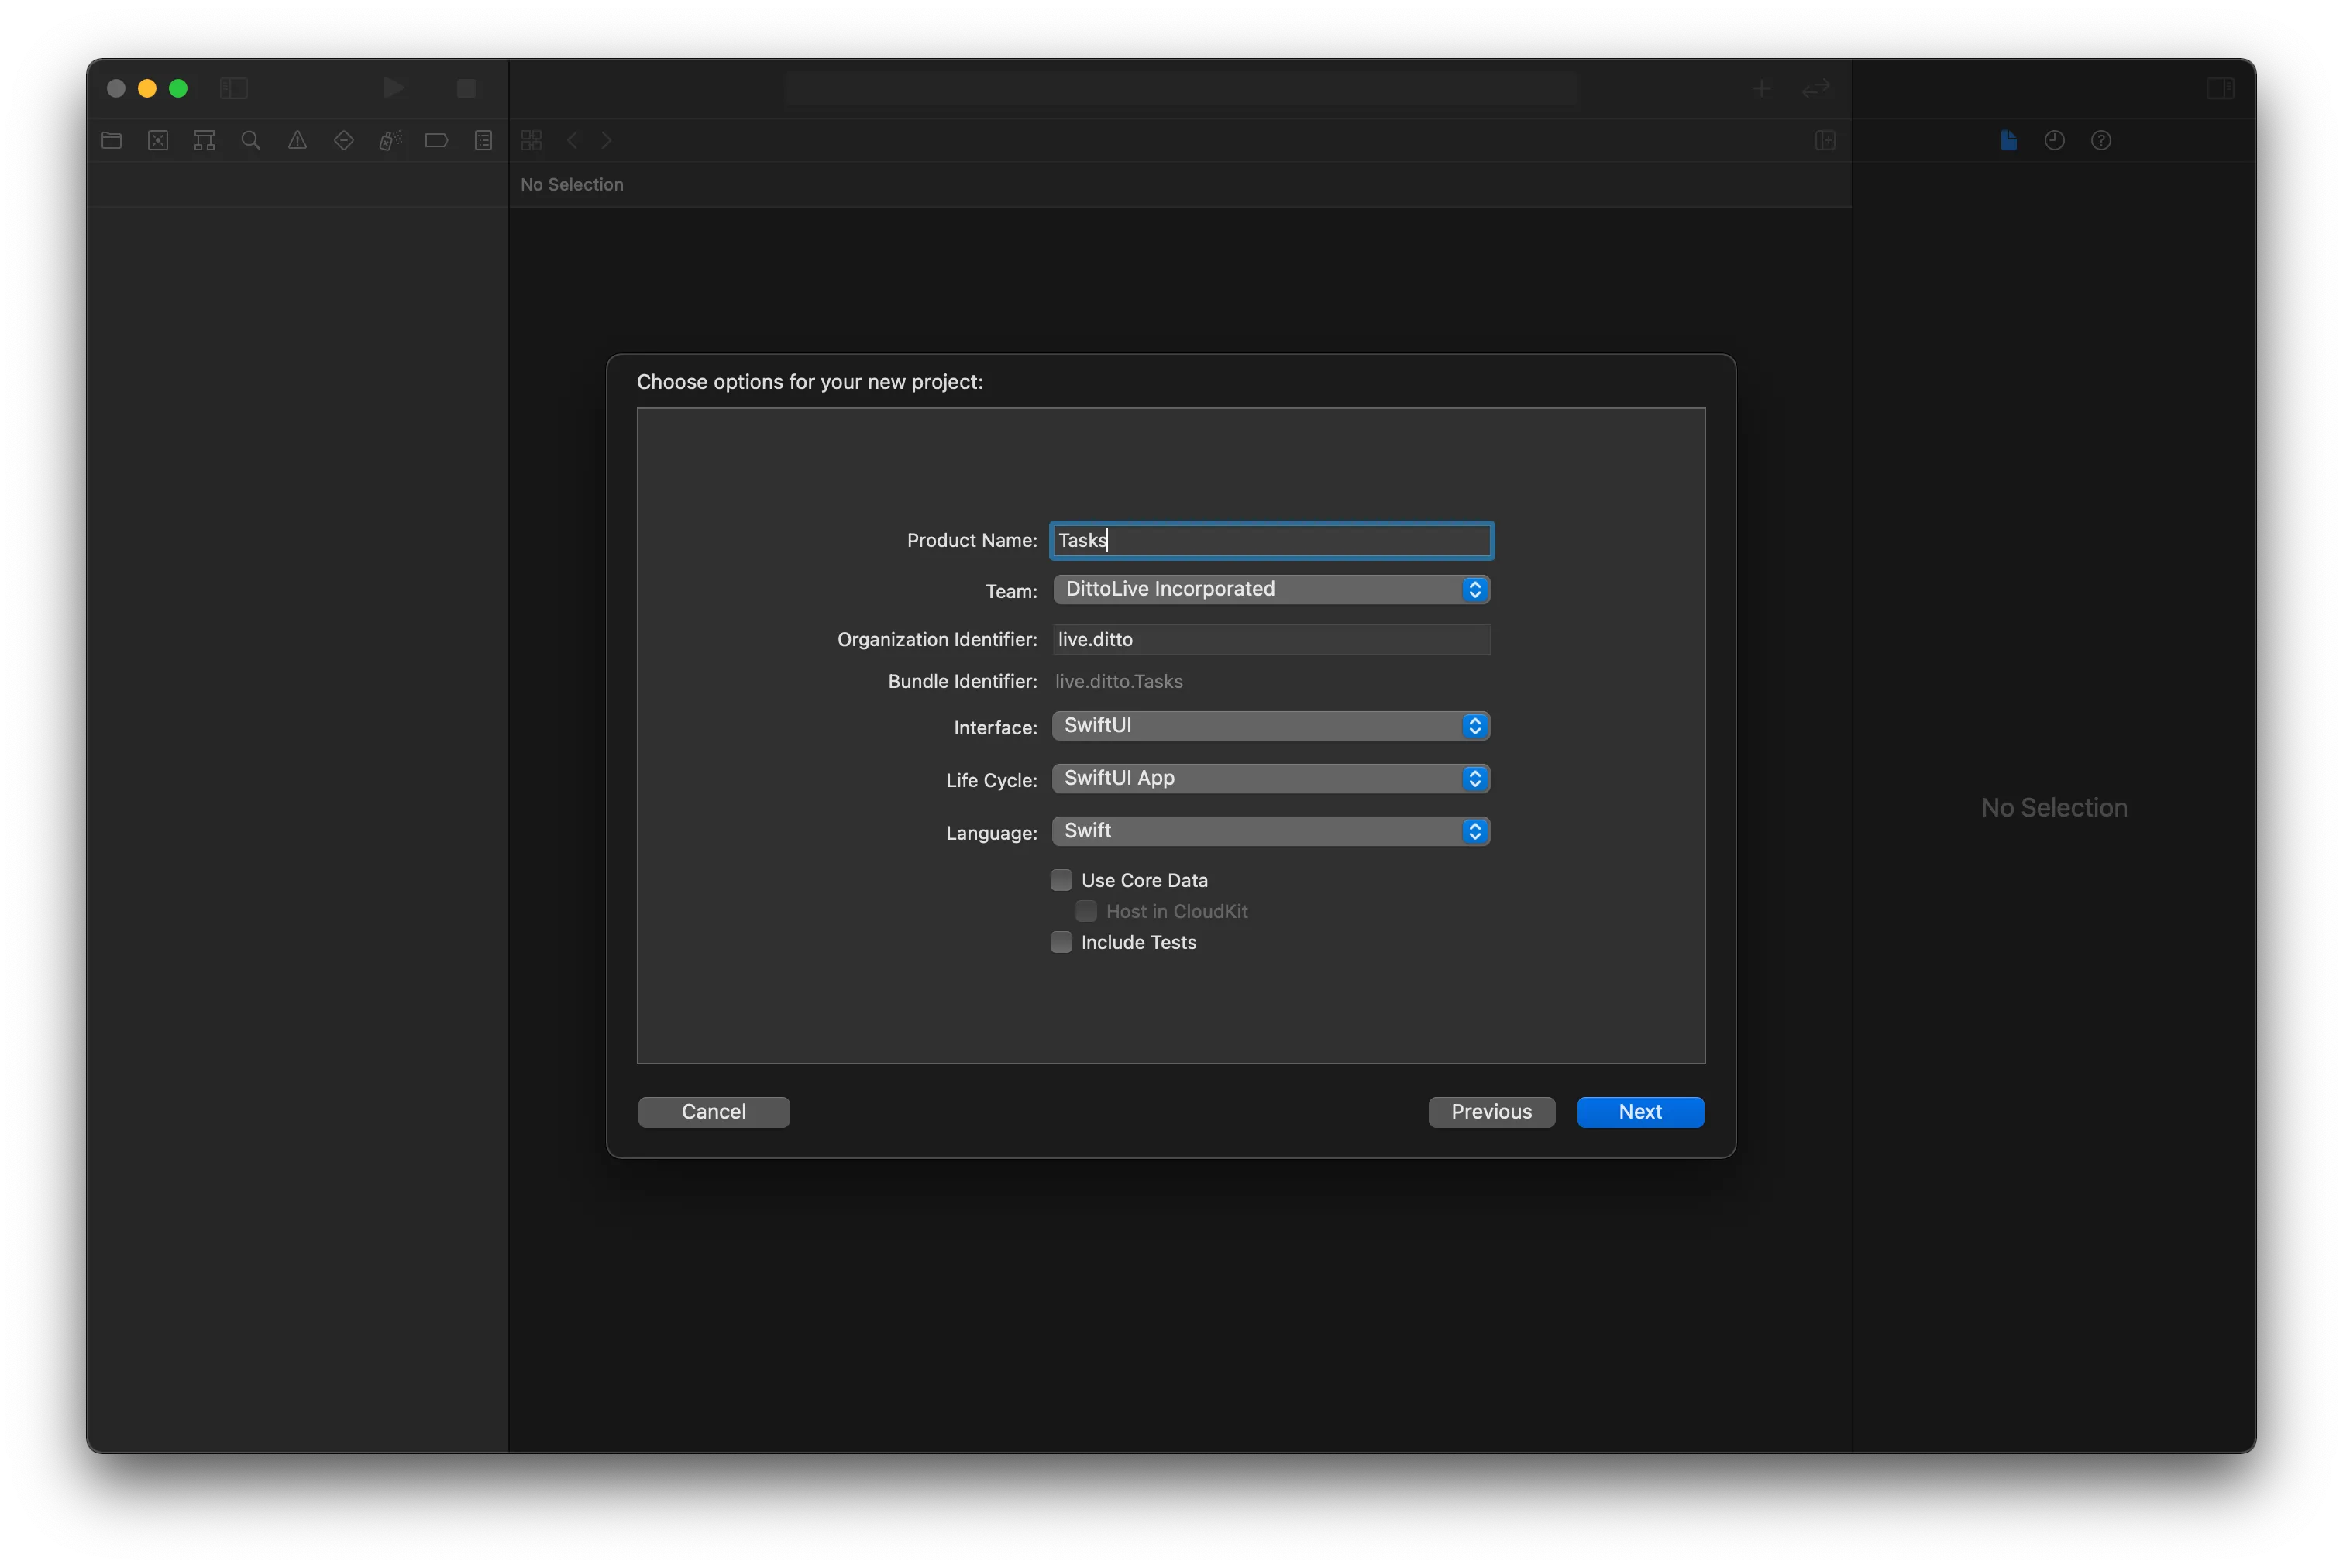
In the Choose options for your new project modal, enter information as appropriate and then click Next.
The following are merely suggestions; enter any information in the form that you desire.
The following steps provide suggested values for the form; however, you can enter any information you desire:
- For Product Name, type "Tasks".
- For Team, select None.
- For Organization Identifier, type "live.ditto".
- For Interface, select Storyboard.
- For Life Cycle, select AppKit App Delegate.
- For Language, select Swift.
Adding Permissions to the Info.plist
For Ditto to access available networking capabilities, such as Bluetooth Low Energy, configure your project's user control and privacy permissions by doing the following:
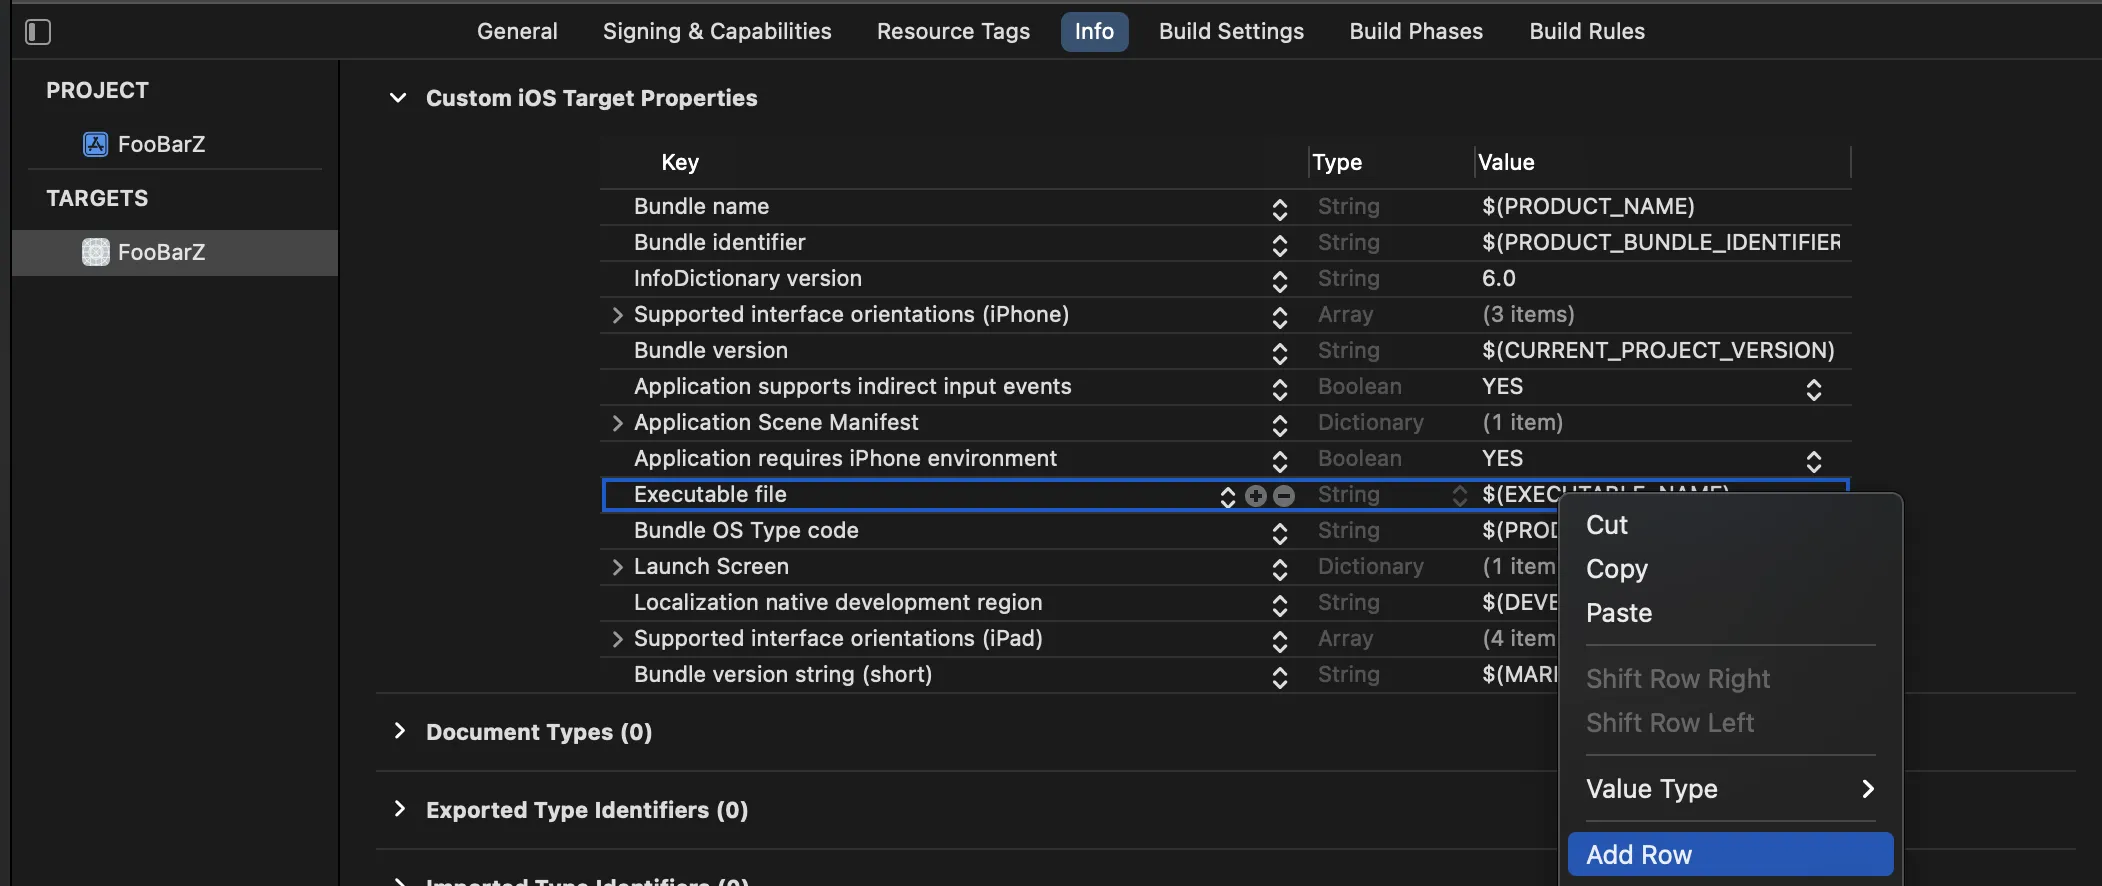
From Xcode, add a new Custom iOS Target Properties entry:
- From the left navigator area, click your project.
- In the editor that appears, click Info tab.
- Right-click any row in the list, and then select Add Row from the menu.
For instructions on configuring permissions for your app, see the Installing Swift SDK > Configuring Permissions topic.
From your project's Info.plistfile, add the following key-value pairs, and then, if desired, modify each string value:
- Once implemented, the following string values display to your end users as dismissable prompts explaining why the app requires certain permissions.
- If desired, replace the default values. For instance, if your end users prefer a language other than English, replace with their language equivalents.
Key: NSBluetoothAlwaysUsageDescription
Type: String
Value: Uses Bluetooth to connect and sync with nearby devices

Key: NSLocalNetworkUsageDescription
Type: String
Value: Uses WiFi to connect and sync with nearby devices

Key: NSBonjourServices
Type: String
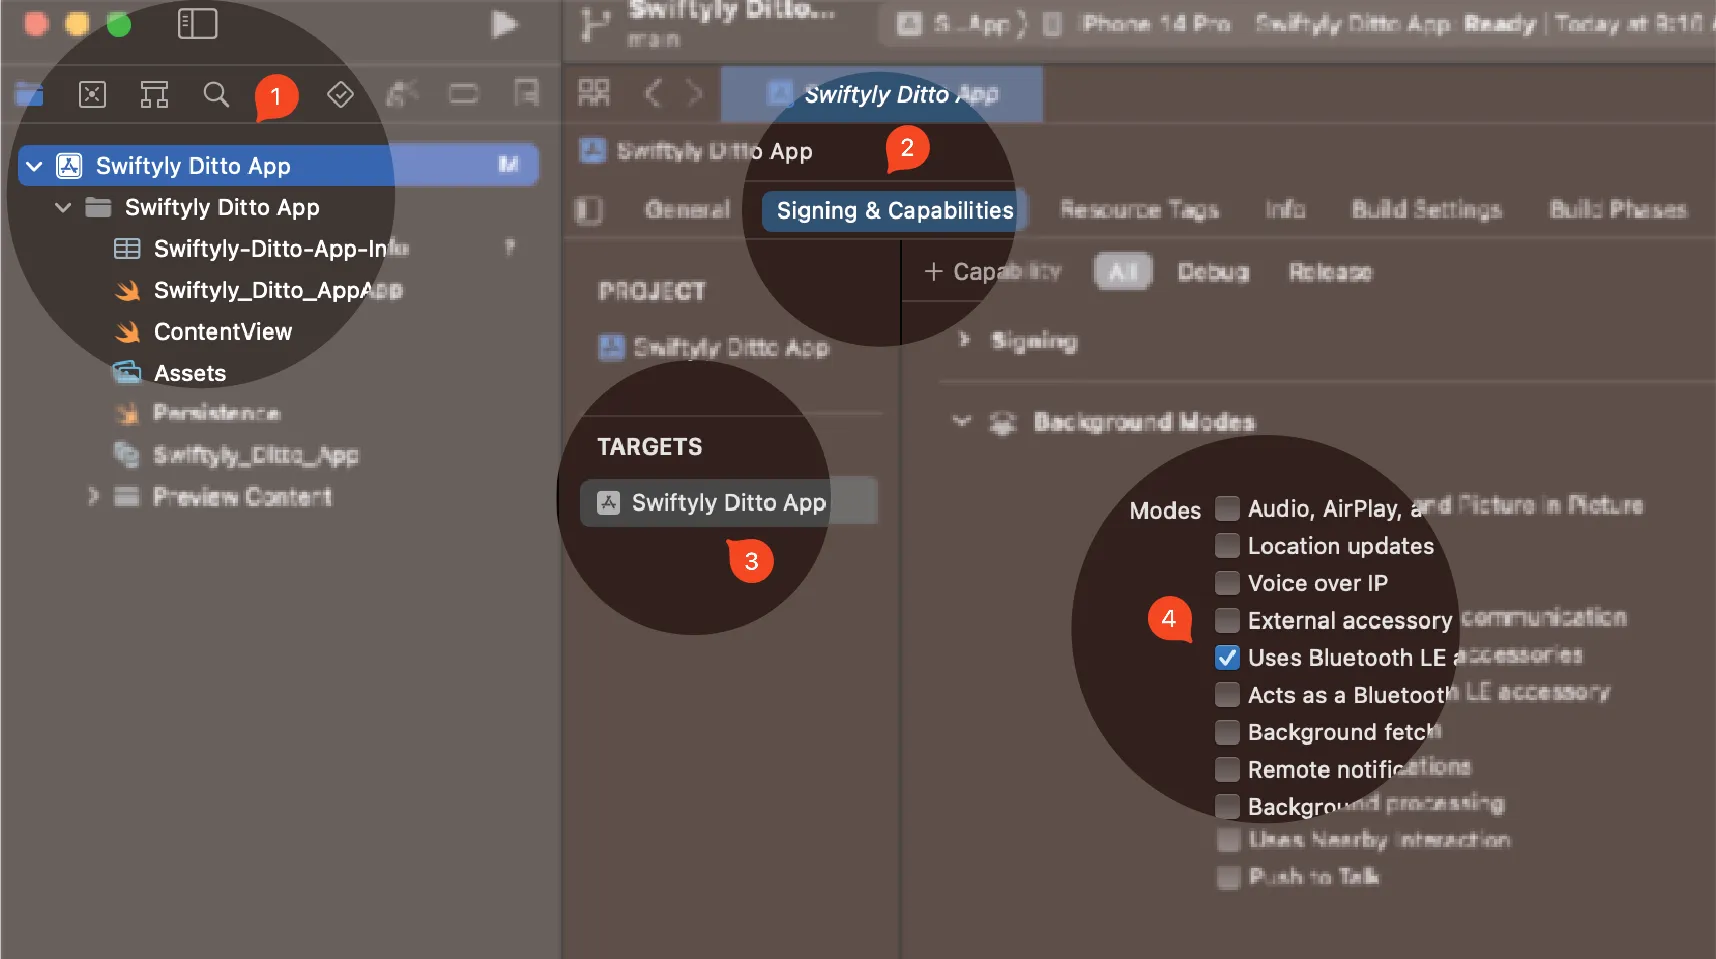
Value: _http-alt._tcp.From Xcode, ensure your app continues to sync while it runs in the background by enabling Bluetooth Background Modes:
Once enabled, your app continuously syncs in the background, even while the device is locked.
- From the left navigator area, click your project.
- Click Signing & Capabilities.
- From TARGETS, select your app from the list.
- From Background Modes, click to select Uses Bluetooth LE accessories from the list.
Creating UI Elements
Create elements for your interface, including a top navigation bar, a task list, and an element for entering the task name:
Click File > New and then select File from the list.
From the Choose a template for your new file modal, select Cocoa Touch Class and then click Next.
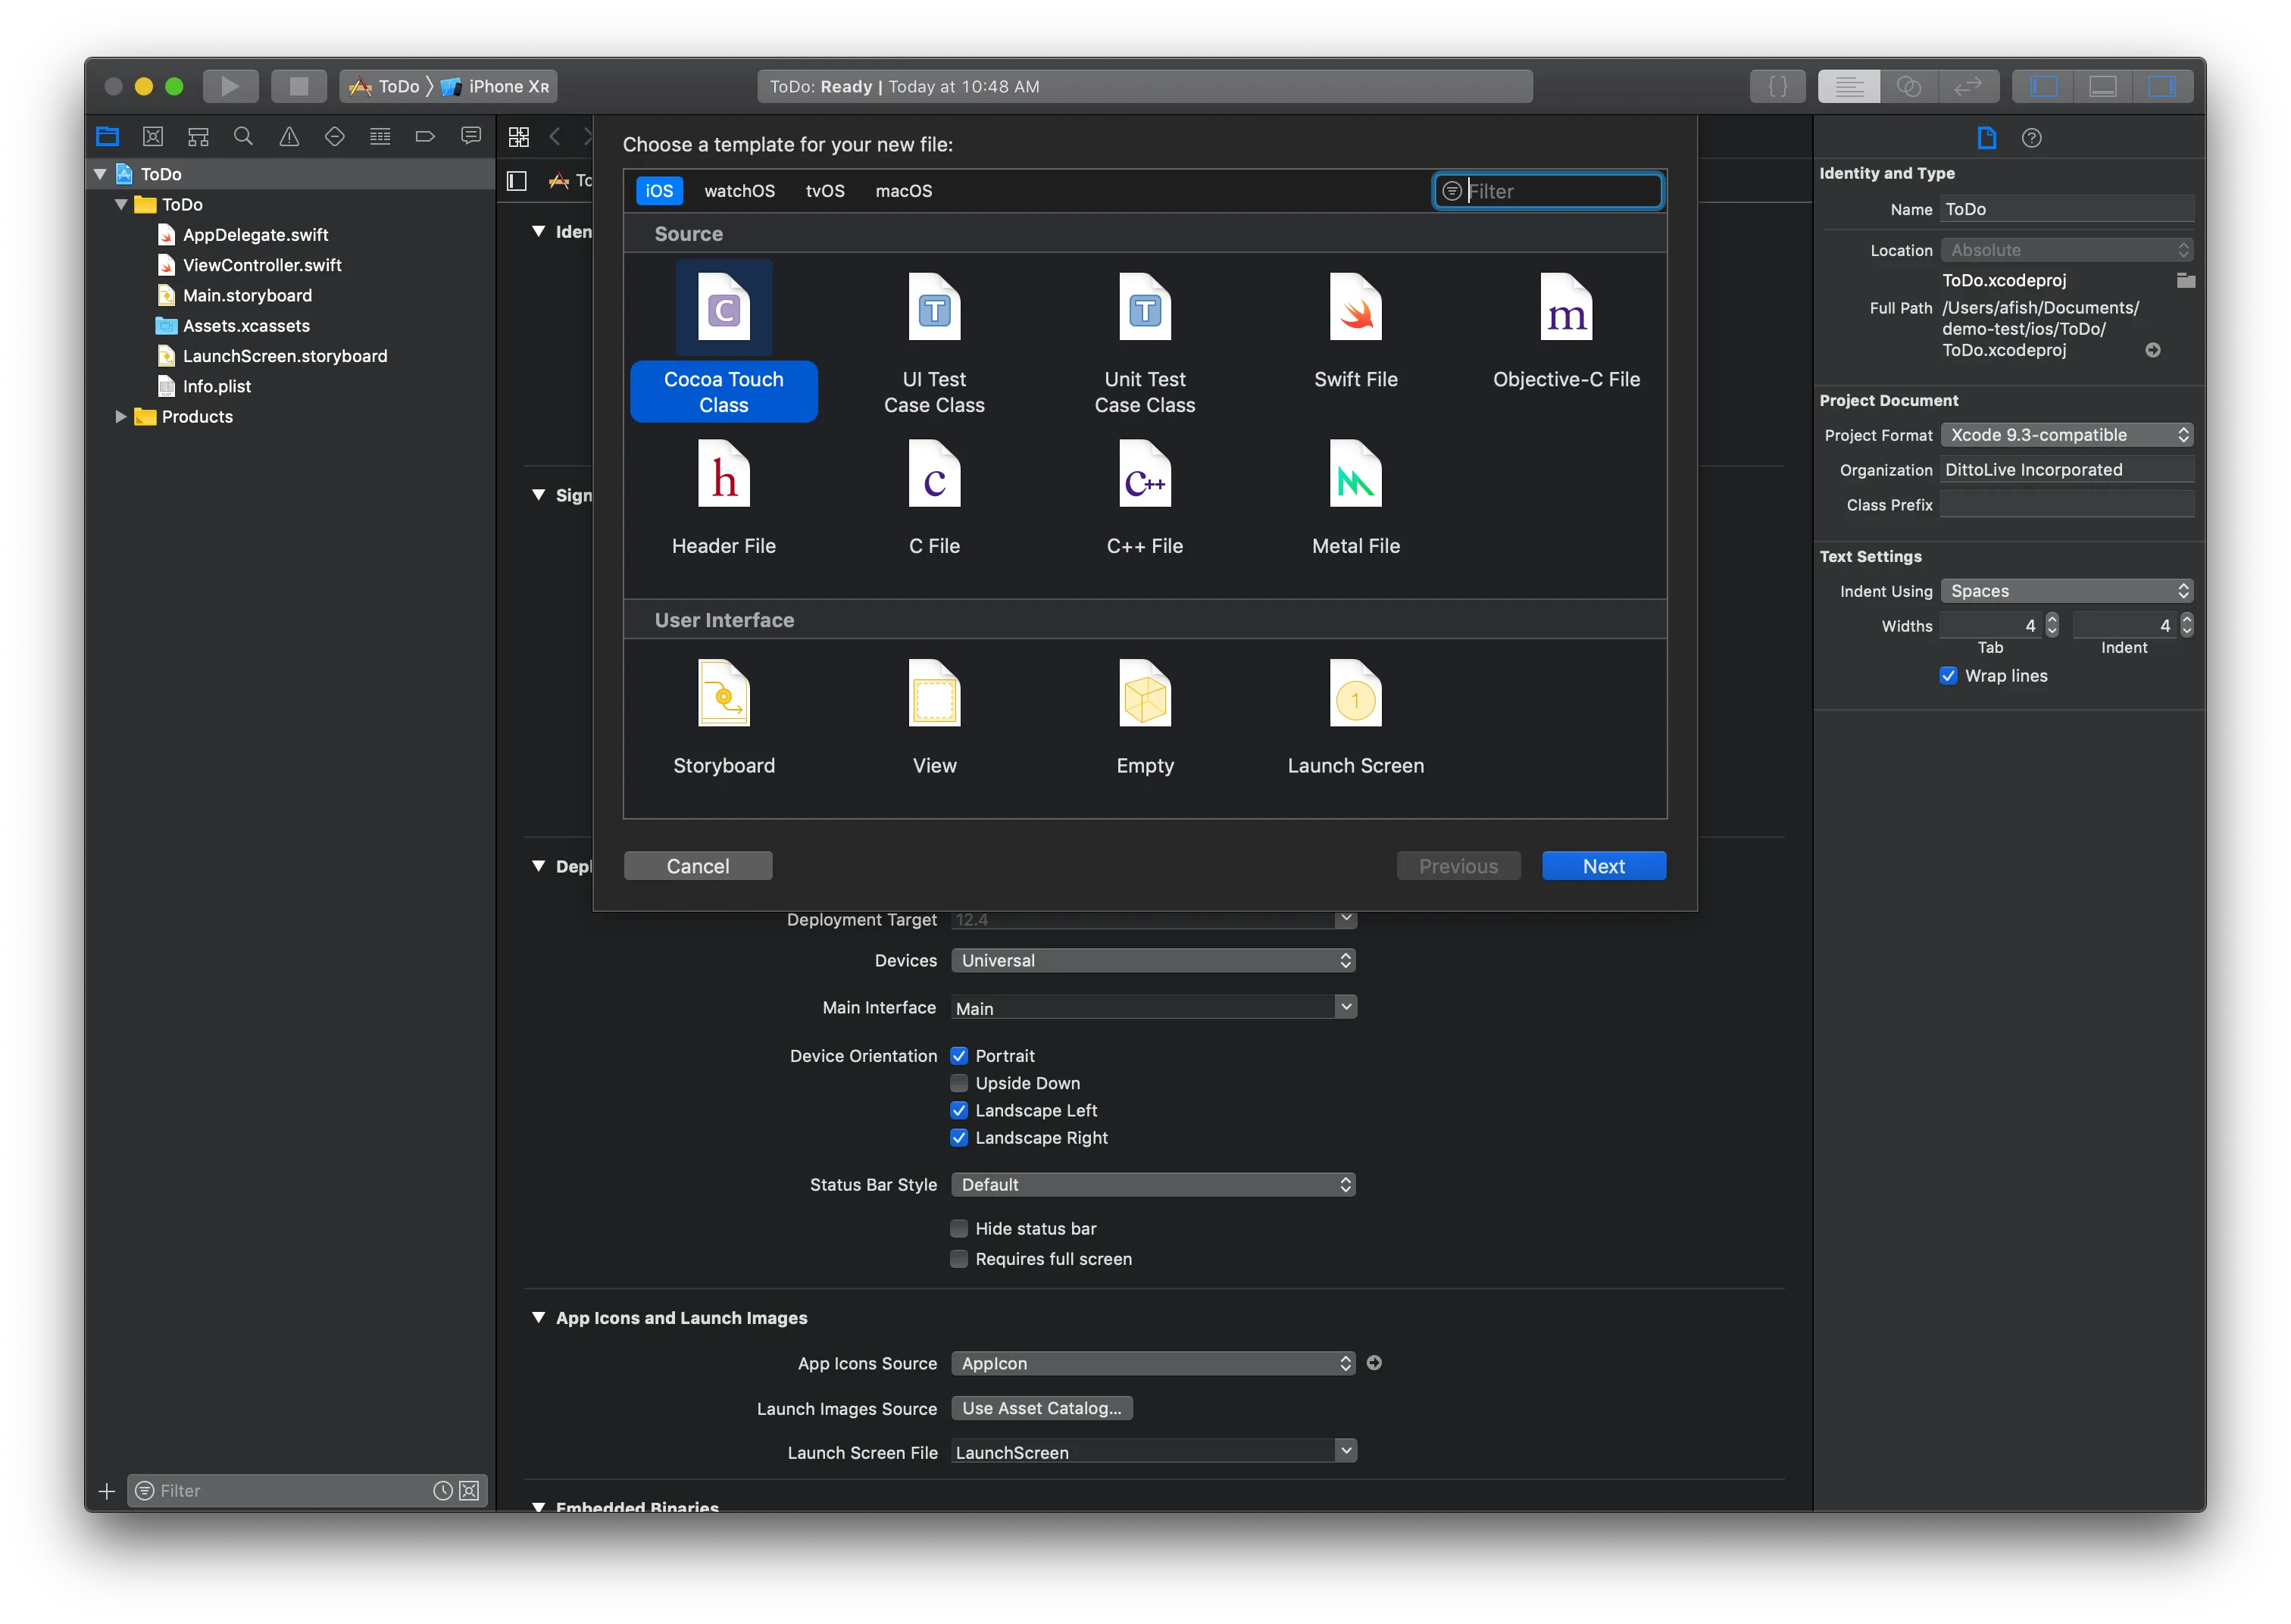
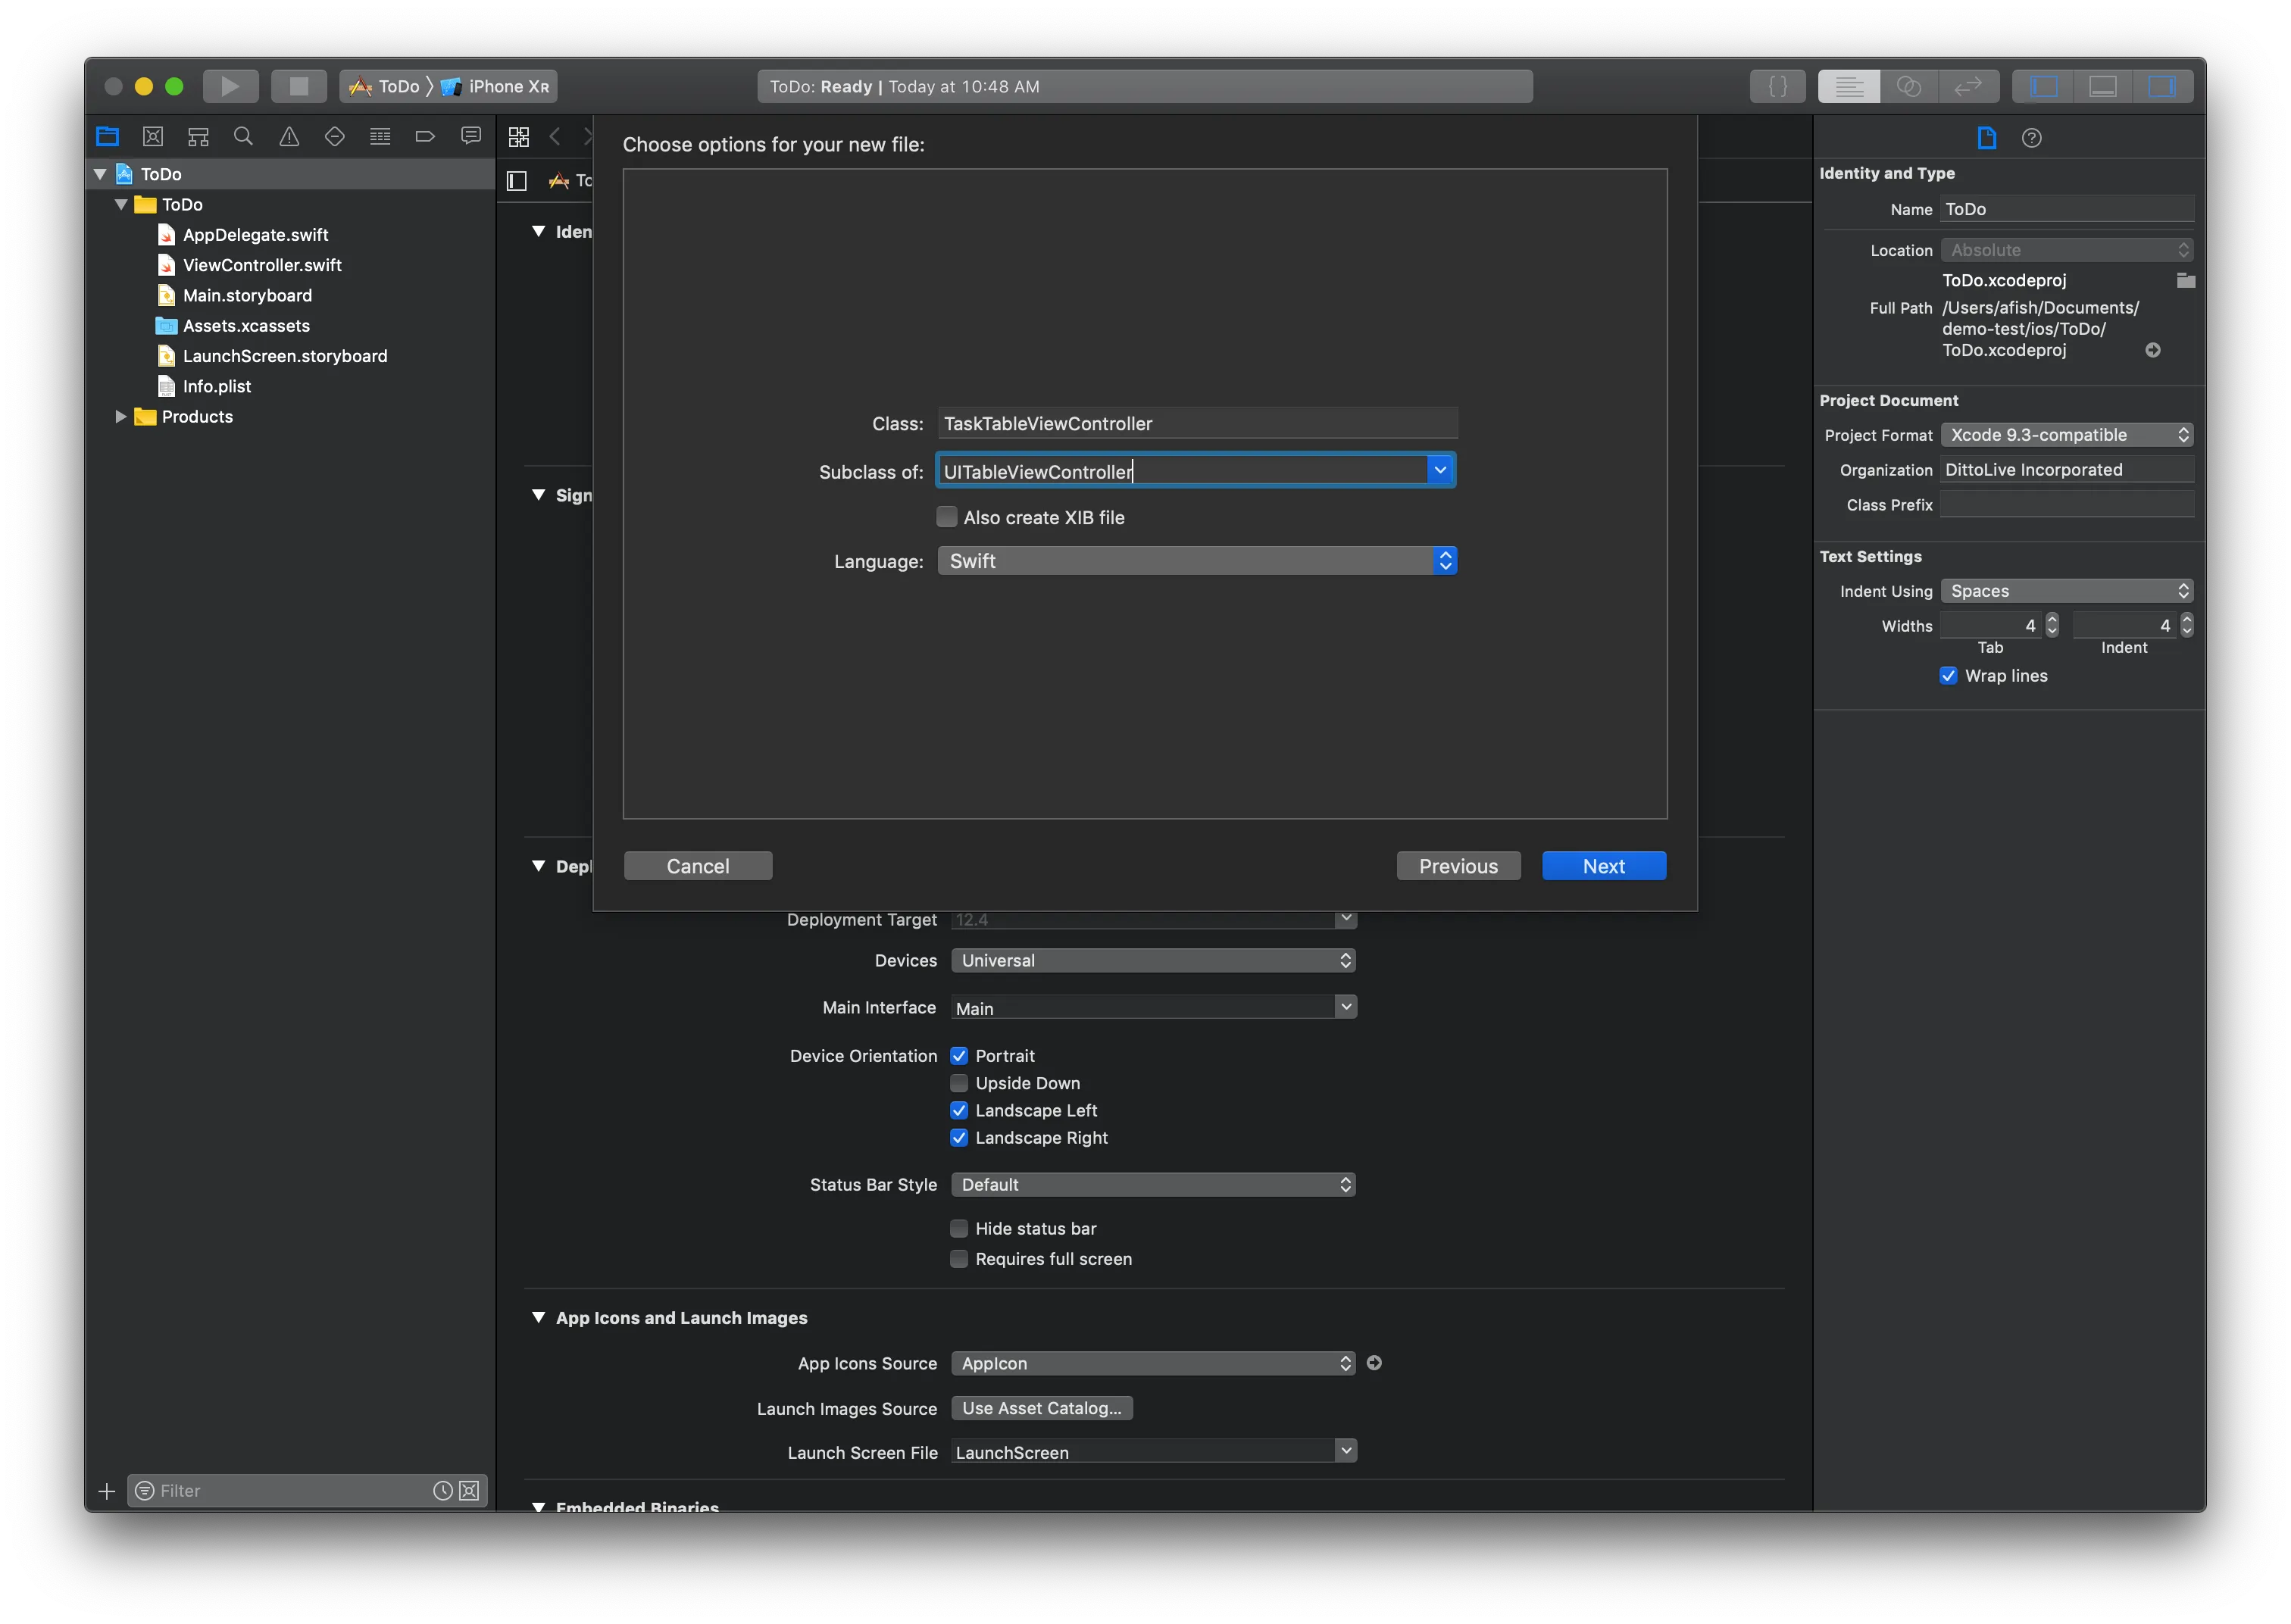
From the Choose options for your new file modal, enter the following:
- For Class, type "TaskTableViewController".
- For Subclass of, select UITableViewController.
- For Language, select Swift.
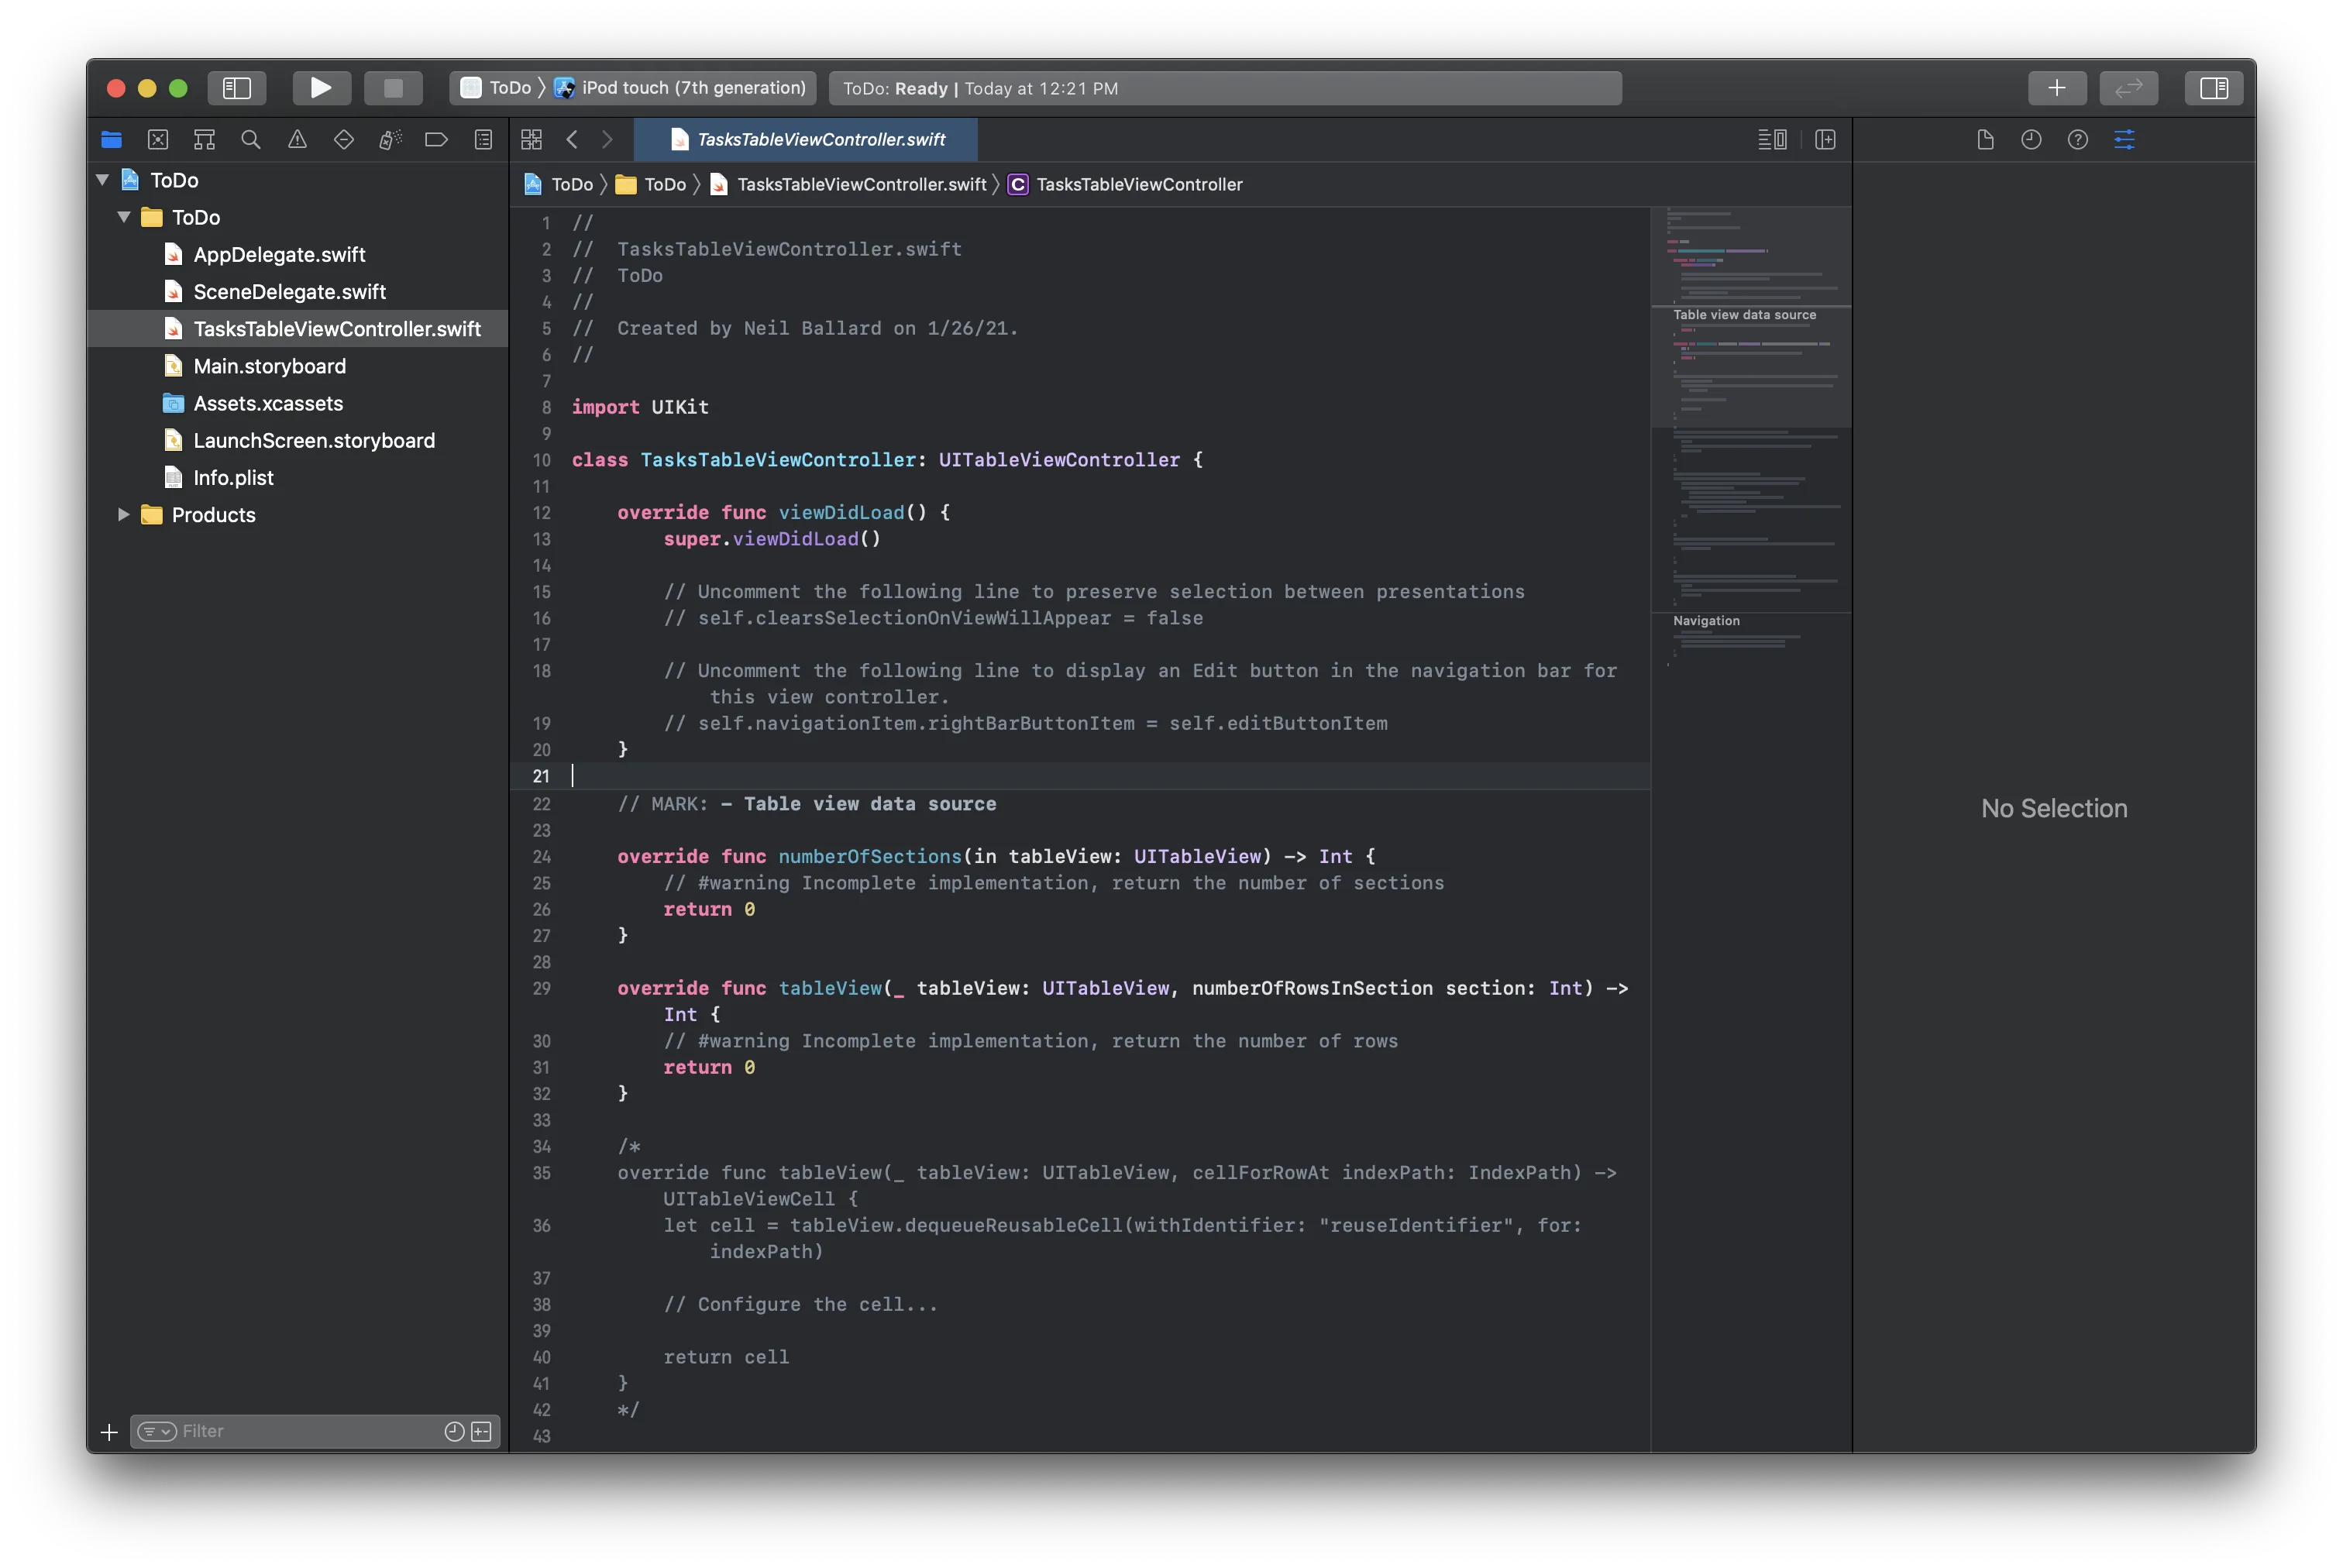
Delete your project's default view controller file by right-clicking ViewController.swift from the left navigator area and selecting Delete.
Verify that your project structure appears as follows:
Configuring the Storyboard
Once you've created your UI elements, open your project's Main.storyboard file located in the left navigator area and then do the following to set up your storyboard:
In the storyboard editor that appears, right-click the ViewController.swift file and select Delete from the list.
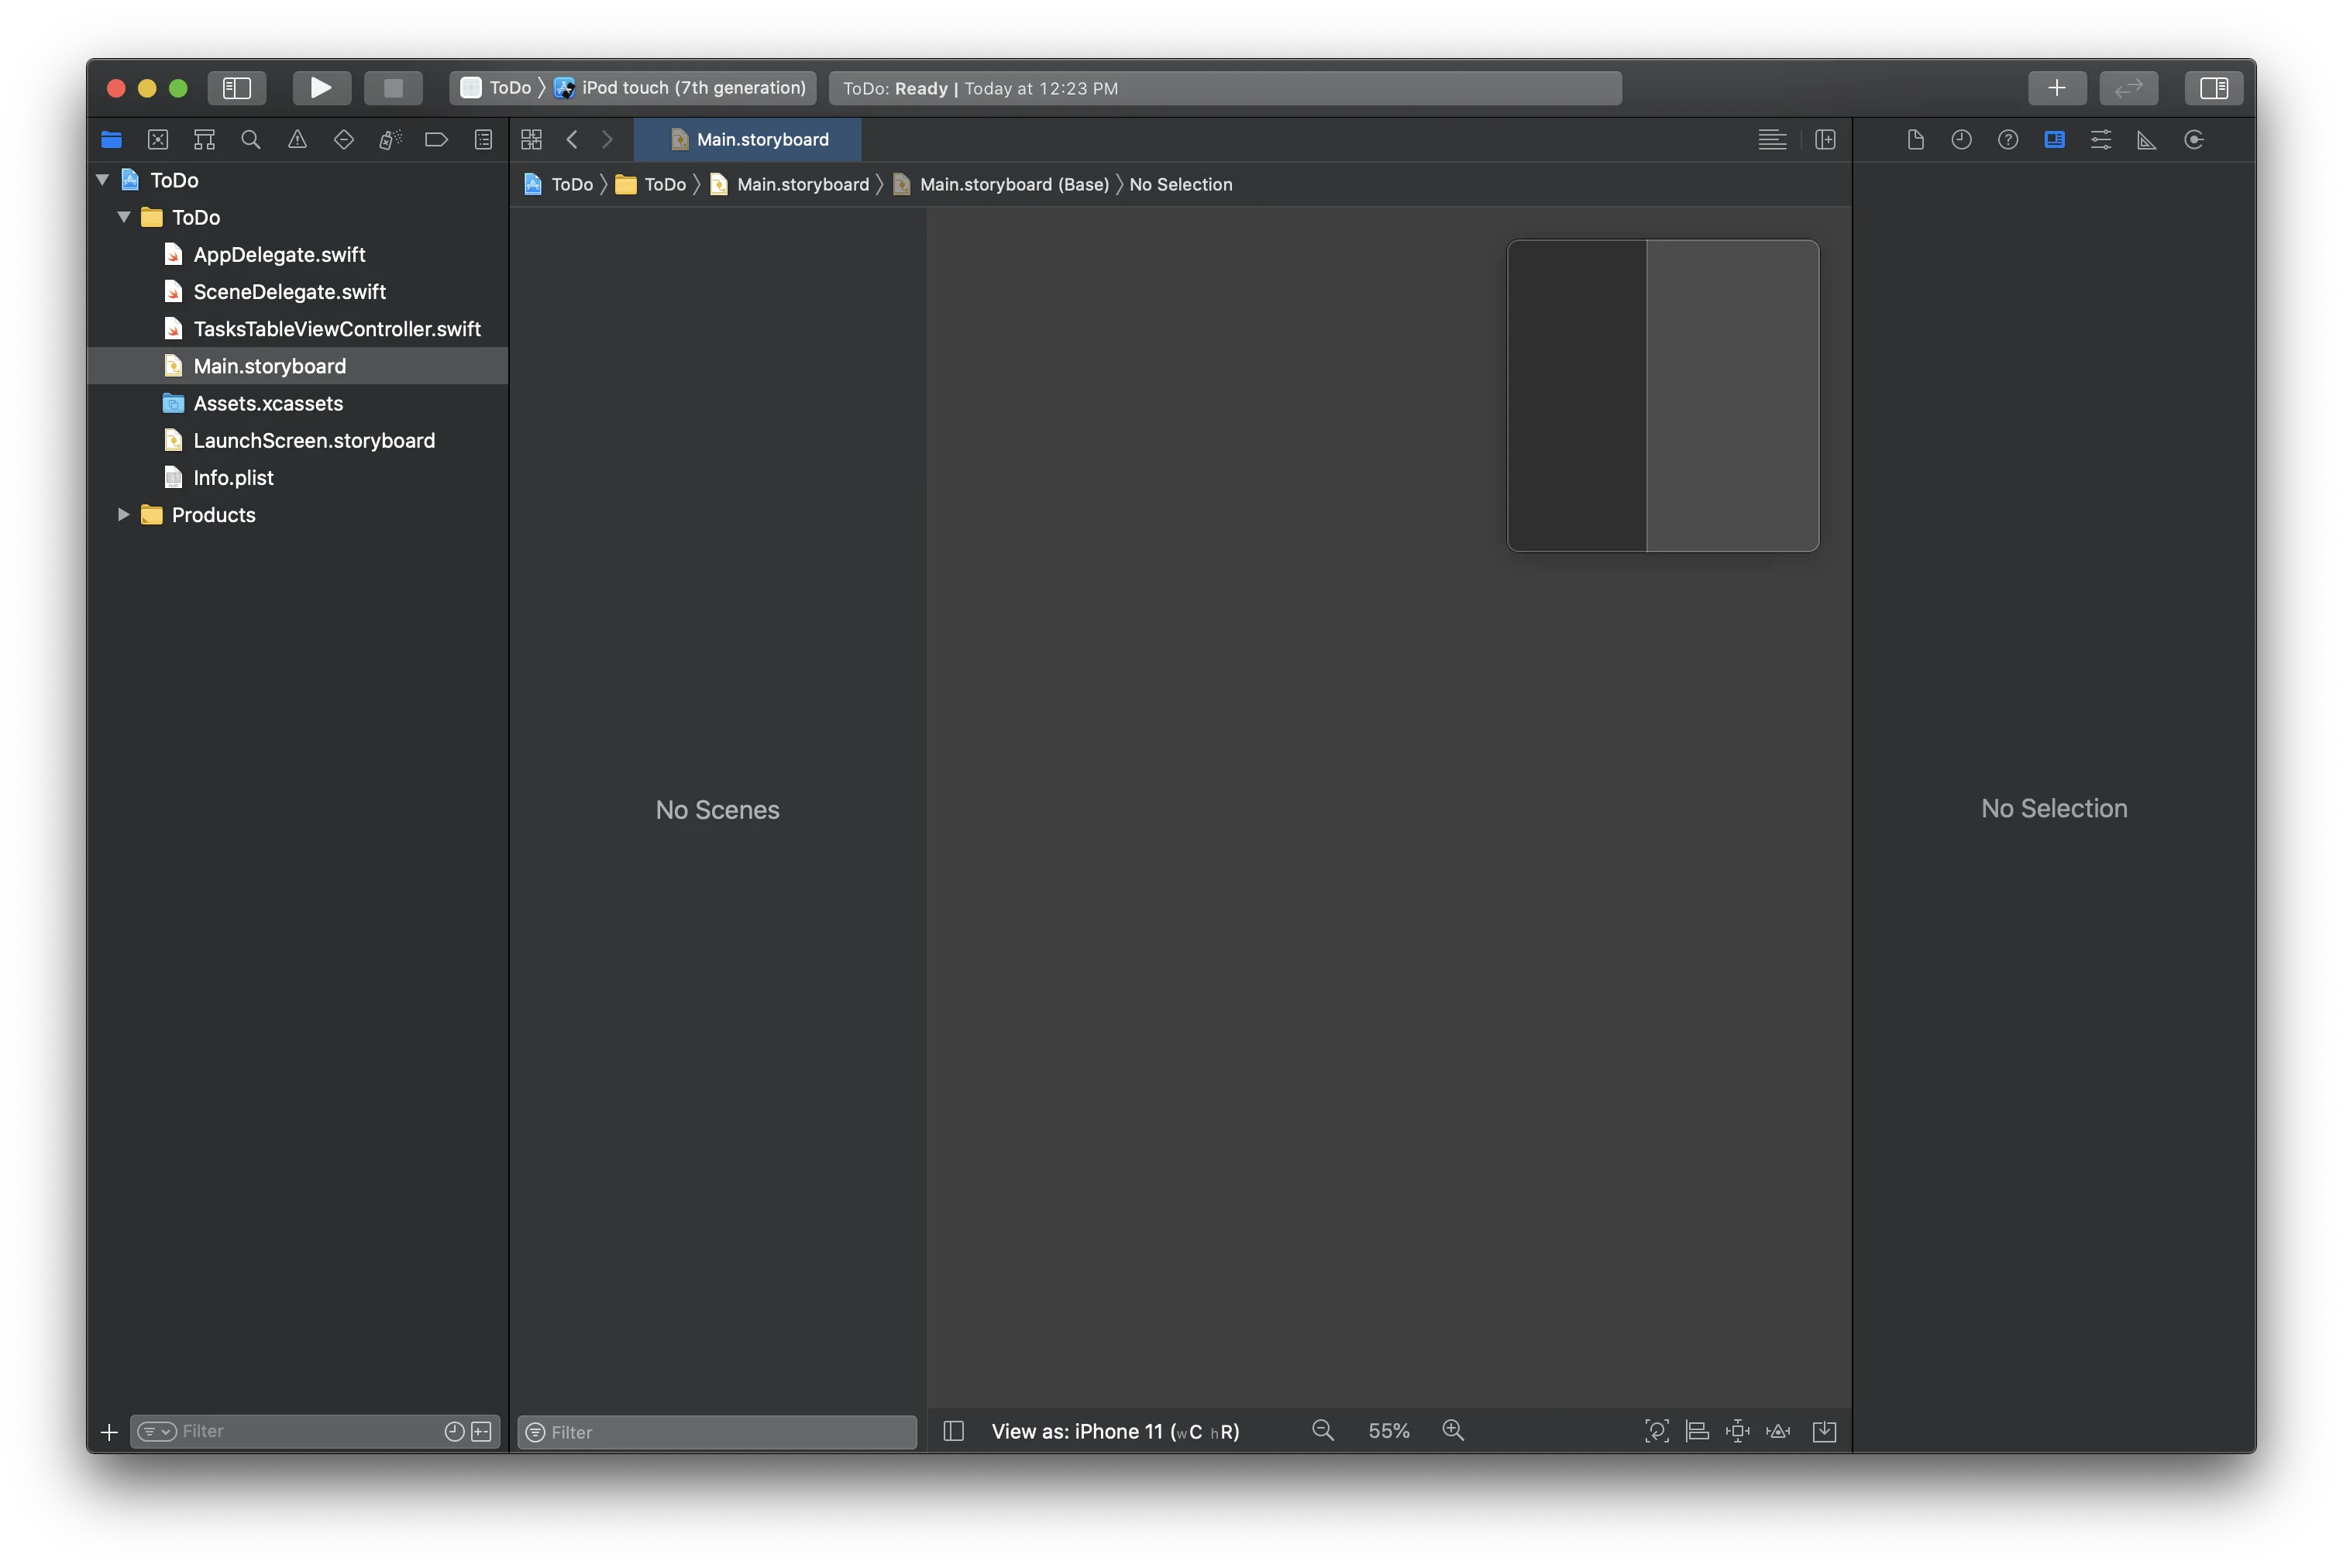
Add a UINavigationController into the storyboard.
- Click the circle with a square in it icon in the top right to display your list of UI elements and search for UINavigationController.
- Click to add it to the storyboard.
- Click on the "Root View Controller Scene" and navigate the right hand menu to declare the UITableViewController as a custom class of TasksTableViewController.
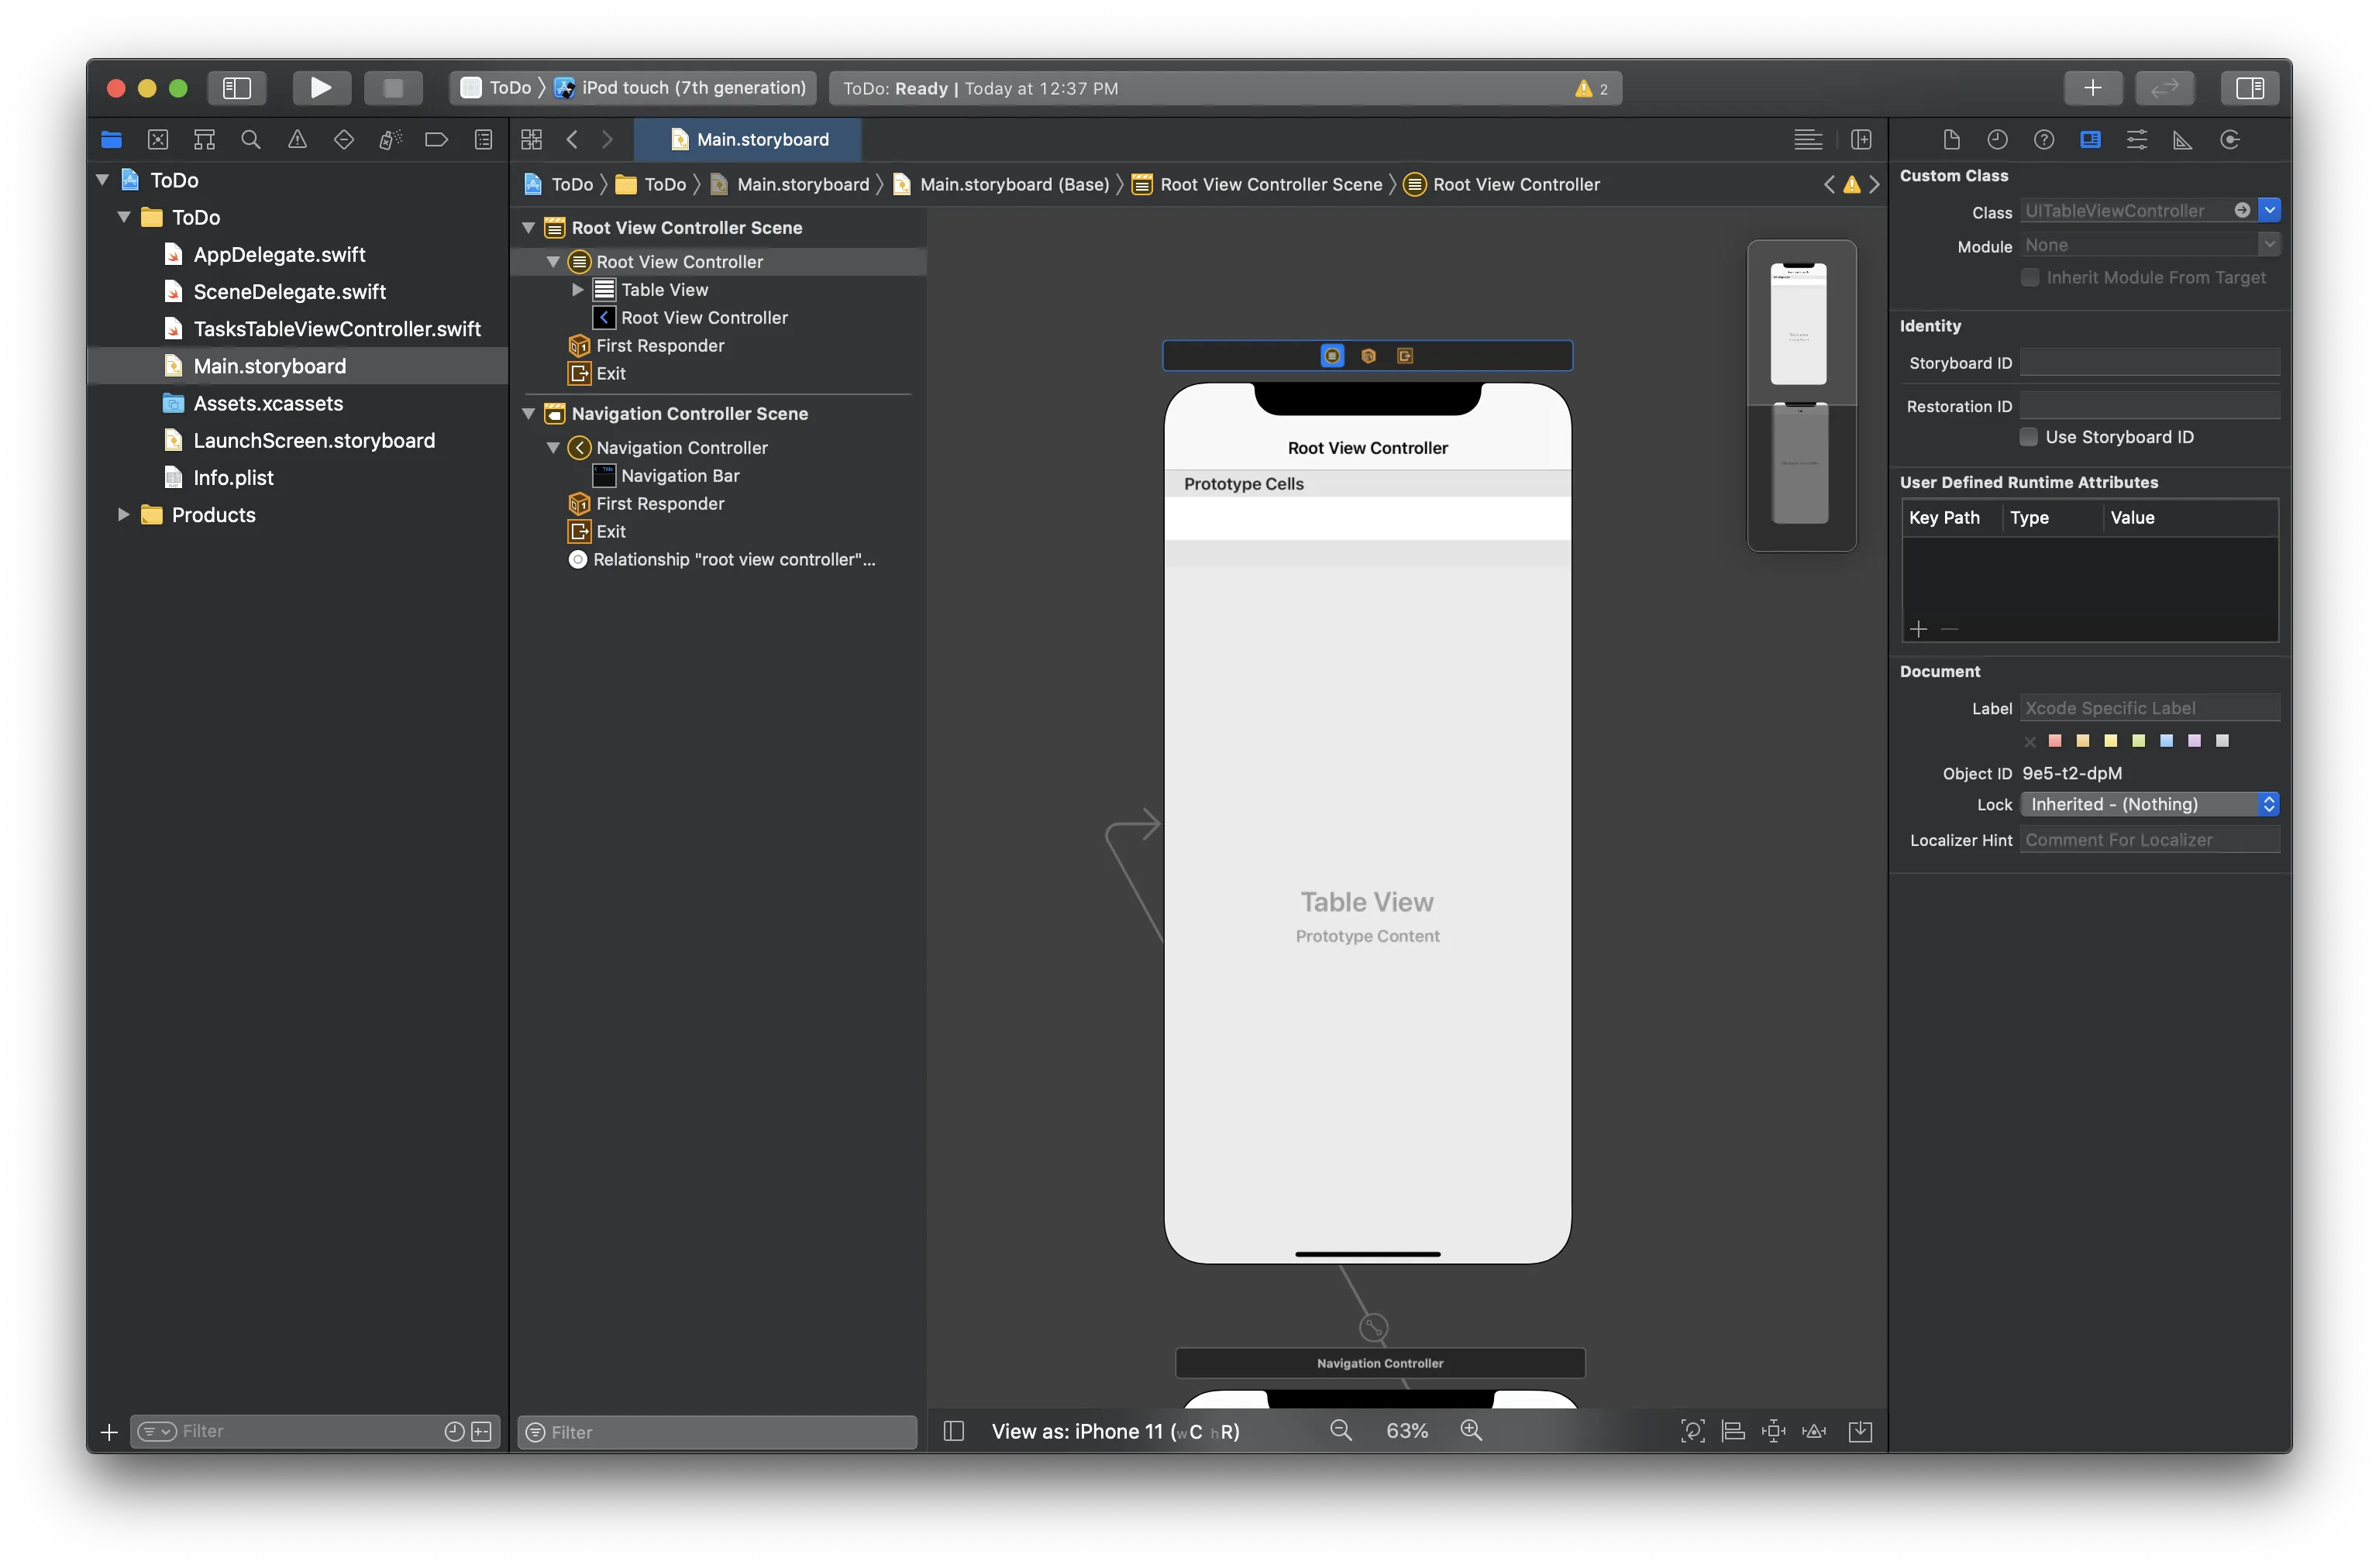
This created a UINavigationController and a root view controller based on UITableViewController, but it needs to be configured to work with our TasksTableViewController.swift file:
Click on the "Root View Controller Scene" and navigate to the menu on the right to declare the UITableViewController as a custom class of TasksTableViewController:
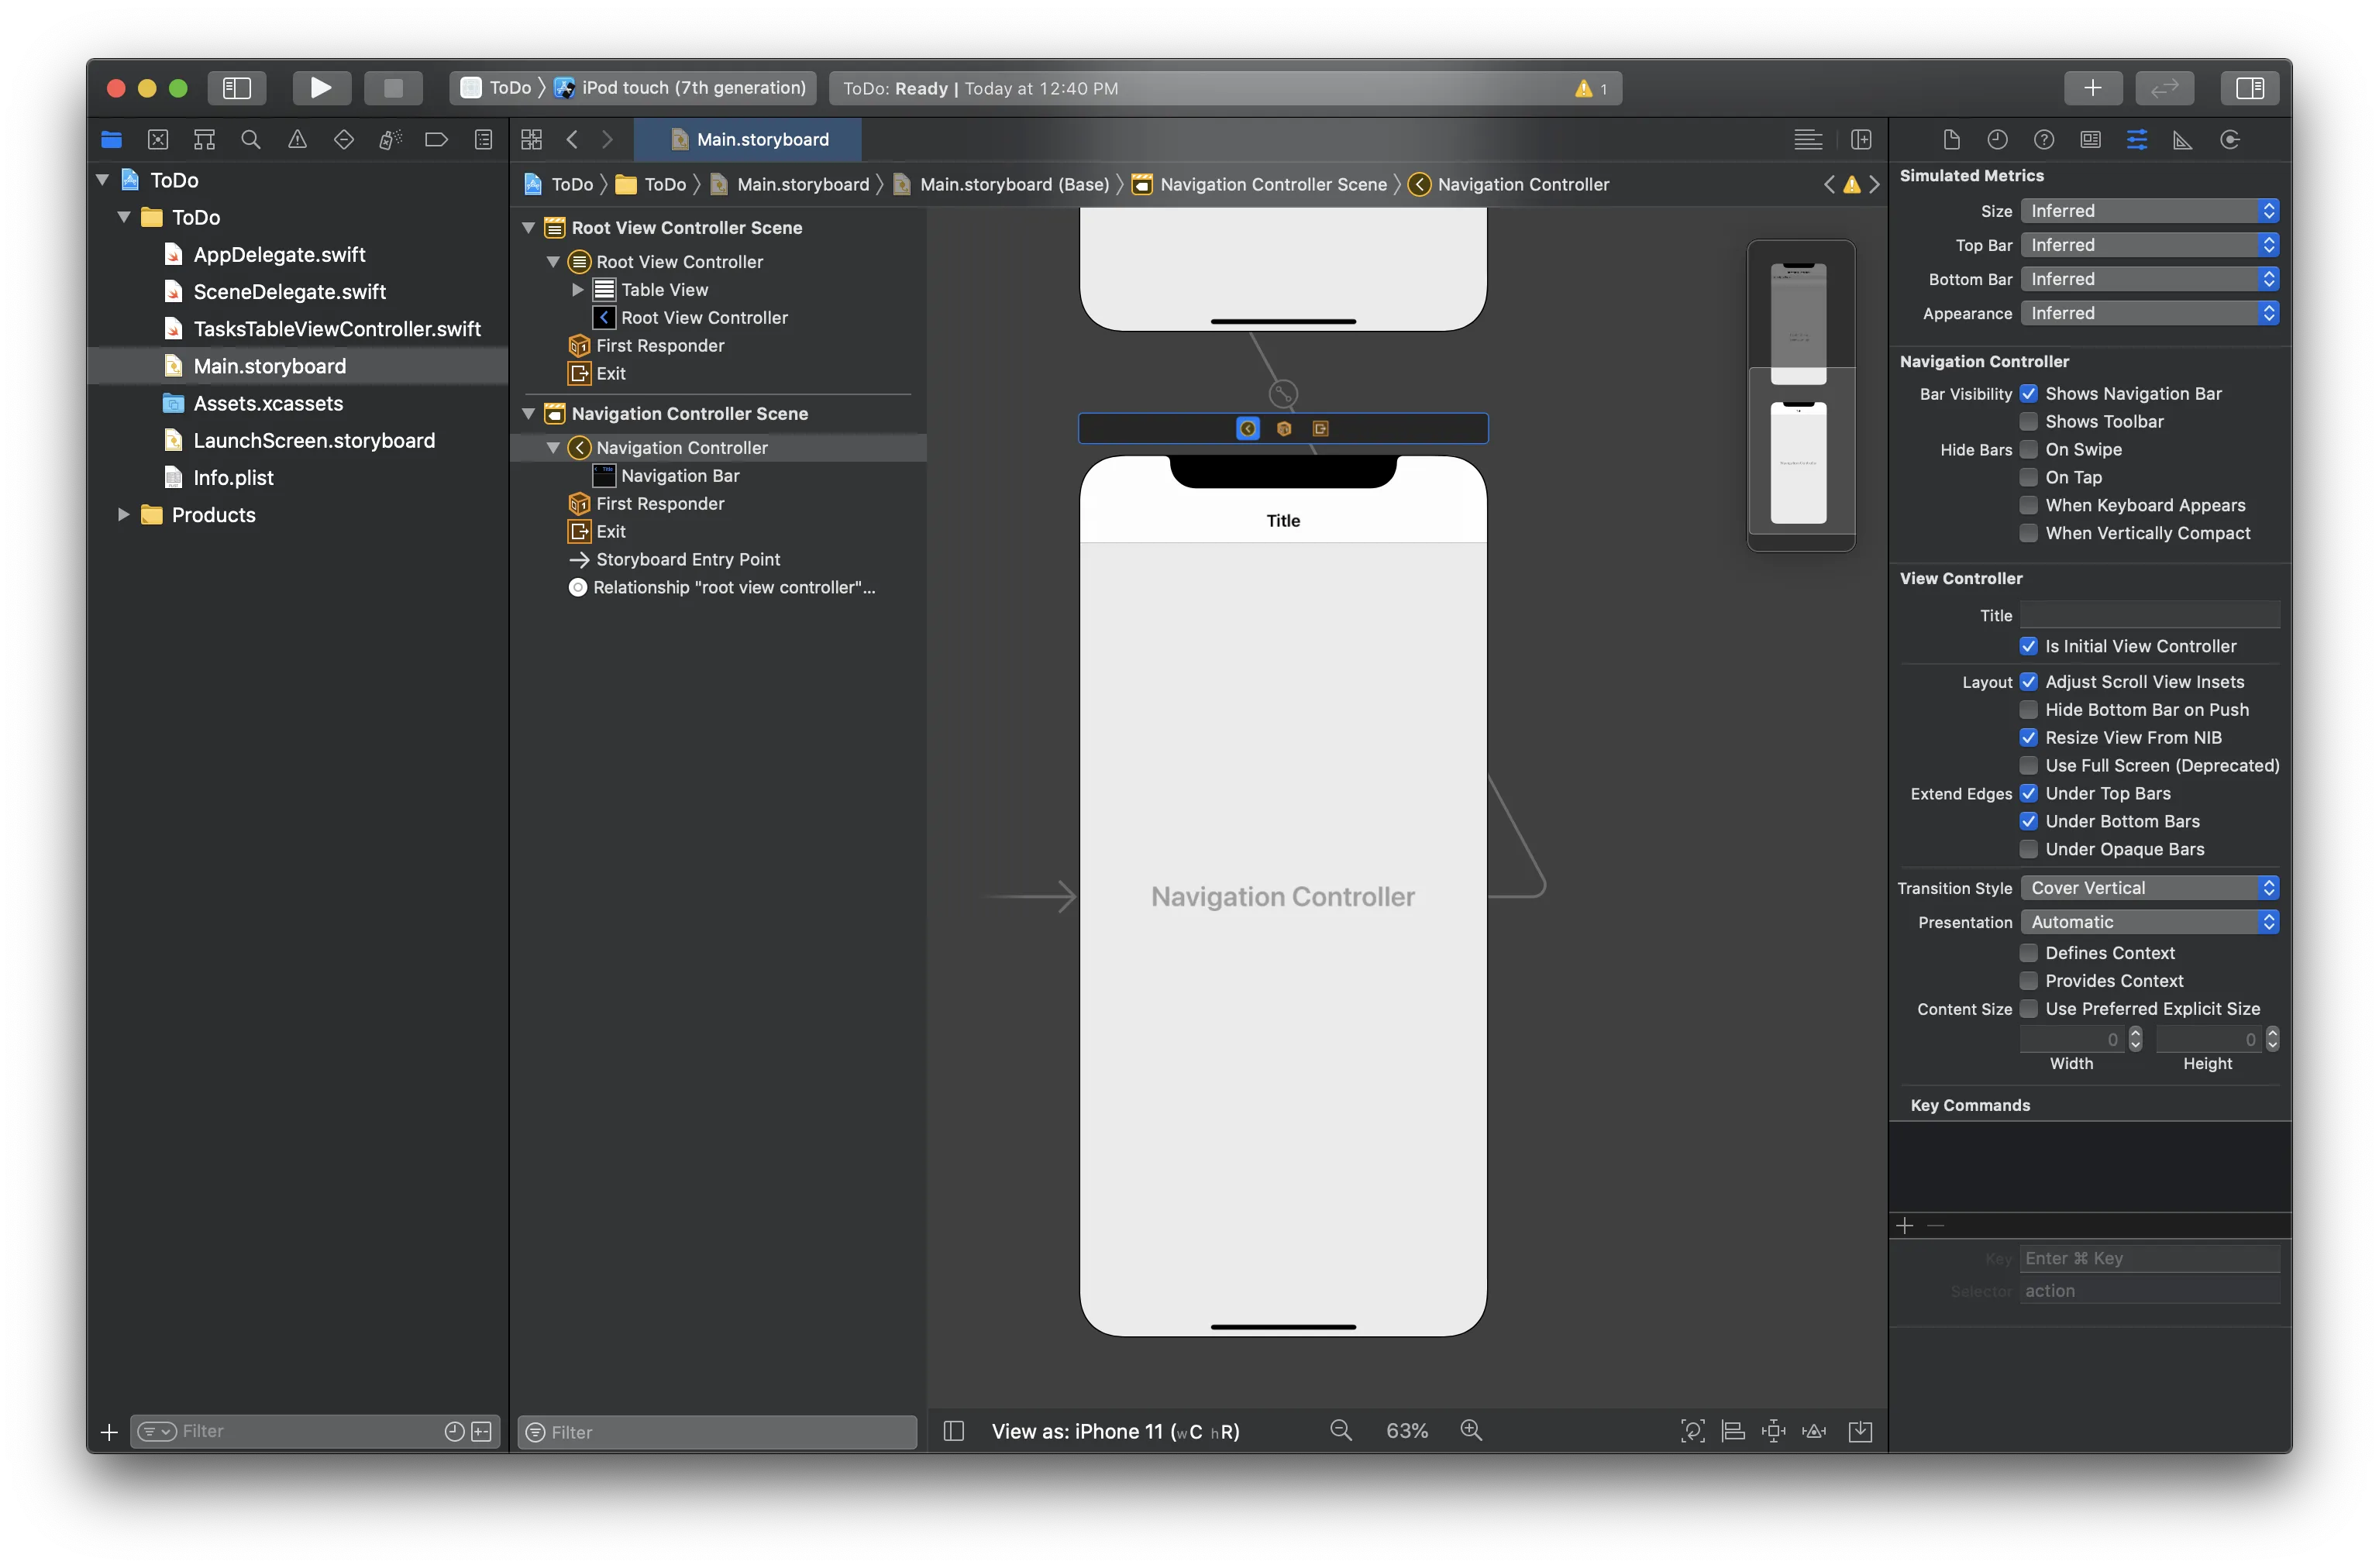
Ensure that the "Navigation Controller Scene" is the initial view controller for our app, so click on it and navigate to the menu on the right to set this property:
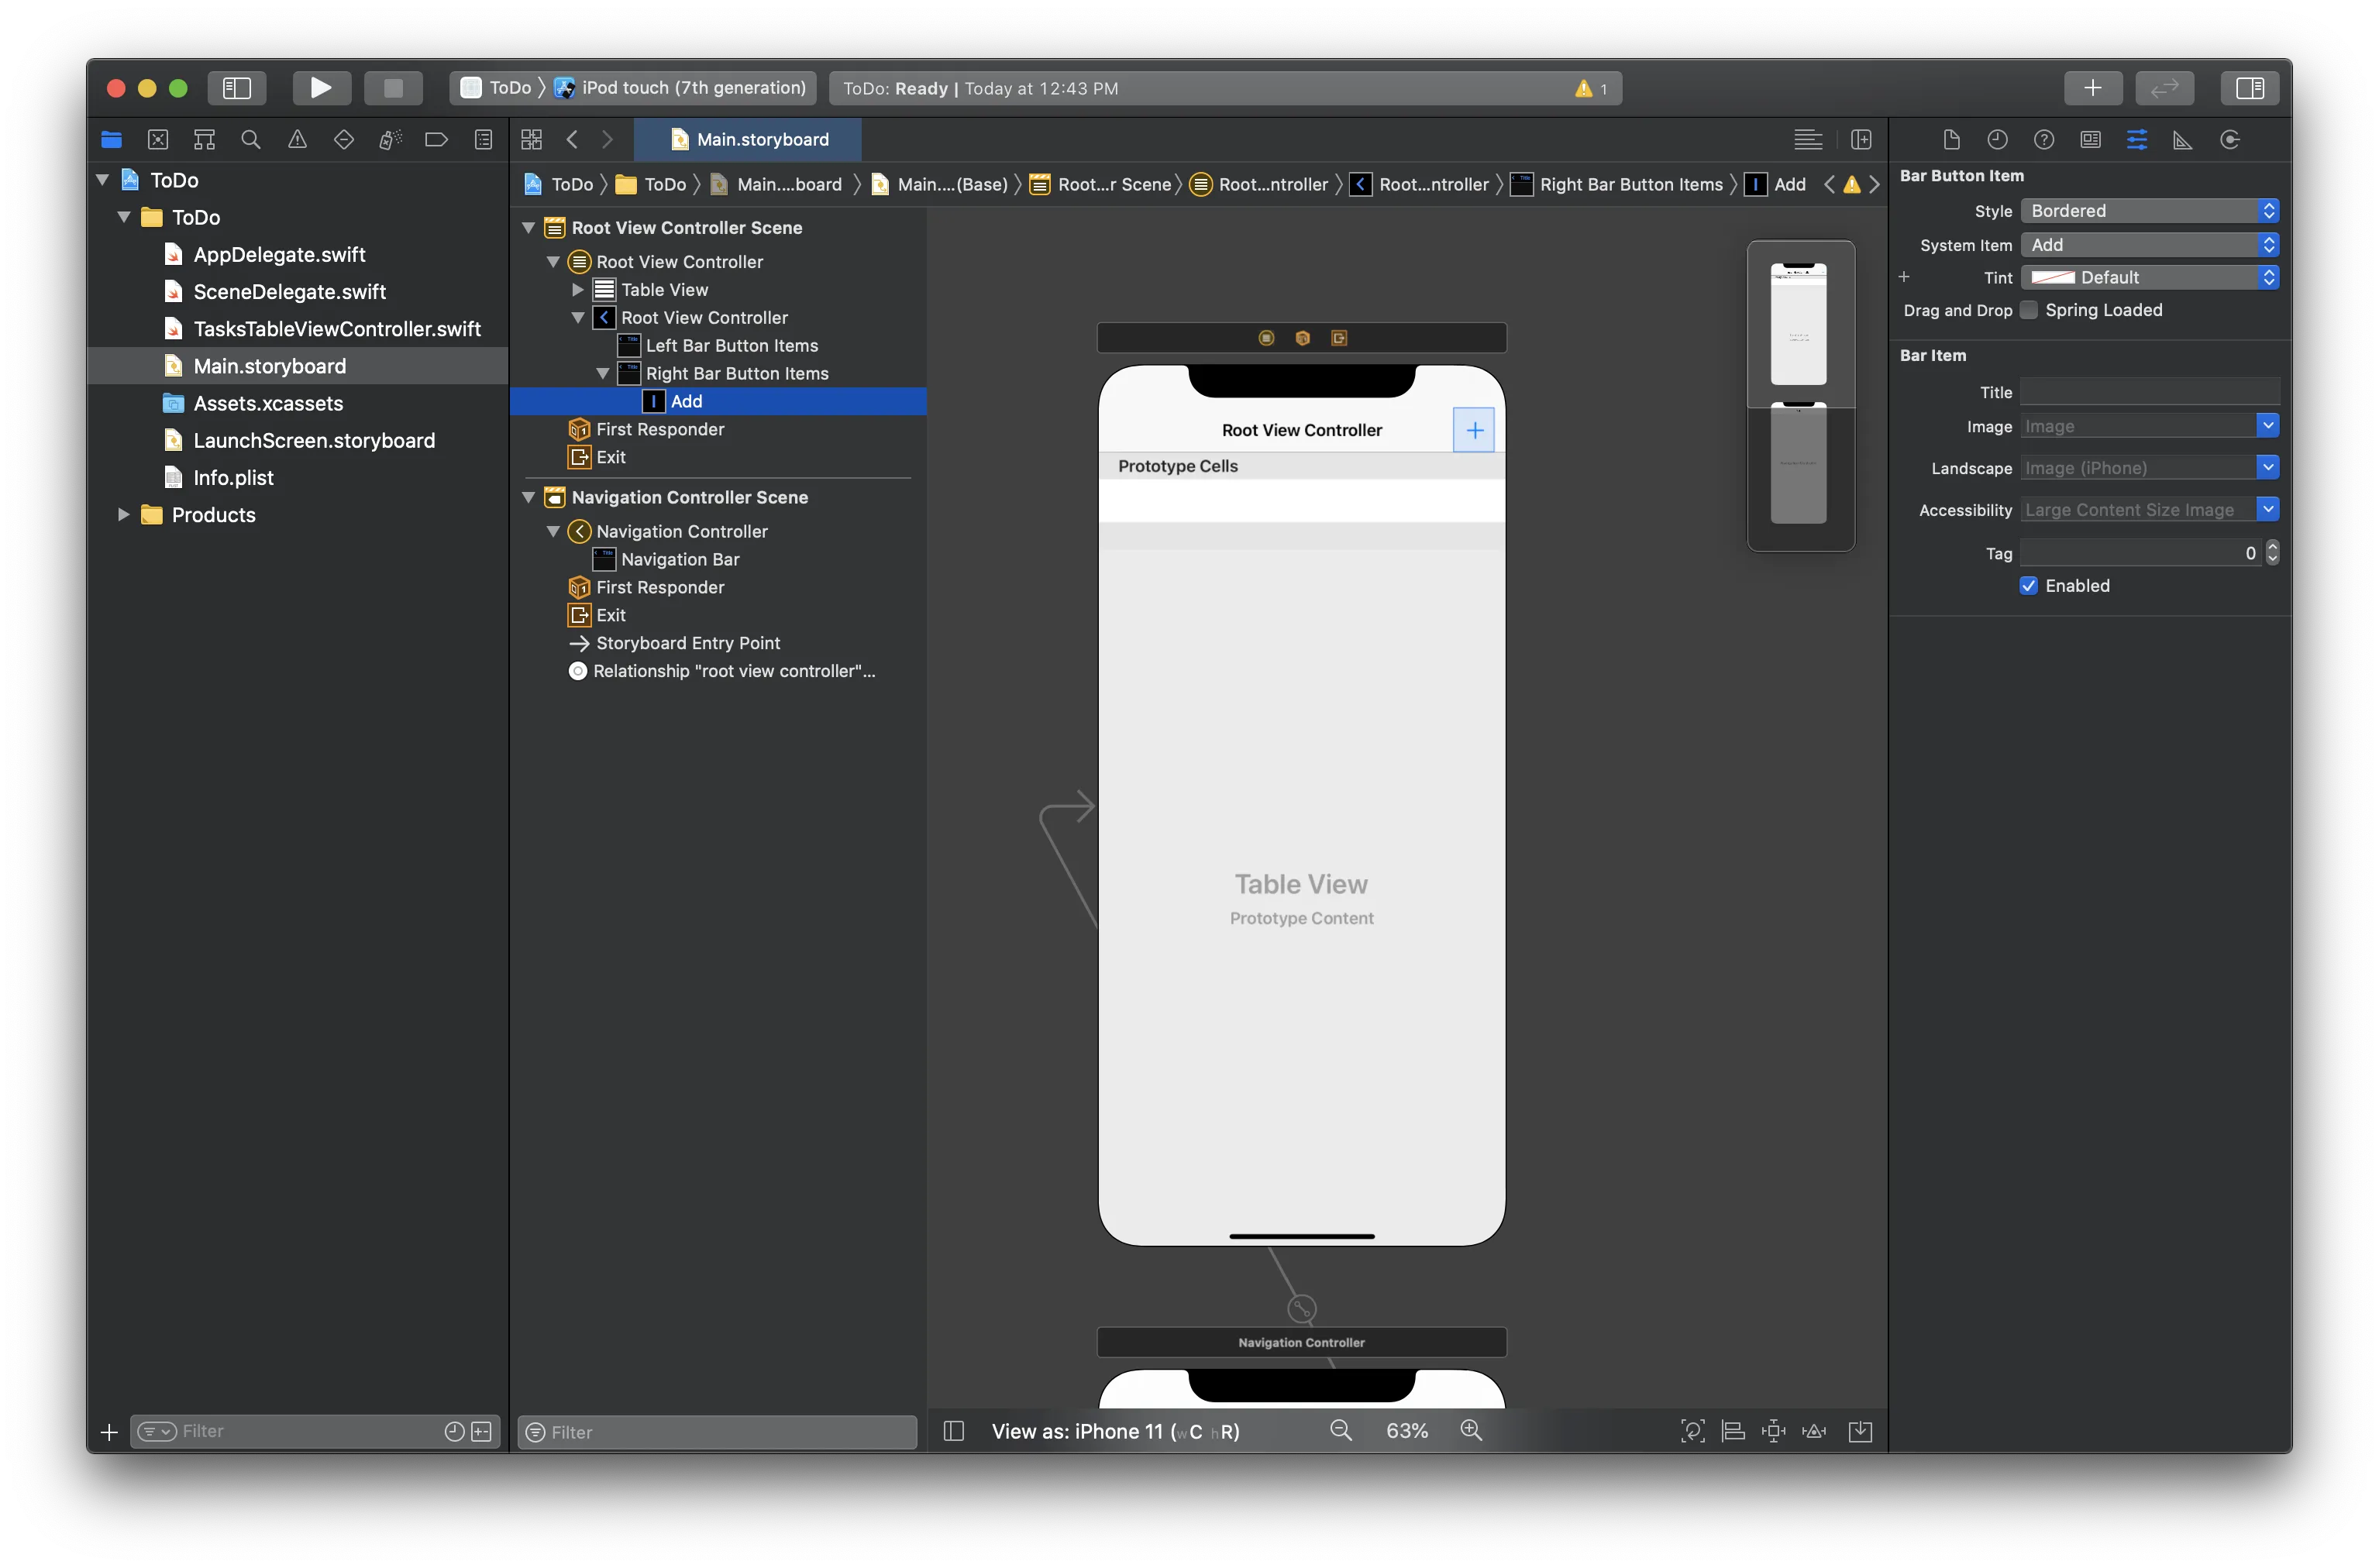
Now we need to customize the UITableViewController to include the add task button. Click on the "Root View Controller Scene" and then click the "Circle with square" icon in the top right to add a UIBarButtonItem , search for "Bar Button Item" and drag it onto the top right corner of the UINavigationBar. Finally, configure the bar item to use the "System Item" "Add" in the right-hand menu:
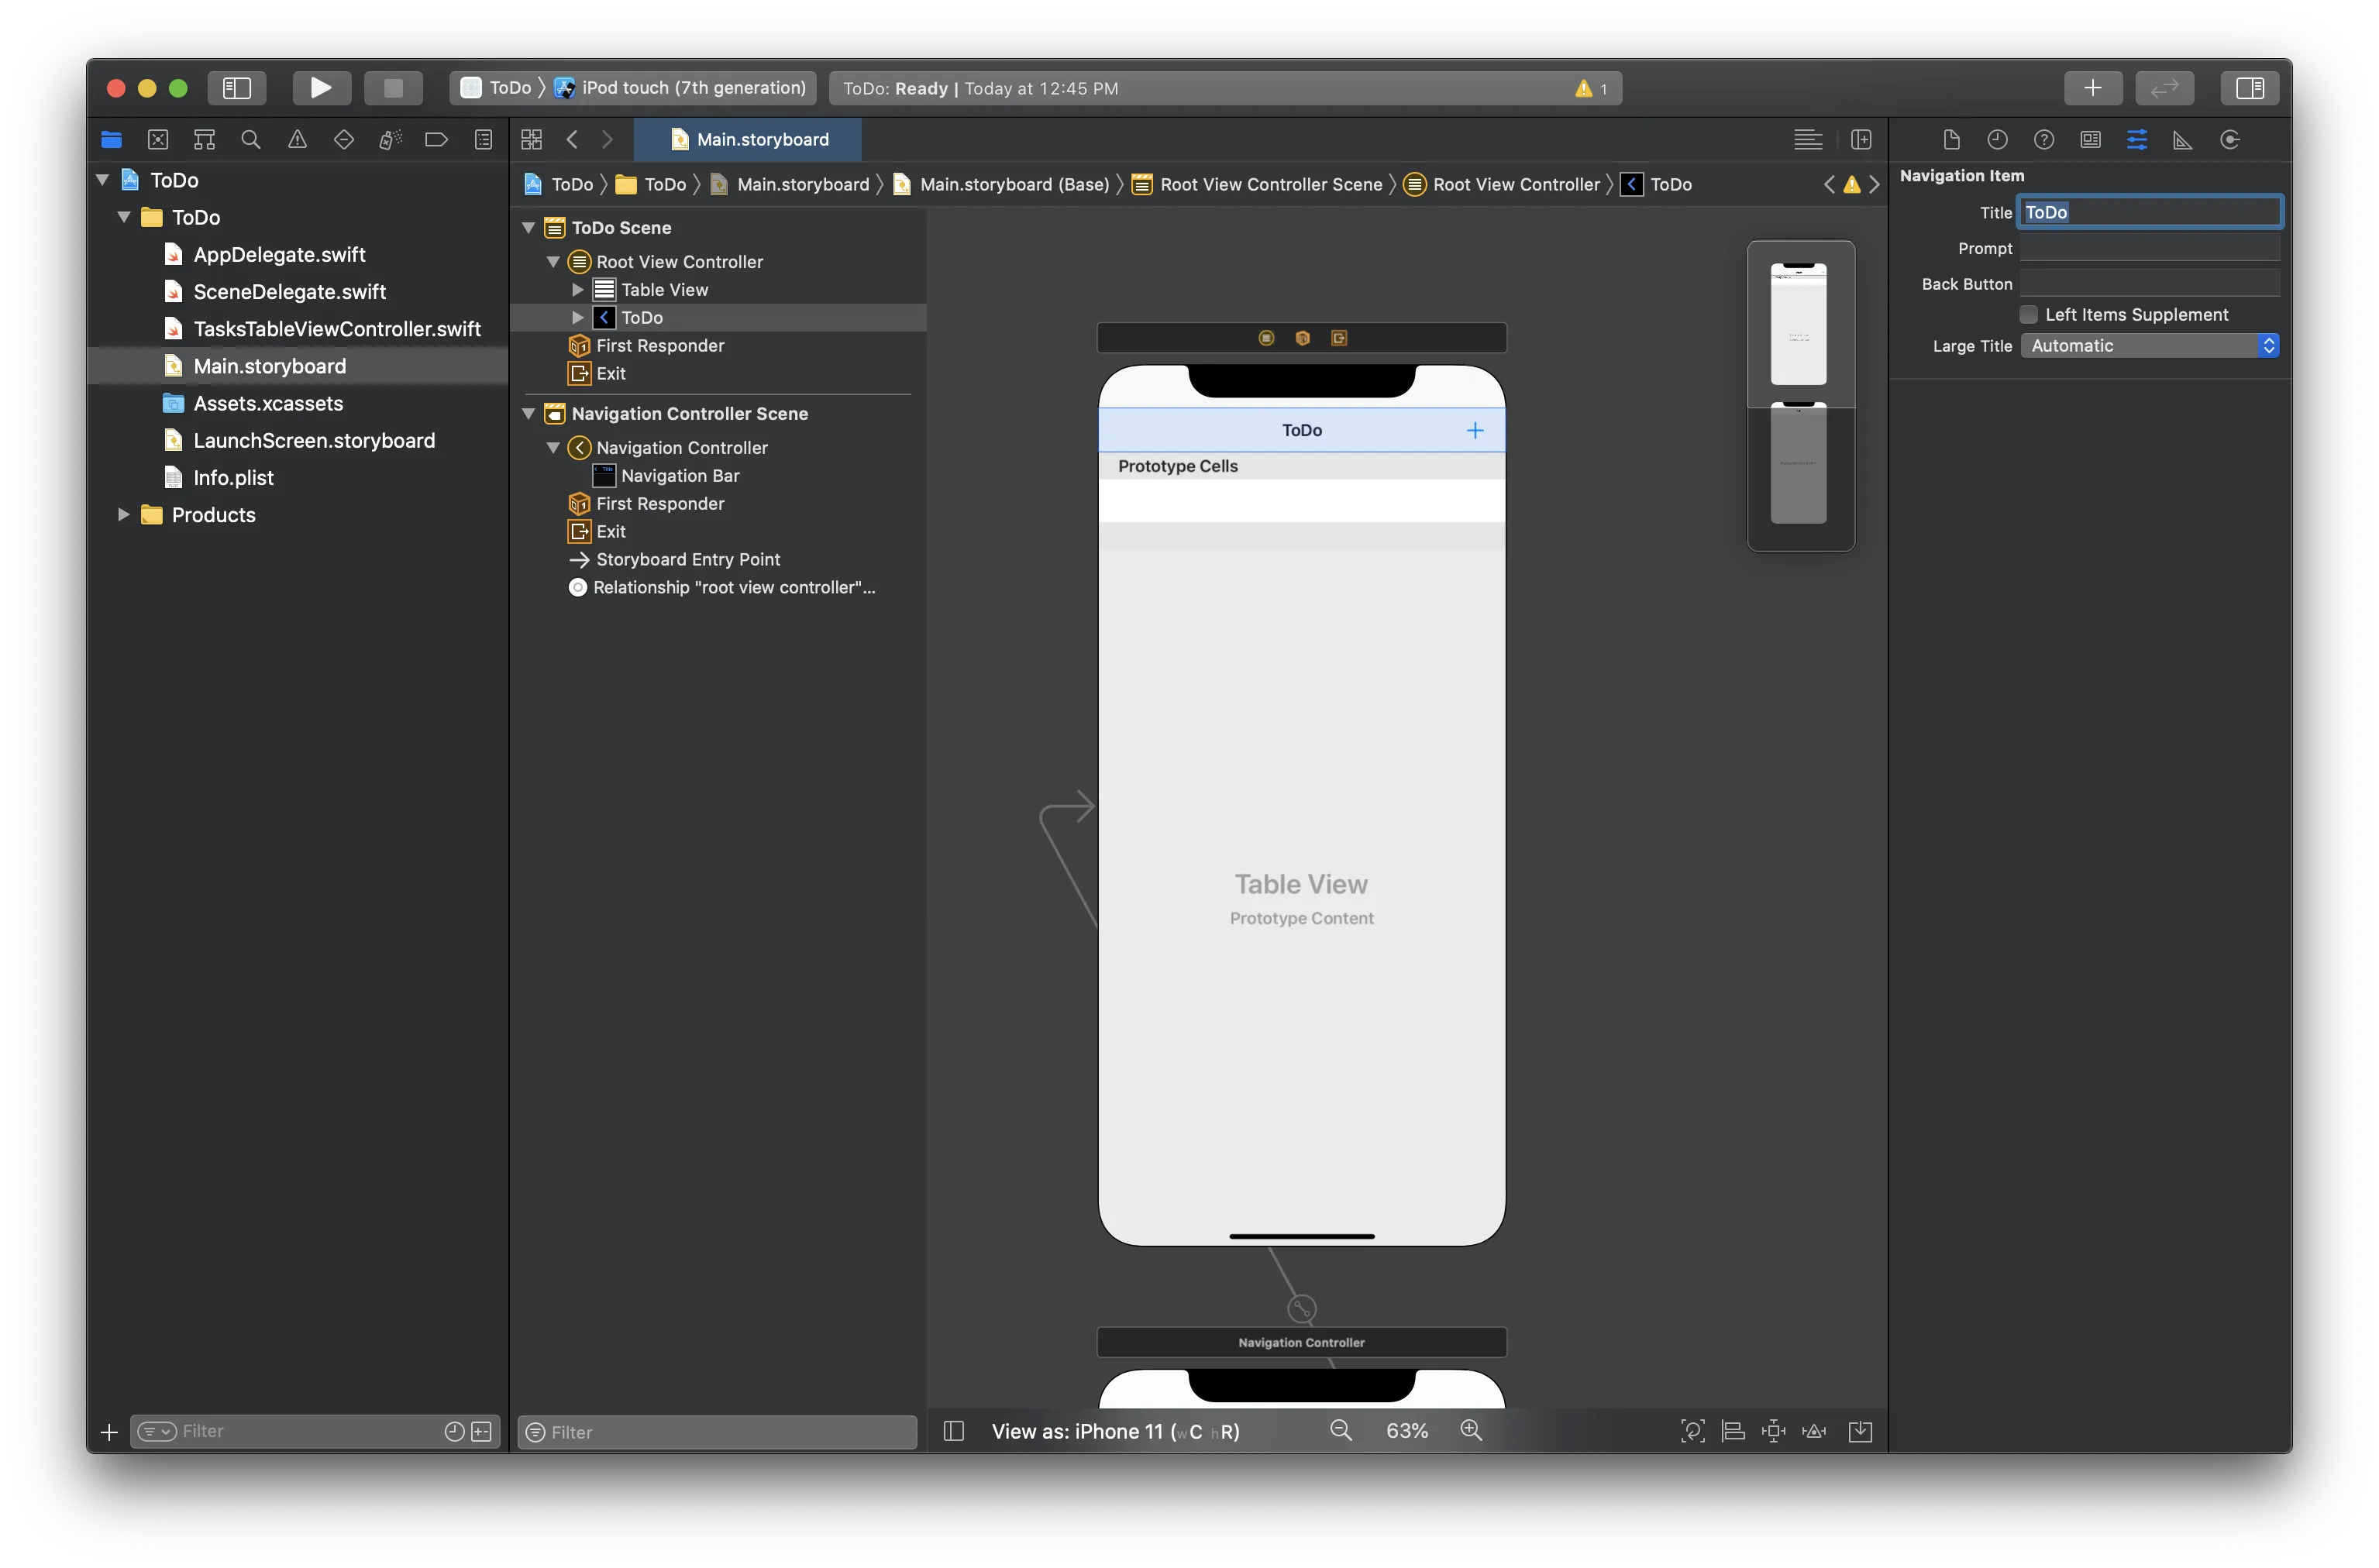
The last configuration is to adjust the name in the navigation bar to "Tasks", click on the "Root View Controller" text and navigate to the menu on the right to adjust the name:
Connecting the UI
Declare a function that will called when the user clicks on the add icon in the navigation bar. To do so, click the "Show Assistant Editor" button in the top right so that our storyboard and TaskTableViewController.swift file are both displayed:
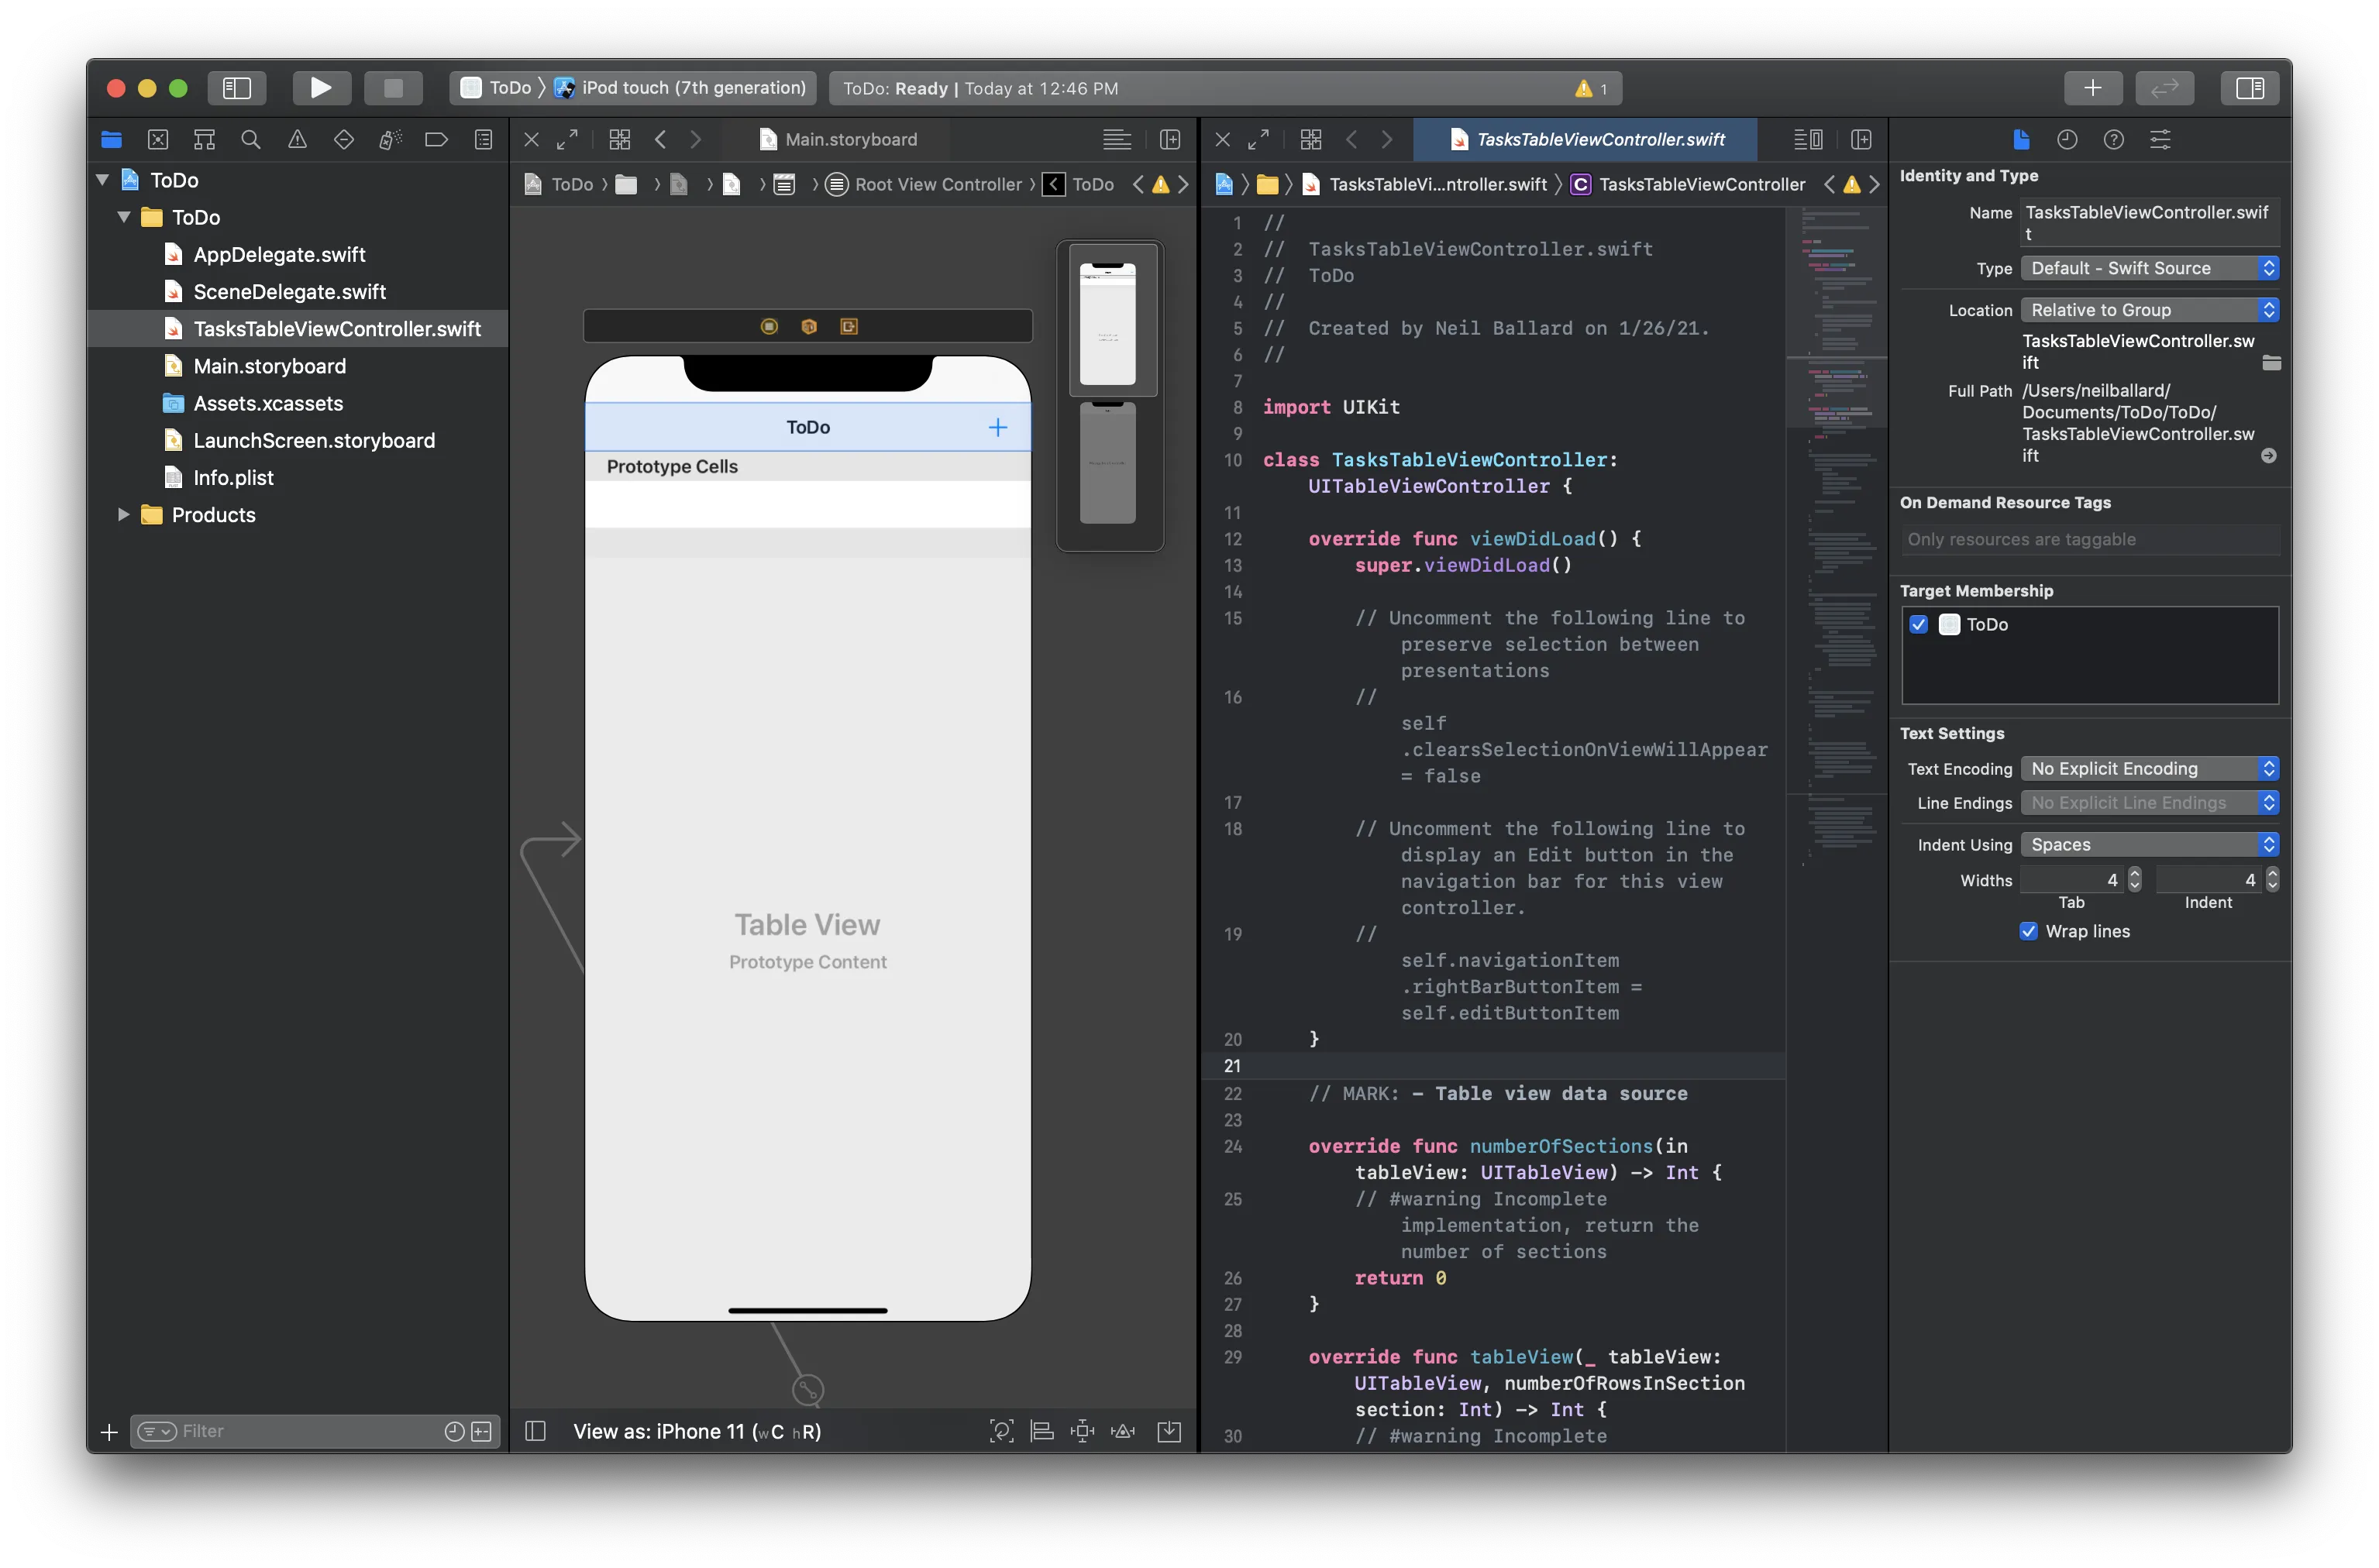
Now, right-click on the add button and drag it into the class implementation of TasksTableViewController just above the numberOfSections() function:
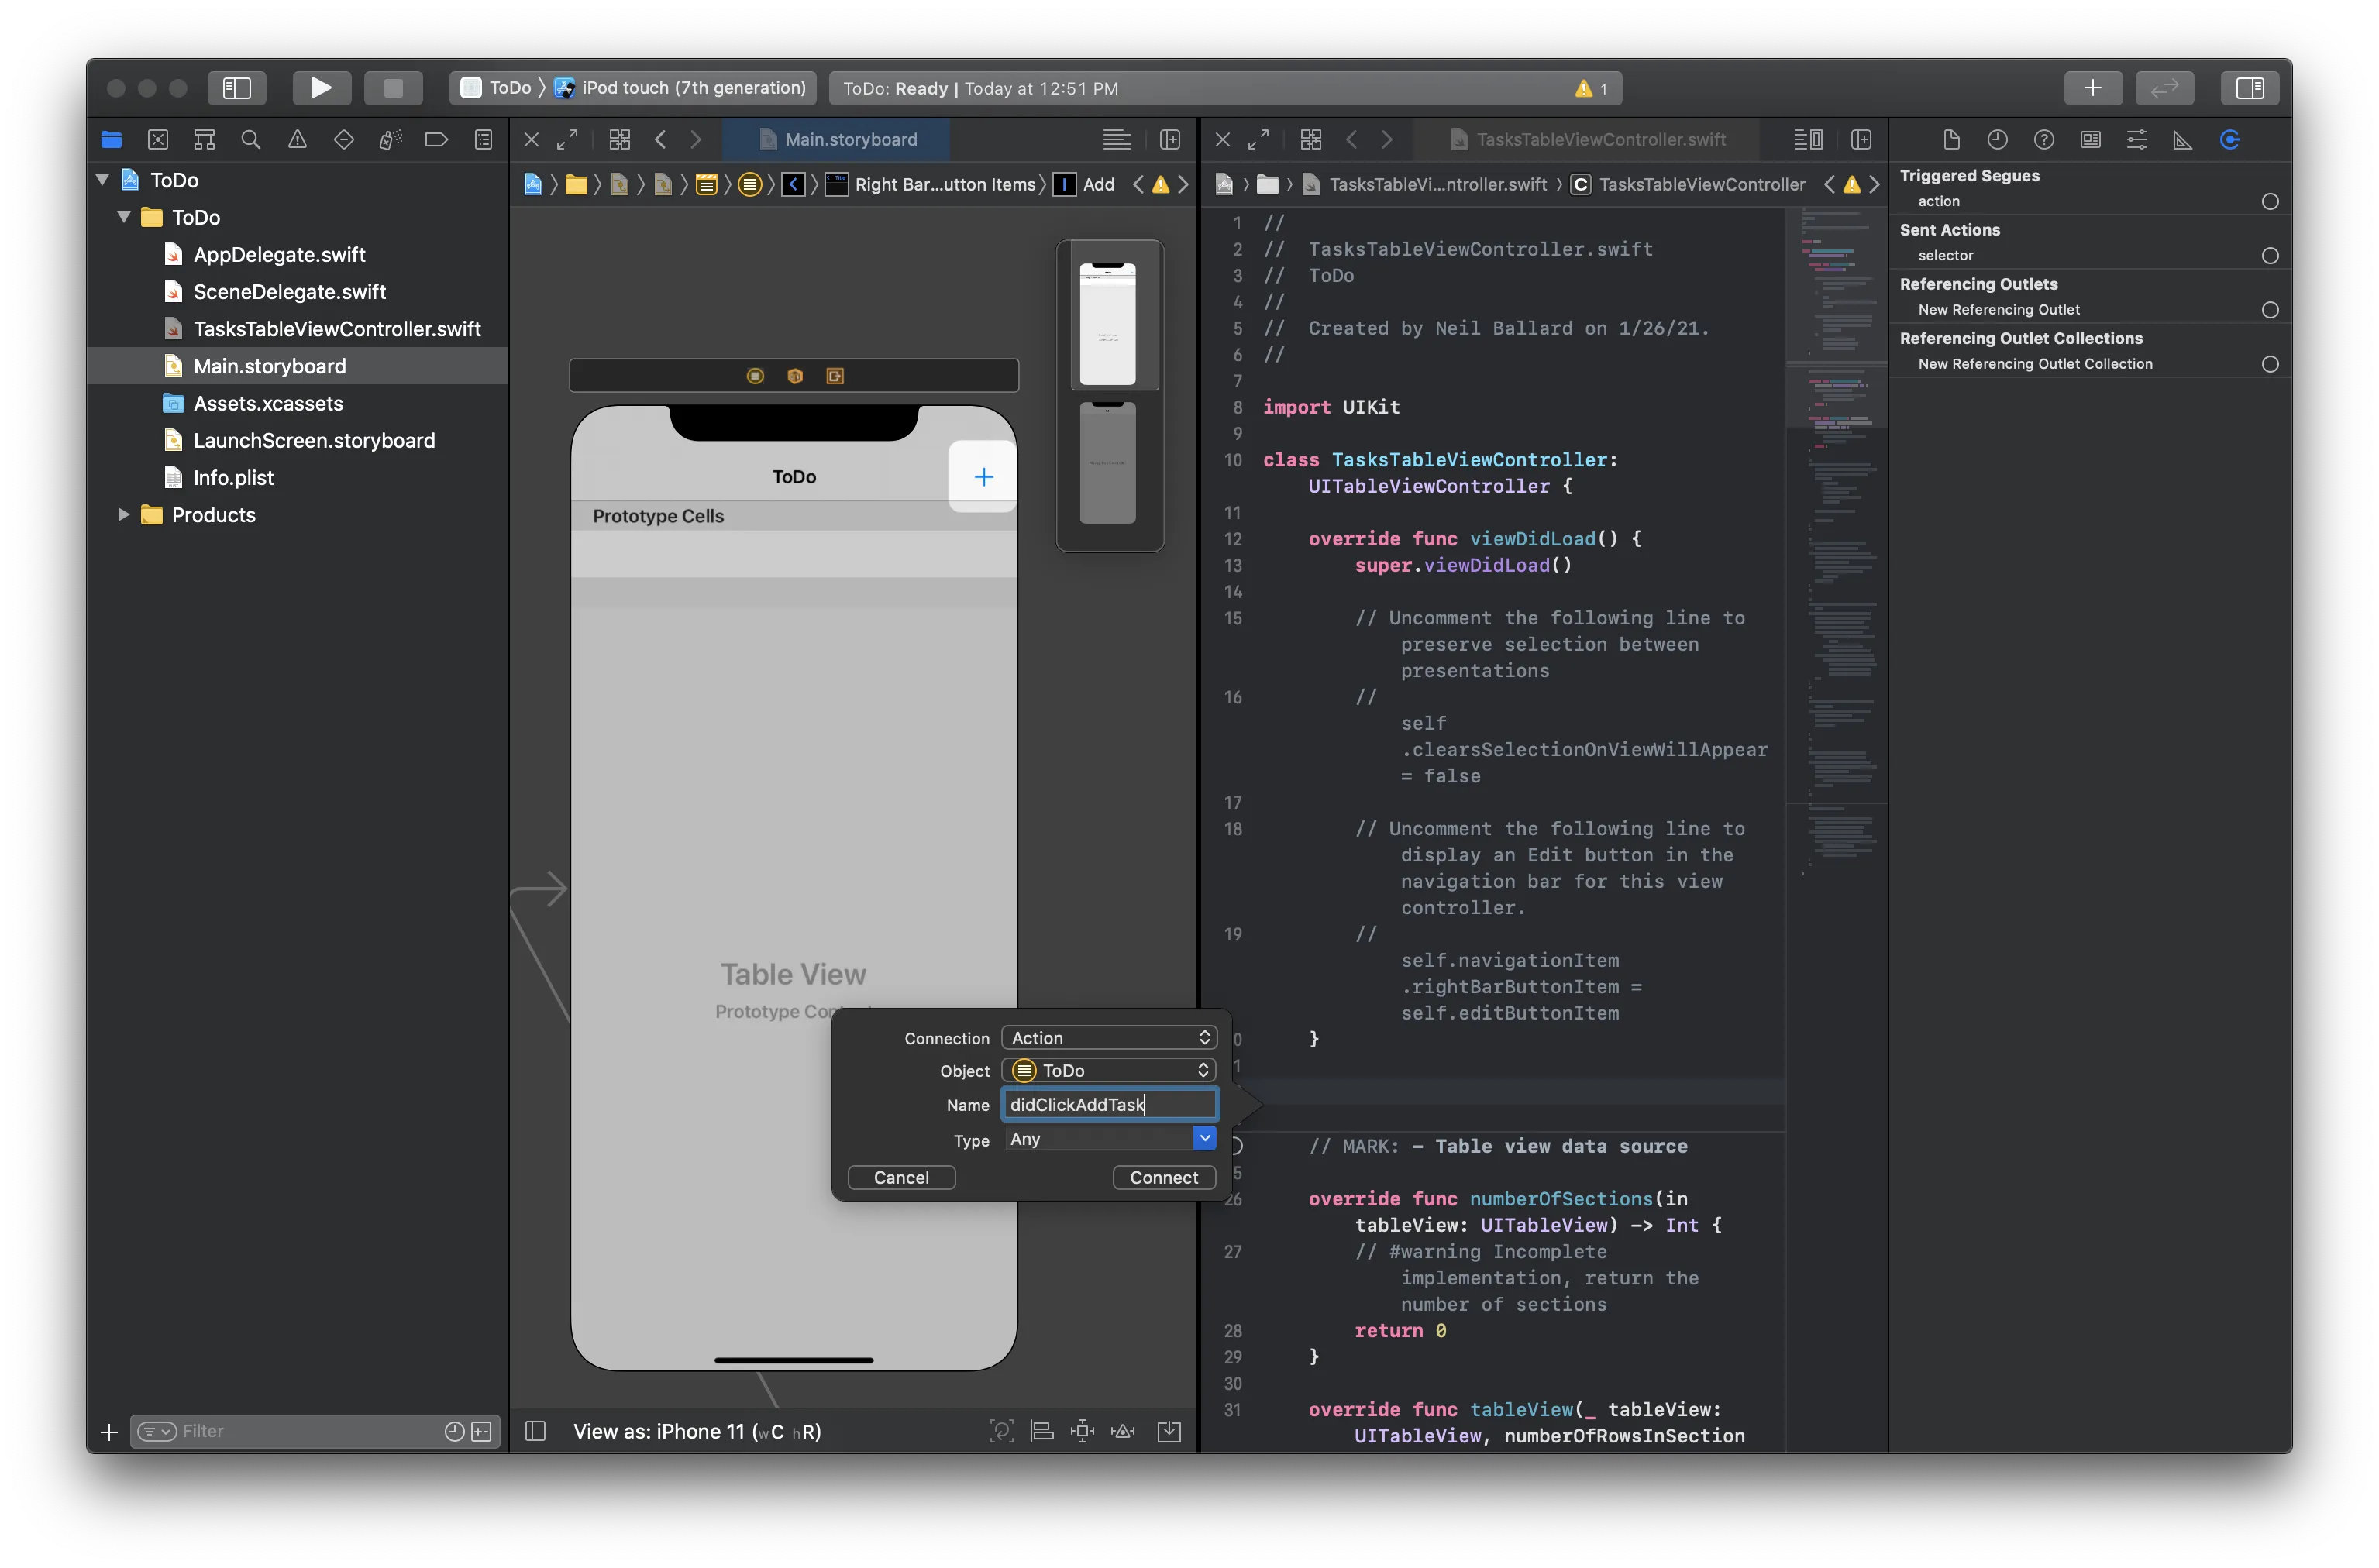
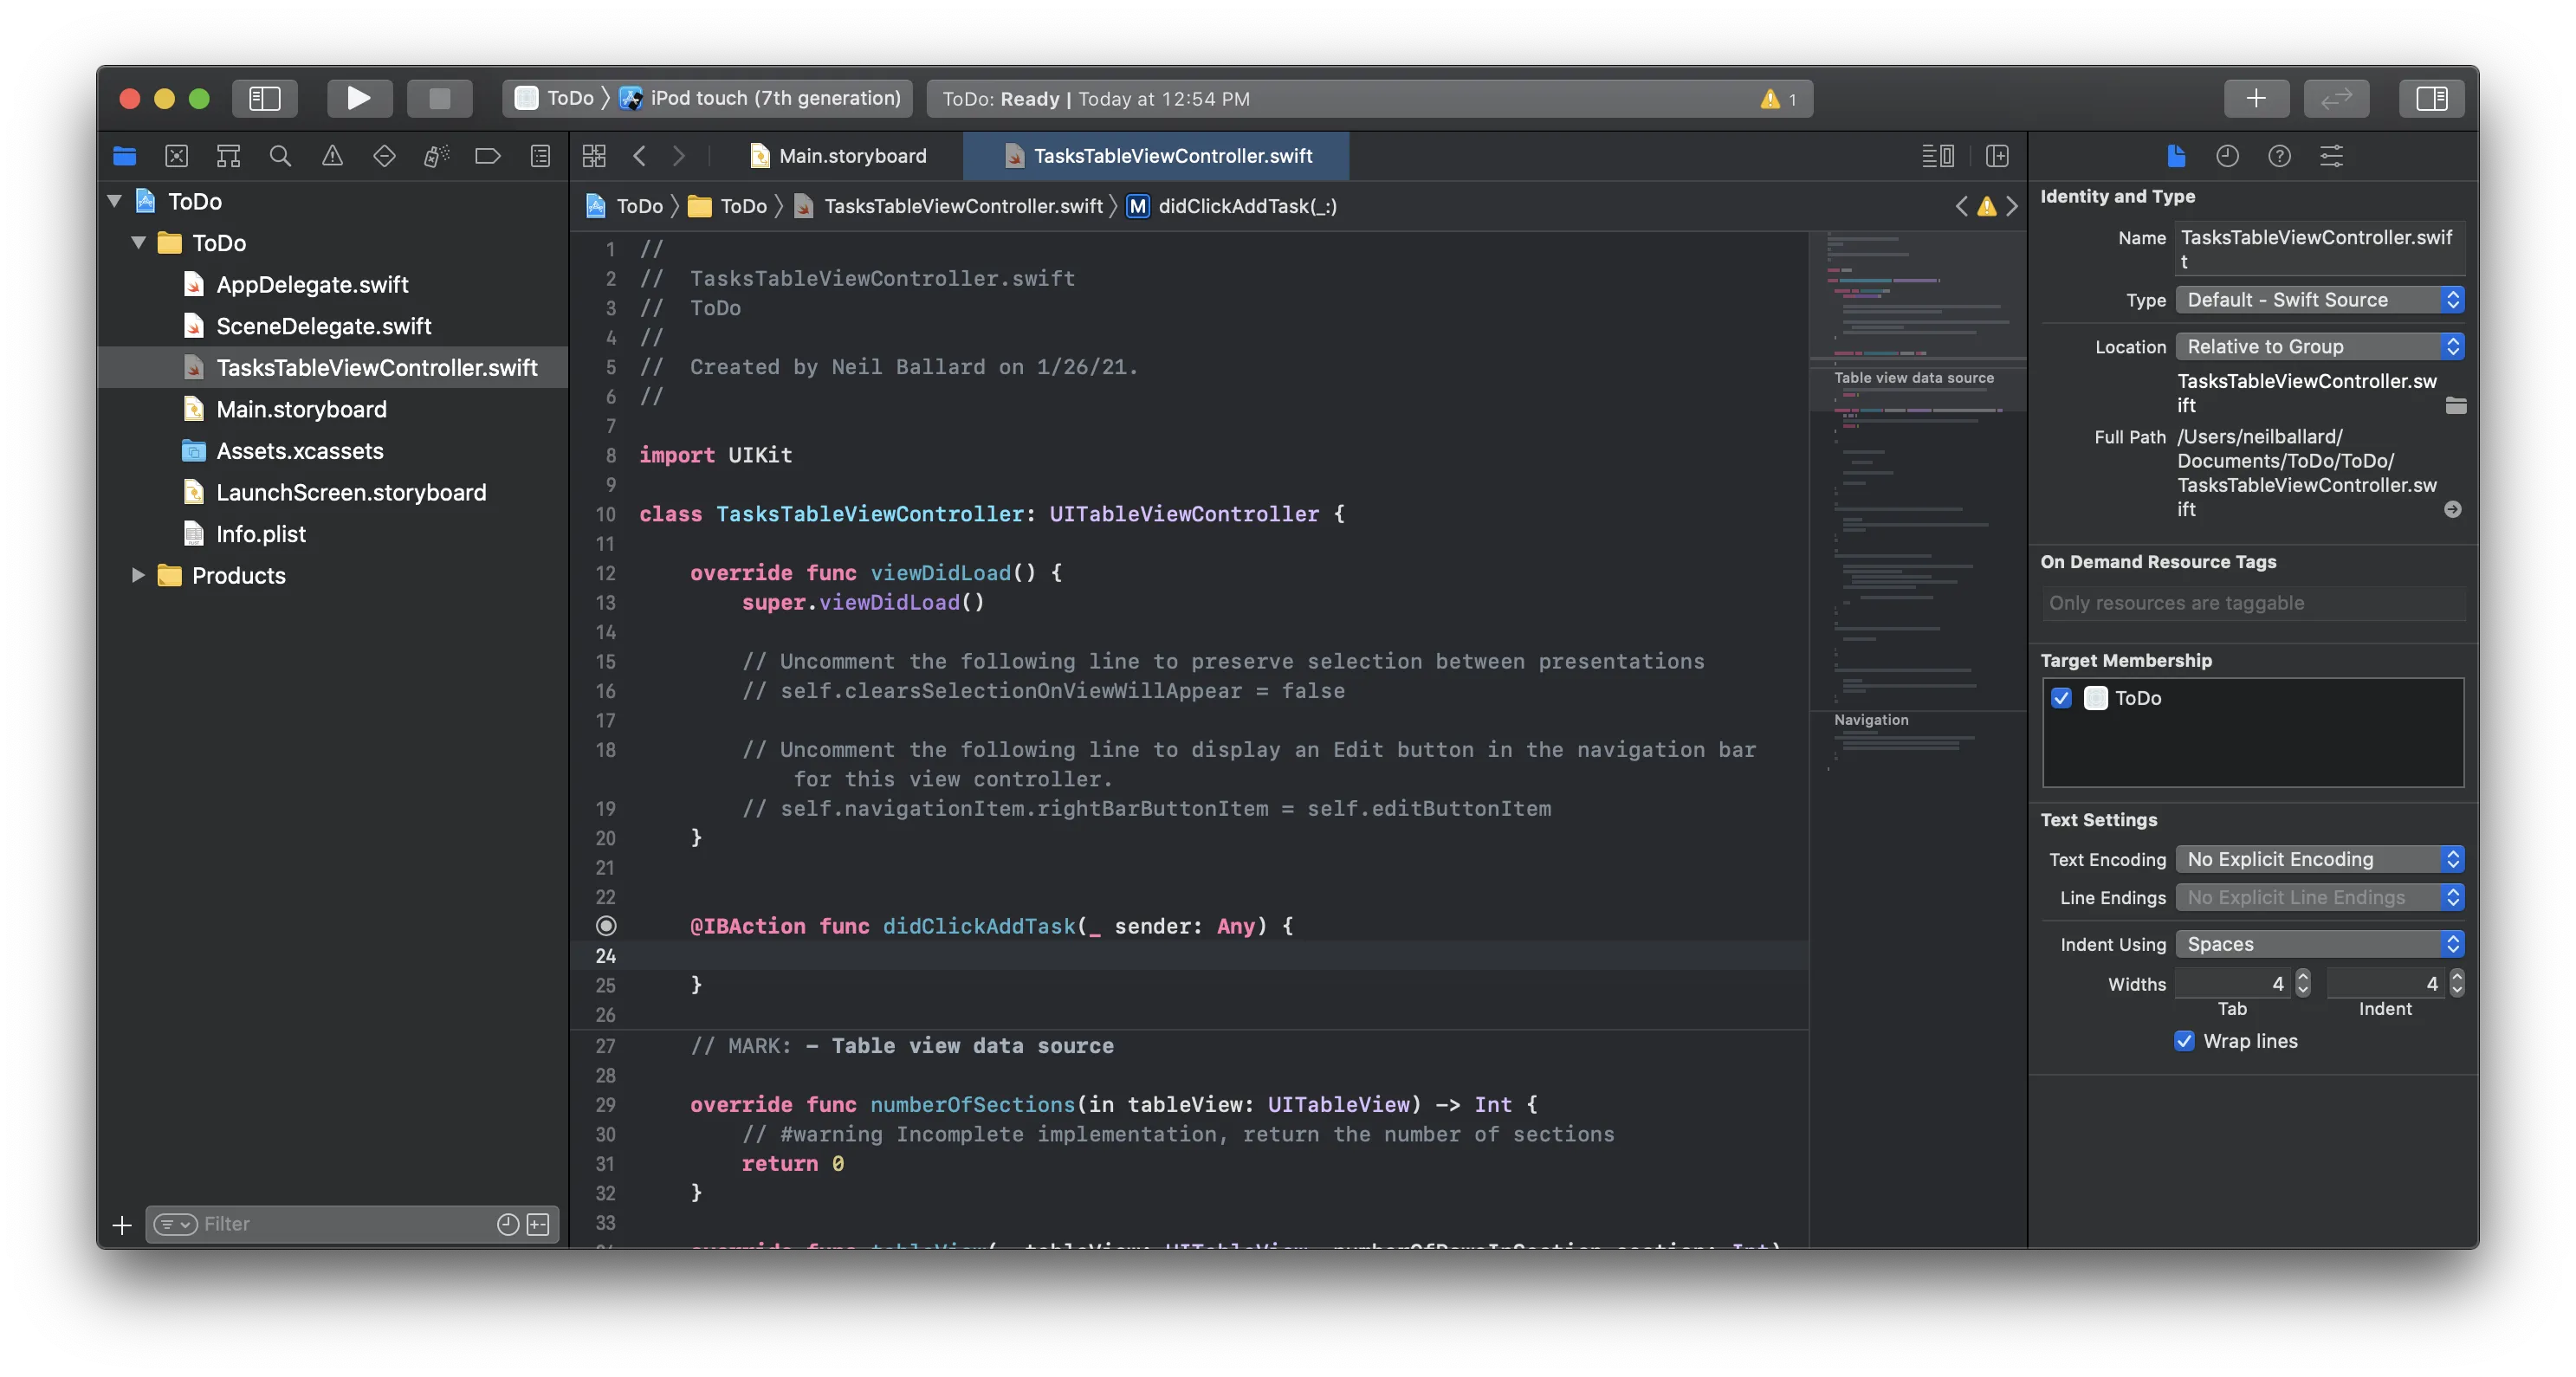
Name the function didClickAddTask and adjust the type to UIBarButtonItem and click connect. You should now have a function that is wired up to be called whenever that button is clicked:
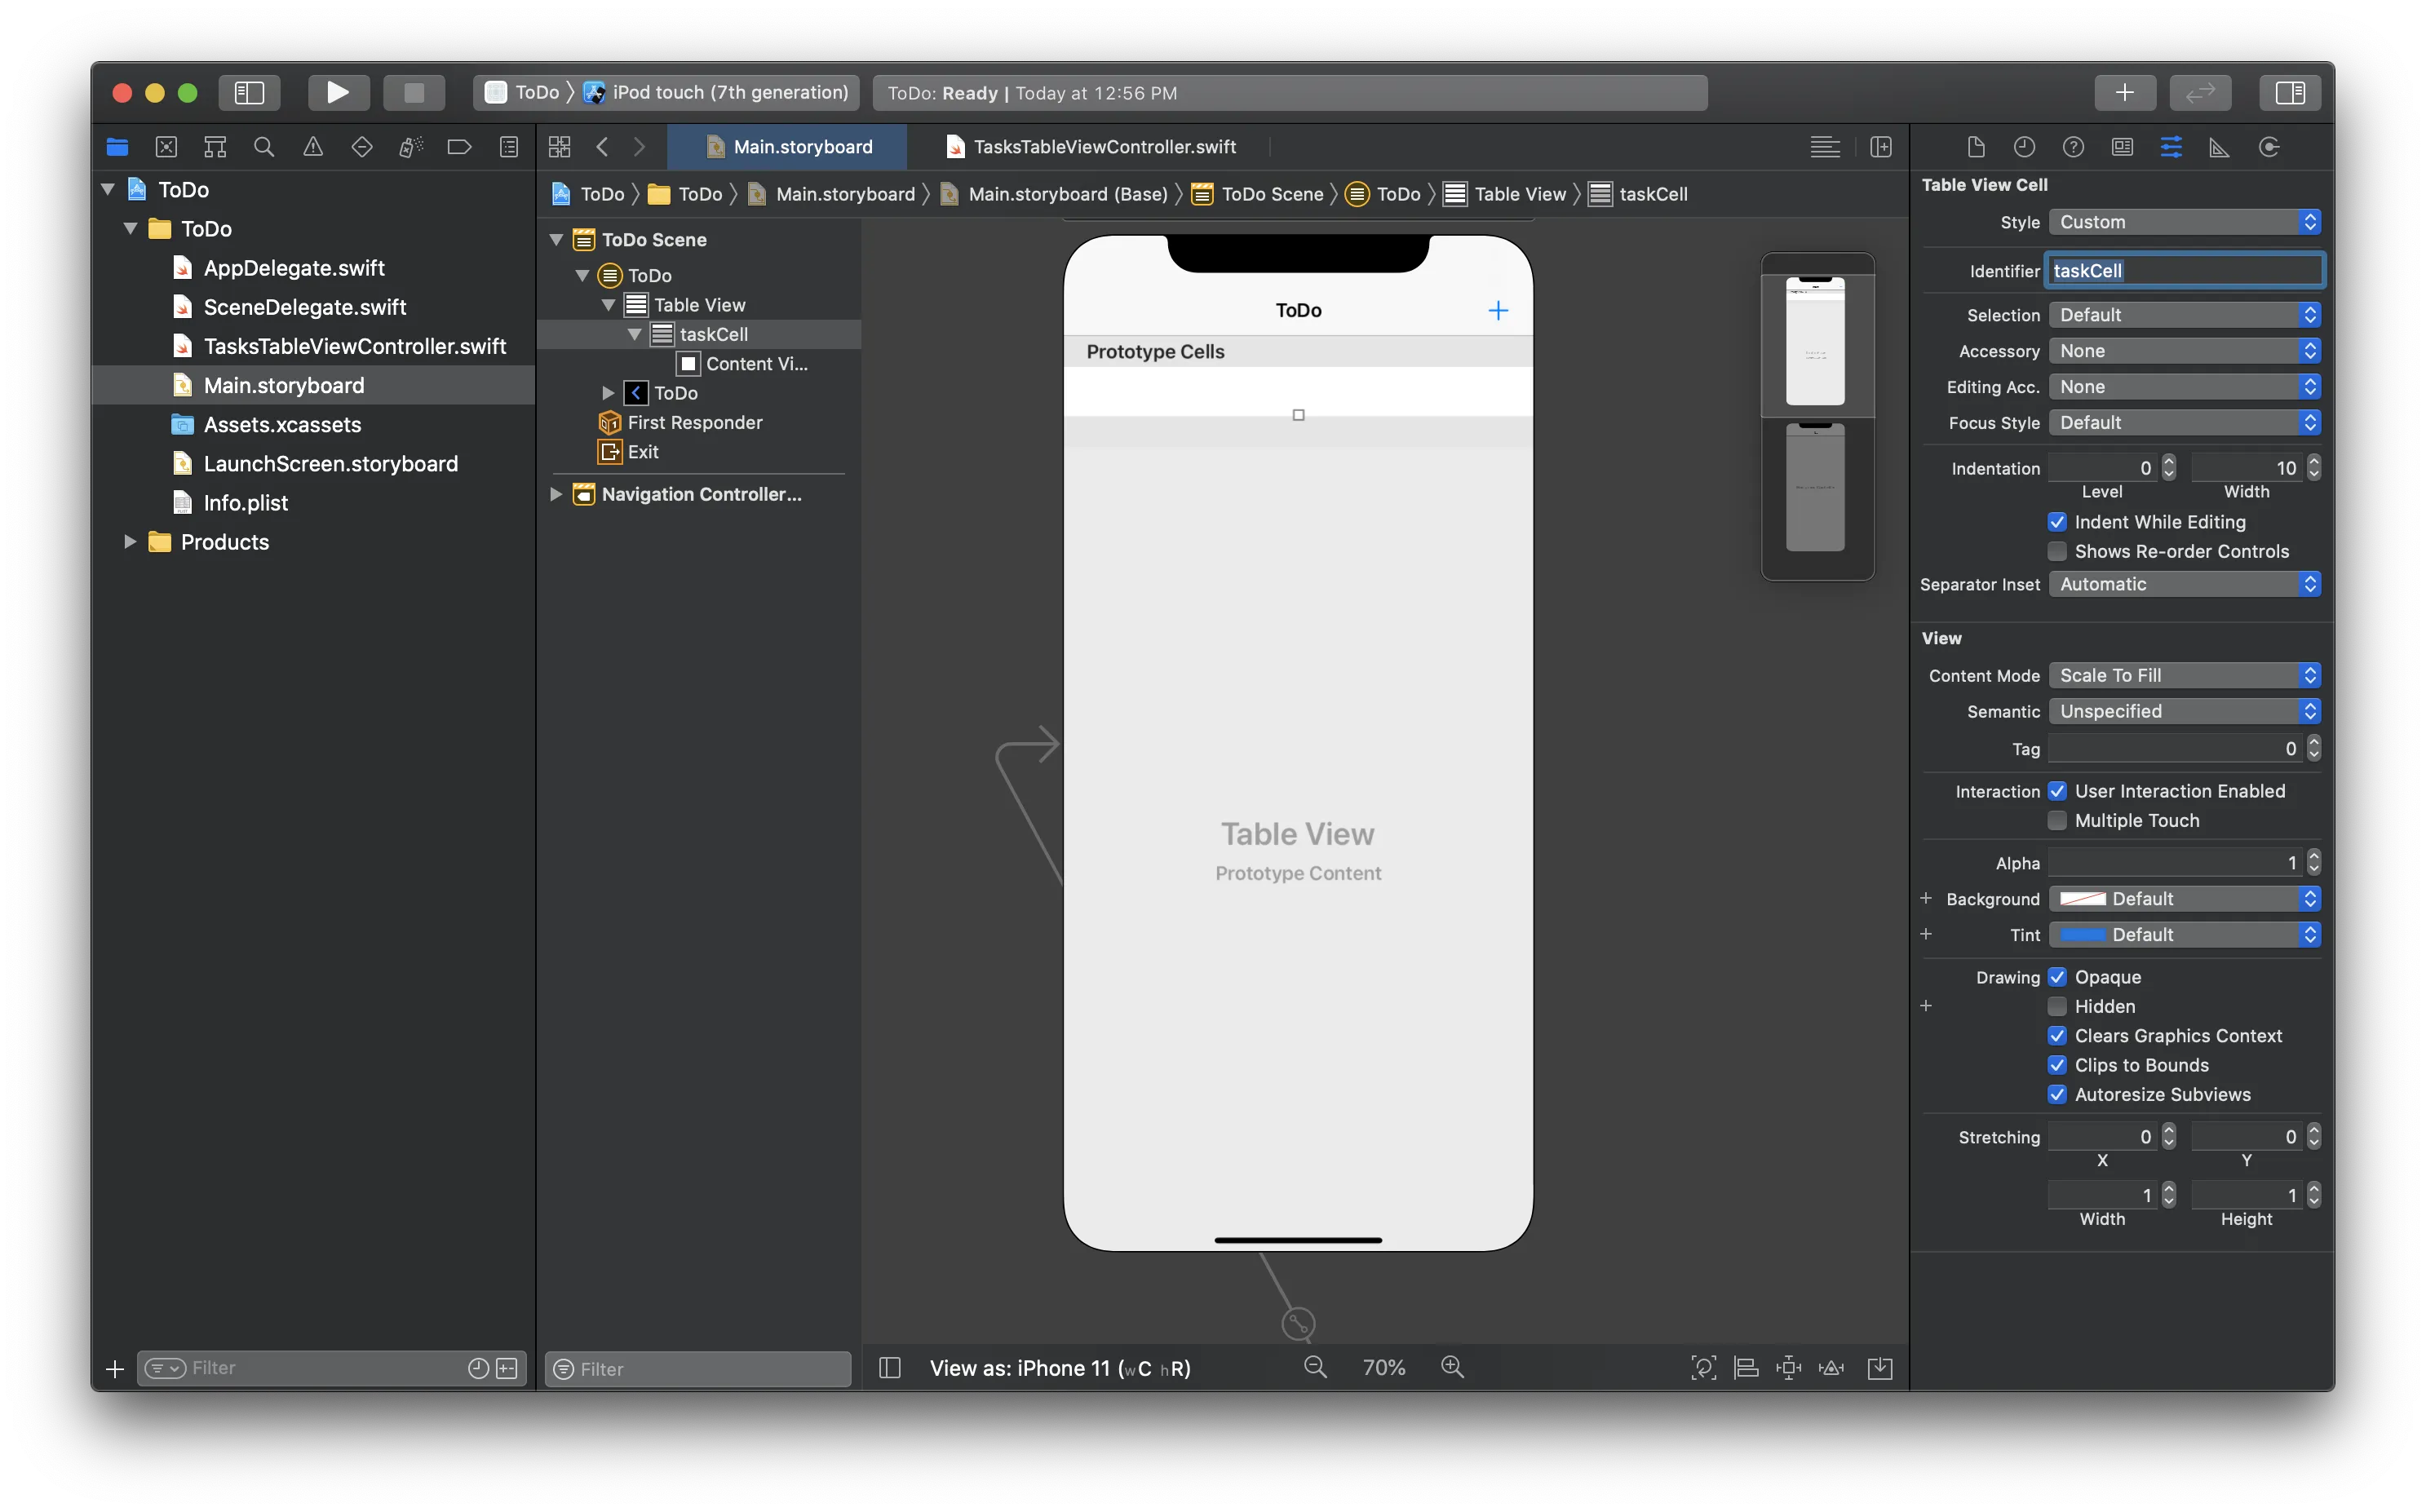
Finally, we will need to configure UITableView in TasksTableViewController and as part of this, we need to provide a "Table view cell reuse identifier", so let's configure our storyboard cell to include an identifier. Click on the "Prototype Cells" area in your view and navigate the right-hand menu to display the configuration for the "Table View Cell" and insert taskCell as the identifier:
Setting Up the TasksTableViewController
First, we need to add some variables that will be created on viewDidLoad of the TasksTableViewController so adjust the class to match this code:
// Remember to import DittoSwift!
import DittoSwift

class TaskTableViewController: UITableViewController {
    // These hold references to Ditto for easy access
    var ditto: Ditto!
    var store: DittoStore!
    var liveQuery: DittoLiveQuery?
    var subscription: DittoSubscription?
    var collection: DittoCollection!

    // This is the UITableView data source
    var tasks: [DittoDocument] = []

    override func viewDidLoad() {
        super.viewDidLoad()

        // Create an instance of Ditto
        ditto = Ditto(identity: .onlinePlayground(appID: "YOUR_APP_ID_HERE", token: "YOUR_TOKEN_HERE"))

        // This starts Ditto's background synchronization
        ditto.startSync()

        // Create some helper variables for easy access
        store = ditto.store
        // We will store data in the "tasks" collection
        // Ditto stores data as collections of documents
        collection = store.collection("tasks")

        // Subscribe to changes with a live-query
        subscription = collection.find("!isDeleted").subscribe()

        // This function will create a "live-query" that will update
        // our UITableView
        setupTaskList()
    }

    func setupTaskList() {
        // Query for all tasks
        // Observe changes and update the UITableView when anything changes
        liveQuery = collection.find("!isDeleted").observeLocal { [weak self] docs, event in
            guard let `self` = self else { return }
            switch event {
            case .update(let changes):
                guard changes.insertions.count > 0 || changes.deletions.count > 0 || changes.updates.count > 0  || changes.moves.count > 0 else { return }
                DispatchQueue.main.async {
                    self.tableView.beginUpdates()
                    self.tableView.performBatchUpdates({
                        let deletionIndexPaths = changes.deletions.map { idx -> IndexPath in
                            return IndexPath(row: idx, section: 0)
                        }
                        self.tableView.deleteRows(at: deletionIndexPaths, with: .automatic)
                        let insertionIndexPaths = changes.insertions.map { idx -> IndexPath in
                            return IndexPath(row: idx, section: 0)
                        }
                        self.tableView.insertRows(at: insertionIndexPaths, with: .automatic)
                        let updateIndexPaths = changes.updates.map { idx -> IndexPath in
                            return IndexPath(row: idx, section: 0)
                        }
                        self.tableView.reloadRows(at: updateIndexPaths, with: .automatic)
                        for move in changes.moves {
                            let from = IndexPath(row: move.from, section: 0)
                            let to = IndexPath(row: move.to, section: 0)
                            self.tableView.moveRow(at: from, to: to)
                        }
                    }) { _ in }
                    // Set the tasks array backing the UITableView to the new documents
                    self.tasks = docs
                    self.tableView.endUpdates()
                }
            case .initial:
                // Set the tasks array backing the UITableView to the new documents
                self.tasks = docs
                DispatchQueue.main.async {
                    self.tableView.reloadData()
                }
            default: break
            }
        }
    }

// remaining TaskTableViewController code...

}
Let's break down what this code does. First, we create the variables needed and then initialize them in viewDidLoad() . To enable background synchronization, we need to call startSync() which allows you to control when synchronization occurs. For this application we want it to run the entire time the app is in use.
// These hold references to Ditto for easy access
var ditto: Ditto!
var store: DittoStore!
var liveQuery: DittoLiveQuery?
var collection: DittoCollection!
var subscription: DittoSubscription?

// This is the UITableView data source
var tasks: [DittoDocument] = []

override func viewDidLoad() {
    super.viewDidLoad()

    // Create an instance of Ditto
    ditto = Ditto(identity: .onlinePlayground(appID: "YOUR_APP_ID_HERE", token: "YOUR_TOKEN_HERE"))

    // This starts Ditto's background synchronization
    ditto.startSync()

    // Create some helper variables for easy access
    store = ditto.store
    // We will store data in the "tasks" collection
    // Ditto stores data as collections of documents
    collection = store.collection("tasks")

    // Subscribe to changes with a live-query
    subscription = collection.find("!isDeleted").subscribe()


    // This function will create a "live-query" that will update
    // our UITableView
    setupTaskList()
}
After setting up the variables and starting Ditto, we then use Ditto's key API to observe changes to the database by creating a live query in the setupTaskList() function. This allows us to set the initial state of the UITableView after the query is immediately run and then subsequently get callbacks for any new data changes that occur locally or that were synced from other devices:
Note, that we are using the observe API in Ditto. This API performs two functions. First, it sets up a local observer for data changes in the database that match the query and second it creates a subscription for the same query that will be used to request this data from other devices. For simplicity, we are using this combined API, but you can also call them independently. To learn more, see the Observing Changes section in the documentation.
func setupTaskList() {
    liveQuery = collection.find("!isDeleted").observeLocal { [weak self] docs, event in
        guard let `self` = self else { return }
        switch event {
        case .update(let changes):
            guard changes.insertions.count > 0 || changes.deletions.count > 0 || changes.updates.count > 0  || changes.moves.count > 0 else { return }
            DispatchQueue.main.async {
                self.tableView.beginUpdates()
                self.tableView.performBatchUpdates({
                    let deletionIndexPaths = changes.deletions.map { idx -> IndexPath in
                        return IndexPath(row: idx, section: 0)
                    }
                    self.tableView.deleteRows(at: deletionIndexPaths, with: .automatic)
                    let insertionIndexPaths = changes.insertions.map { idx -> IndexPath in
                        return IndexPath(row: idx, section: 0)
                    }
                    self.tableView.insertRows(at: insertionIndexPaths, with: .automatic)
                    let updateIndexPaths = changes.updates.map { idx -> IndexPath in
                        return IndexPath(row: idx, section: 0)
                    }
                    self.tableView.reloadRows(at: updateIndexPaths, with: .automatic)
                    for move in changes.moves {
                        let from = IndexPath(row: move.from, section: 0)
                        let to = IndexPath(row: move.to, section: 0)
                        self.tableView.moveRow(at: from, to: to)
                    }
                }) { _ in }
                // Set the tasks array backing the UITableView to the new documents
                self.tasks = docs
                self.tableView.endUpdates()
            }
        case .initial:
            // Set the tasks array backing the UITableView to the new documents
            self.tasks = docs
            DispatchQueue.main.async {
                self.tableView.reloadData()
            }
        default: break
        }
    }

    collection.find("isDeleted == true").evict()
}
Adding a Task
To allow the user to create a task we want to display an alert view in response to clicking the add bar item. Add the following code to the didClickAddTask() function we added earlier:
@IBAction func didClickAddTask(_ sender: UIBarButtonItem) {
    // Create an alert
    let alert = UIAlertController(
        title: "Add New Task",
        message: nil,
        preferredStyle: .alert)

    // Add a text field to the alert for the new task text
    alert.addTextField(configurationHandler: nil)

    alert.addAction(UIAlertAction(title: "Cancel", style: .cancel, handler: nil))

    // Add a "OK" button to the alert.
    alert.addAction(UIAlertAction(title: "OK", style: .default, handler: { [weak self] (_) in
        guard let self = self else { return }
        if let body = alert.textFields?[0].text
        {
            // Insert the data into Ditto
            _ = try! self.collection.upsert([
                "body": body,
                "isCompleted": false
            ])
        }
    }))

    // Present the alert to the user
    present(alert, animated: true, completion: nil)
}
Take note that this logic is using the Ditto insert() API to create a task document. Ditto's API is designed around JSON-compatible documents which are organized into collections:
_ = try! self.collection.upsert([
    "body": body,
    "isCompleted": false
])
Configuring the UITableView to Display Task List
To ensure the UITableView can display the tasks, we need to configure it. Adjust your TasksTableViewController to include the following code (these functions were already created when the file was generated by Xcode):
// MARK: - Table view data source

override func numberOfSections(in tableView: UITableView) -> Int {
    return 1
}

override func tableView(_ tableView: UITableView, numberOfRowsInSection section: Int) -> Int {
    return tasks.count
}


override func tableView(_ tableView: UITableView, cellForRowAt indexPath: IndexPath) -> UITableViewCell {
    let cell = tableView.dequeueReusableCell(withIdentifier: "taskCell", for: indexPath)

    // Configure the cell...
    let task = tasks[indexPath.row]
    cell.textLabel?.text = task["body"].stringValue
    let taskComplete = task["isCompleted"].boolValue
    if taskComplete {
        cell.accessoryType = .checkmark
    }
    else {
        cell.accessoryType = .none
    }

    return cell
}
Earlier, we created the tasks array which is the data source to the UITableView. This code configures the UITableView to use this array and then configures the table view cell to display the task text and a checkmark on whether it is complete or not.
Editing Tasks
Select the task to complete:
When the user selects the task in the table view, we want to mark the task completed. Adjust your TasksTableViewController to include the following code (these functions were already created when the file was generated by Xcode):
 override func tableView(_ tableView: UITableView, didSelectRowAt indexPath: IndexPath) {
    // Deselect the row so it is not highlighted
    tableView.deselectRow(at: indexPath, animated: true)
    // Retrieve the task at the row selected
    let task = tasks[indexPath.row]
    // Update the task to mark completed
    collection.findByID(task.id).update({ (newTask) in
        newTask?["isCompleted"].set(!task["isCompleted"].boolValue)
    })
}

override func tableView(_ tableView: UITableView, canEditRowAt indexPath: IndexPath) -> Bool {
    // Return false if you do not want the specified item to be editable.
    return true
}
This action makes use of Ditto's Update method where we are able to find the existing task and set the isCompleted value to the opposite of its current value.
Swipe to delete task:
Finally, we want to allow the user to delete a task by swiping the row in the table view. Adjust your TasksTableViewController to include the following code (this function was already created when the file was generated by Xcode):
// Override to support editing the table view.
override func tableView(_ tableView: UITableView, commit editingStyle: UITableViewCell.EditingStyle, forRowAt indexPath: IndexPath) {
    if editingStyle == .delete {
        // Retrieve the task at the row swiped
        let task = tasks[indexPath.row]
        // Delete the task from Ditto
        ditto.store["tasks"].findByID(_id).update { doc in
            doc?["isDeleted"].set(true)
        }
    }
}Build and Run!
You now have a fully functioning to-do app. Build and run it on the simulator or devices and observe the automatic data sync provided by Ditto.