Kotlin Task App Quickstart
Discover Ditto by building and exploring through a task app:
The following procedures are based on Android Studio 4.1 and Kotlin 1.4.
Create Android Studio Project
This guide is based on Android Studio 4.1 and Kotlin 1.4
The first step is to create a project. Go to File → New → New Project and select Basic Activity:
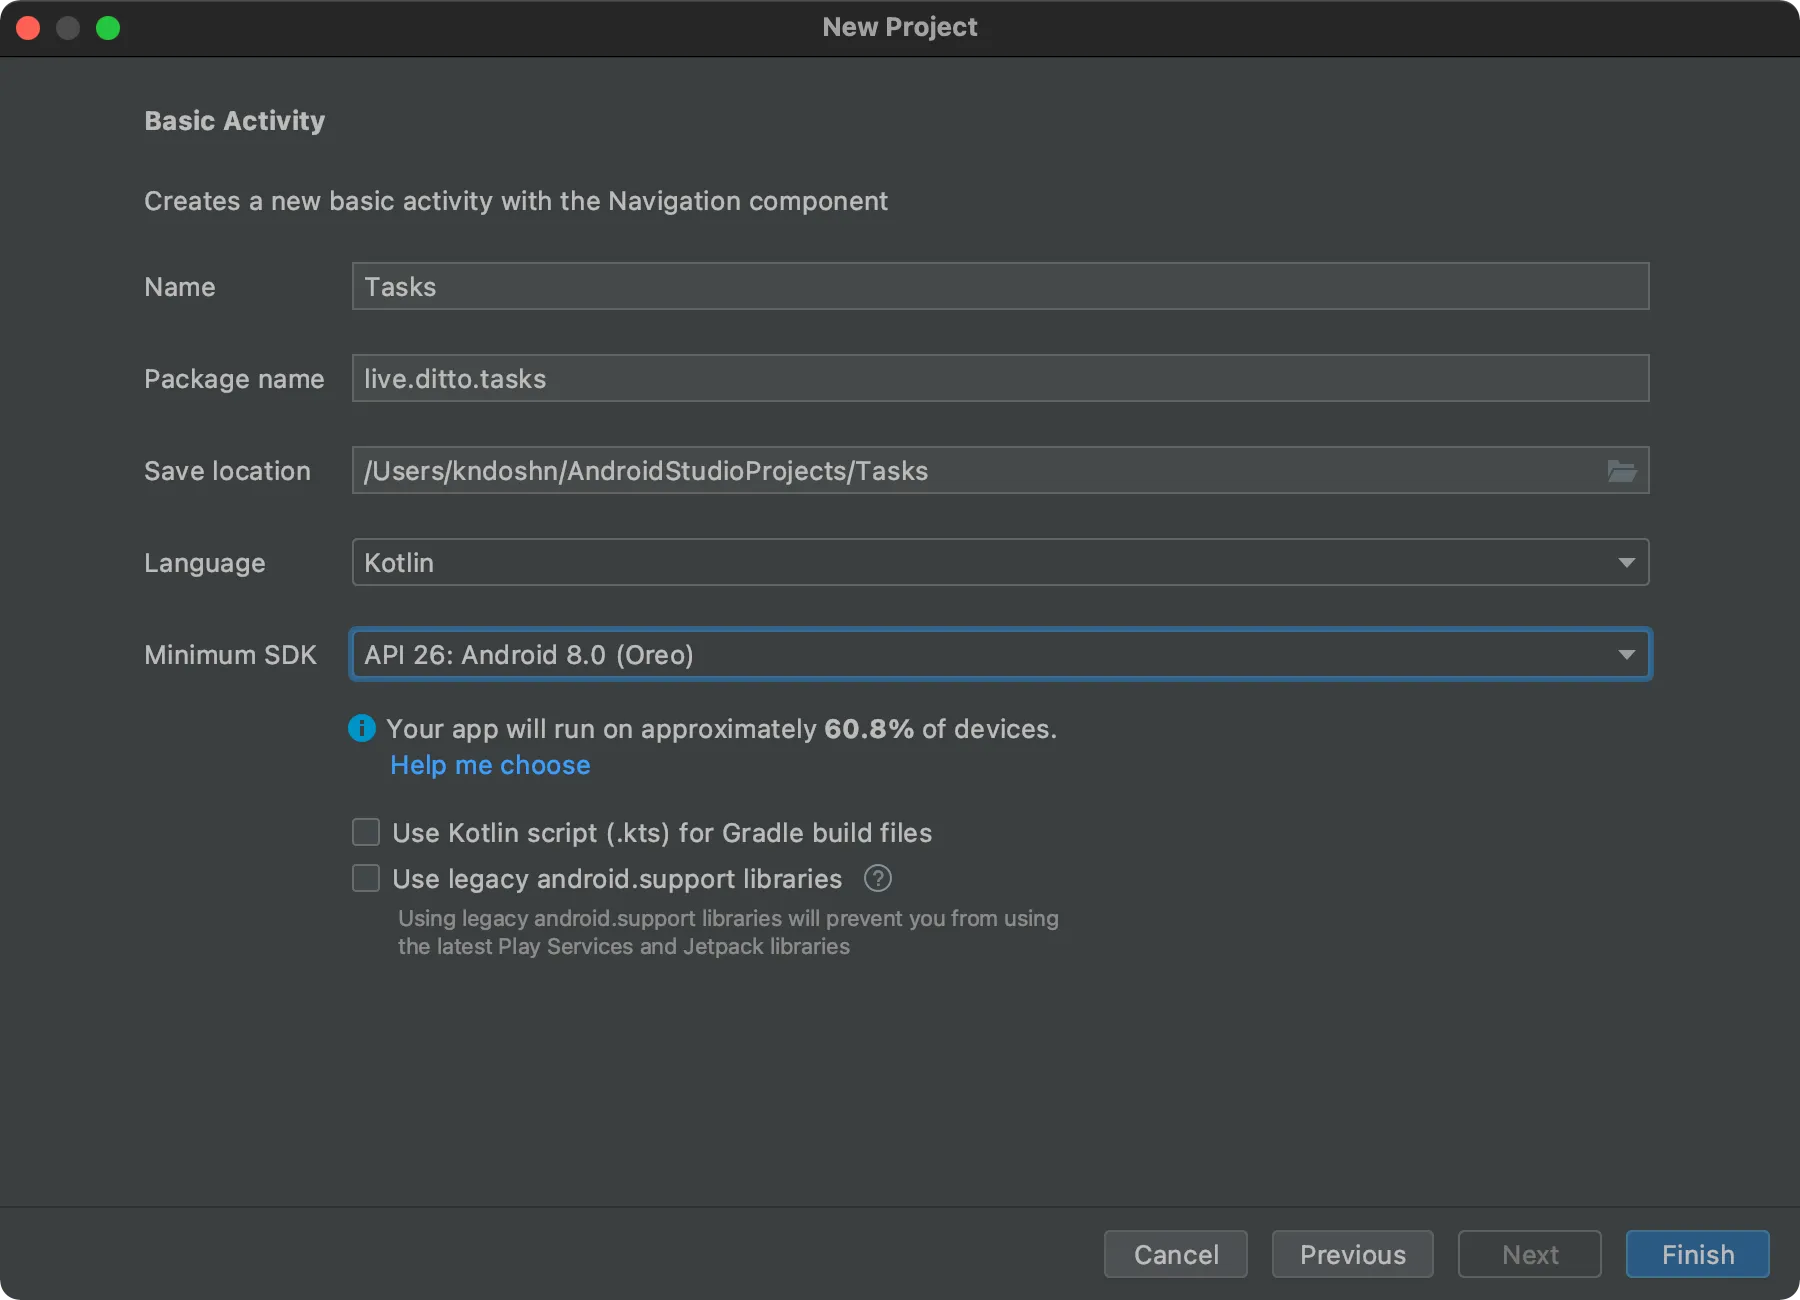
Next, fill out the options with the product name: "Tasks", choose Kotlin, and set the minimum API level to 26:
In the newer version of Android Studio the Basic Activity template includes additional files that are not needed for this tutorial. To continue, remove the following if they exist:
- FirstFragment.kt
- SecondFragment.kt
- fragment_first.xml
- fragment_second.xml
- nav_graph.xml
Install Ditto
To install Ditto, we need to add it as a dependency in the build.gradle script for the app, as well as ensuring that we have the relevant Java -compatibility set.
Android requires requesting permission to use Bluetooth Low Energy and Wifi Aware. For instructions, see Jetpack Compose: Defining UI.
Add Extensions
For the UI in this example, we are still using Kotlin synthetics, which are no longer bundled automatically. We need to add kotlin-android-extensions in the the plugins section of build.gradle to enable.
plugins {
    // ...
    id 'kotlin-android-extensions'
}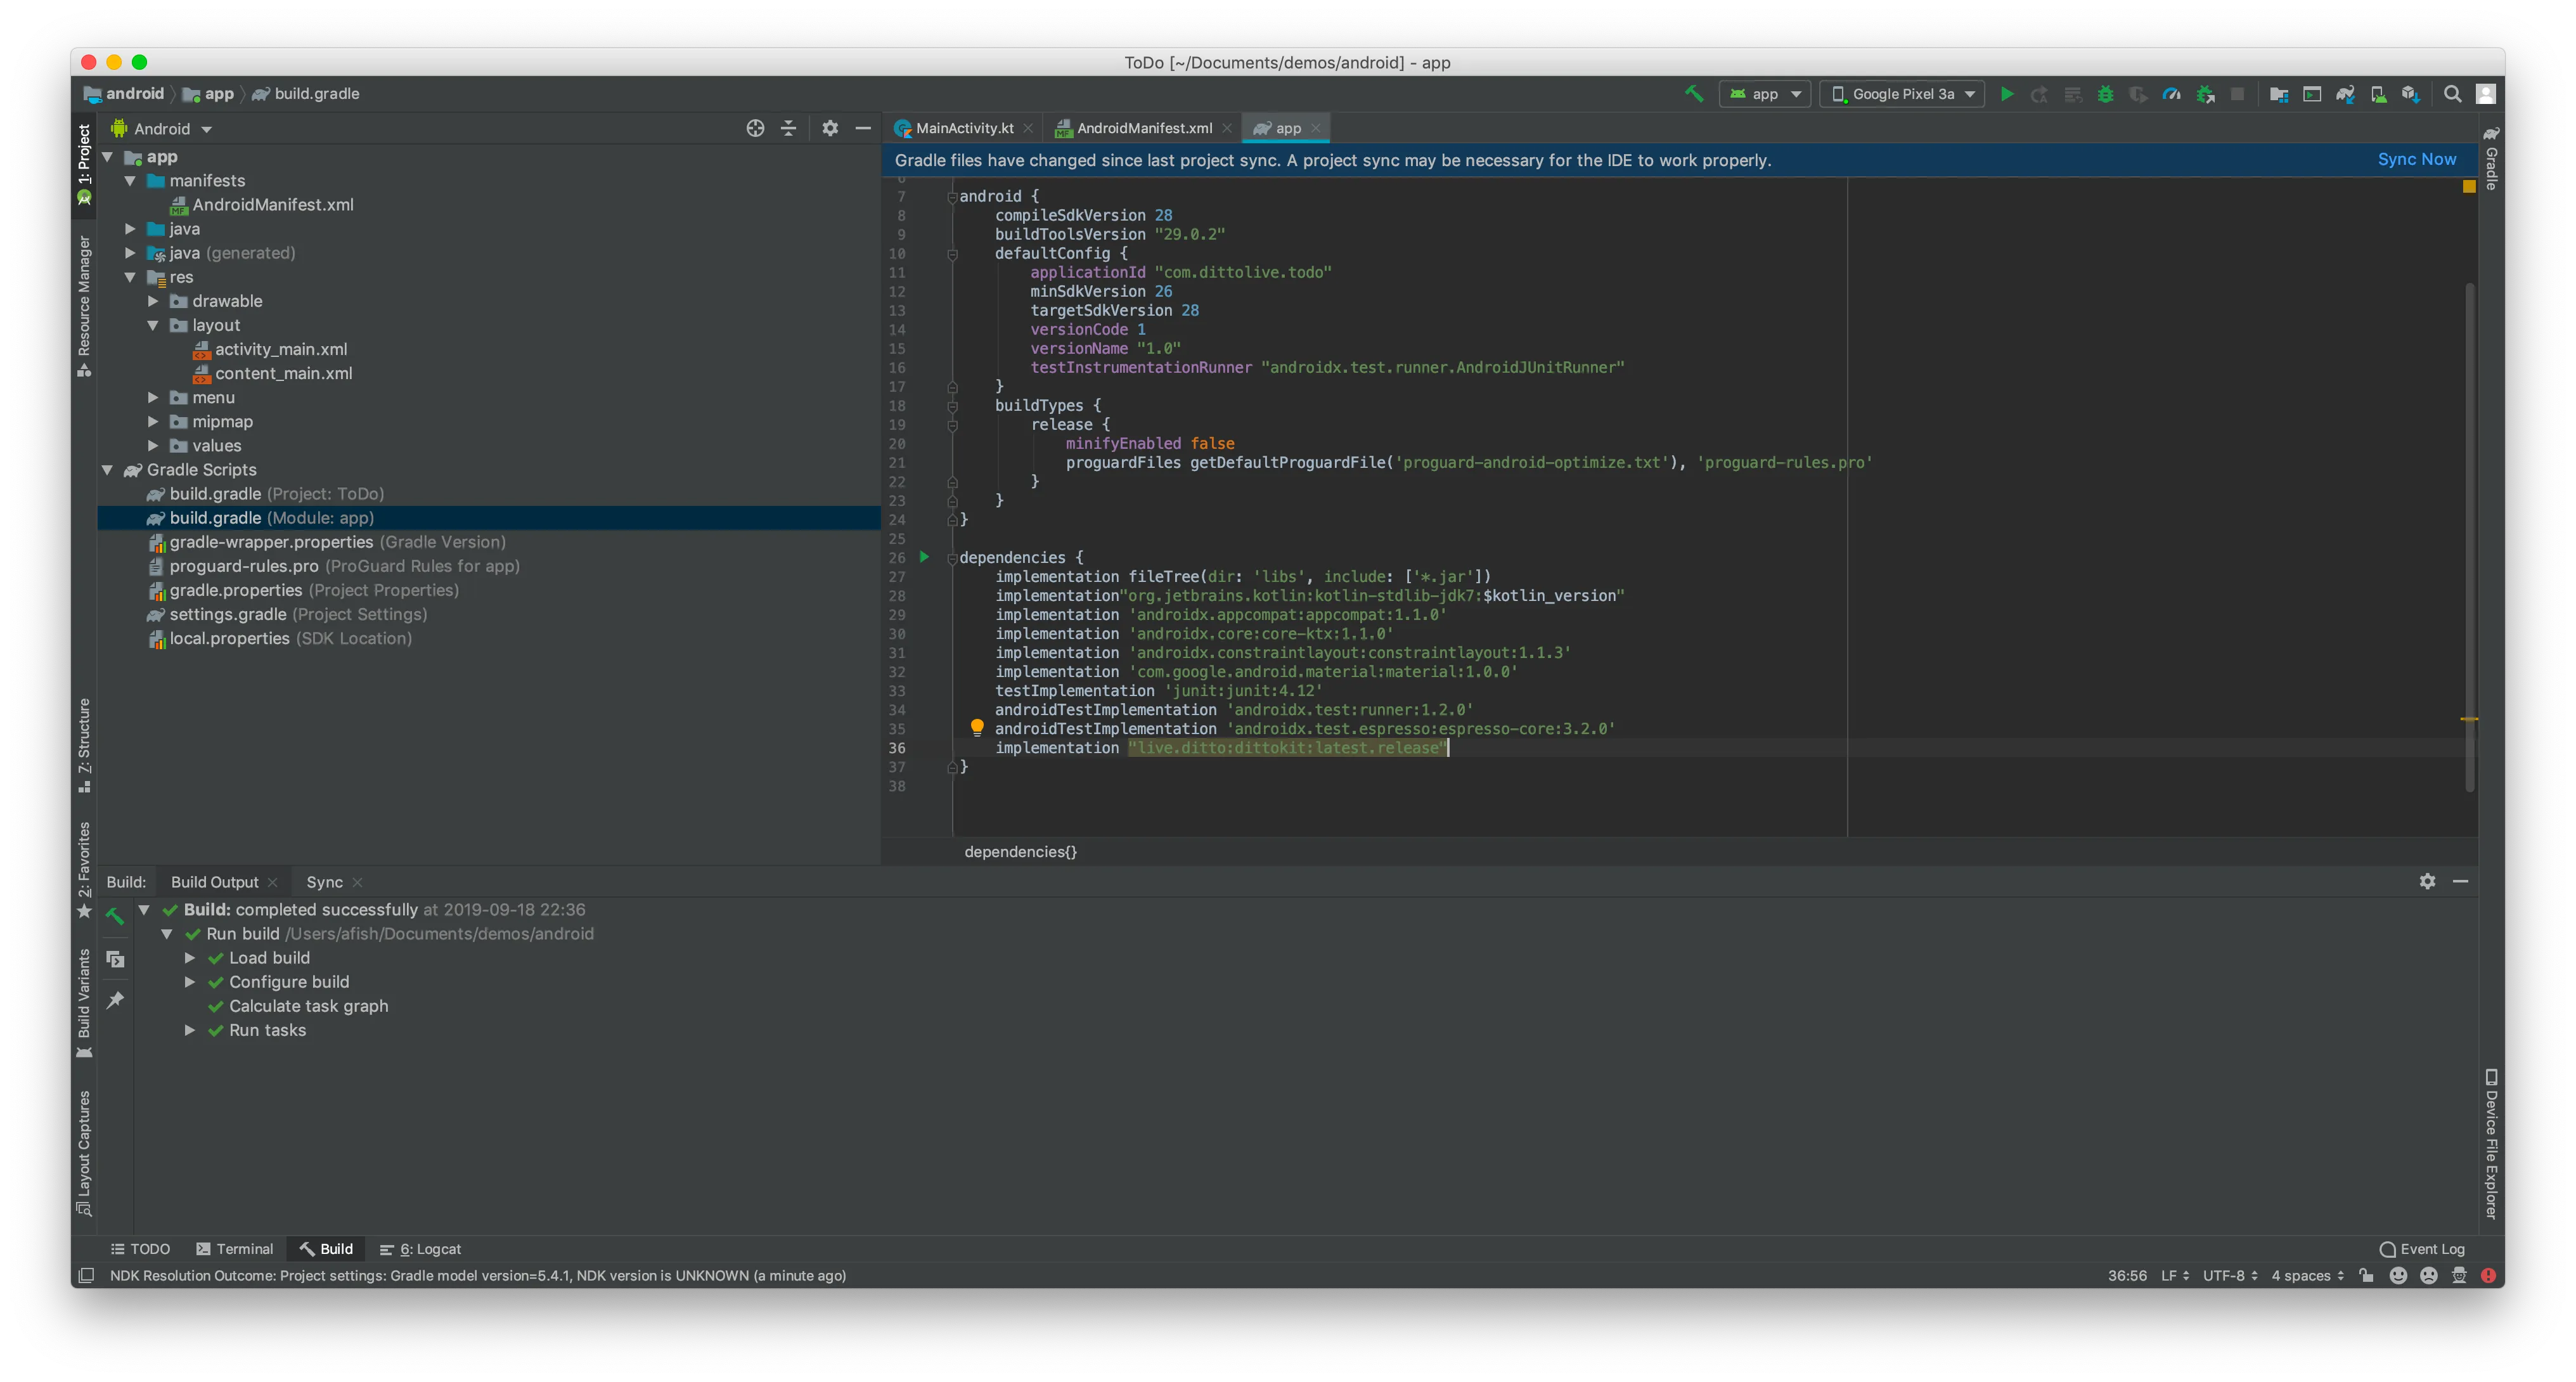
Be sure to Sync Project with Gradle Files after you add Ditto as a dependency. Click the elephant icon with the blue arrow in the top right to manually trigger if it doesn't prompt.
At this point, you have the basic project in place! Now we need to start to build the UI elements.
Create UI
Set up the interface for your task app:
- Create an alert and define the string values.
- Create a dialog box for adding new tasks.
Adjusting Existing Layouts
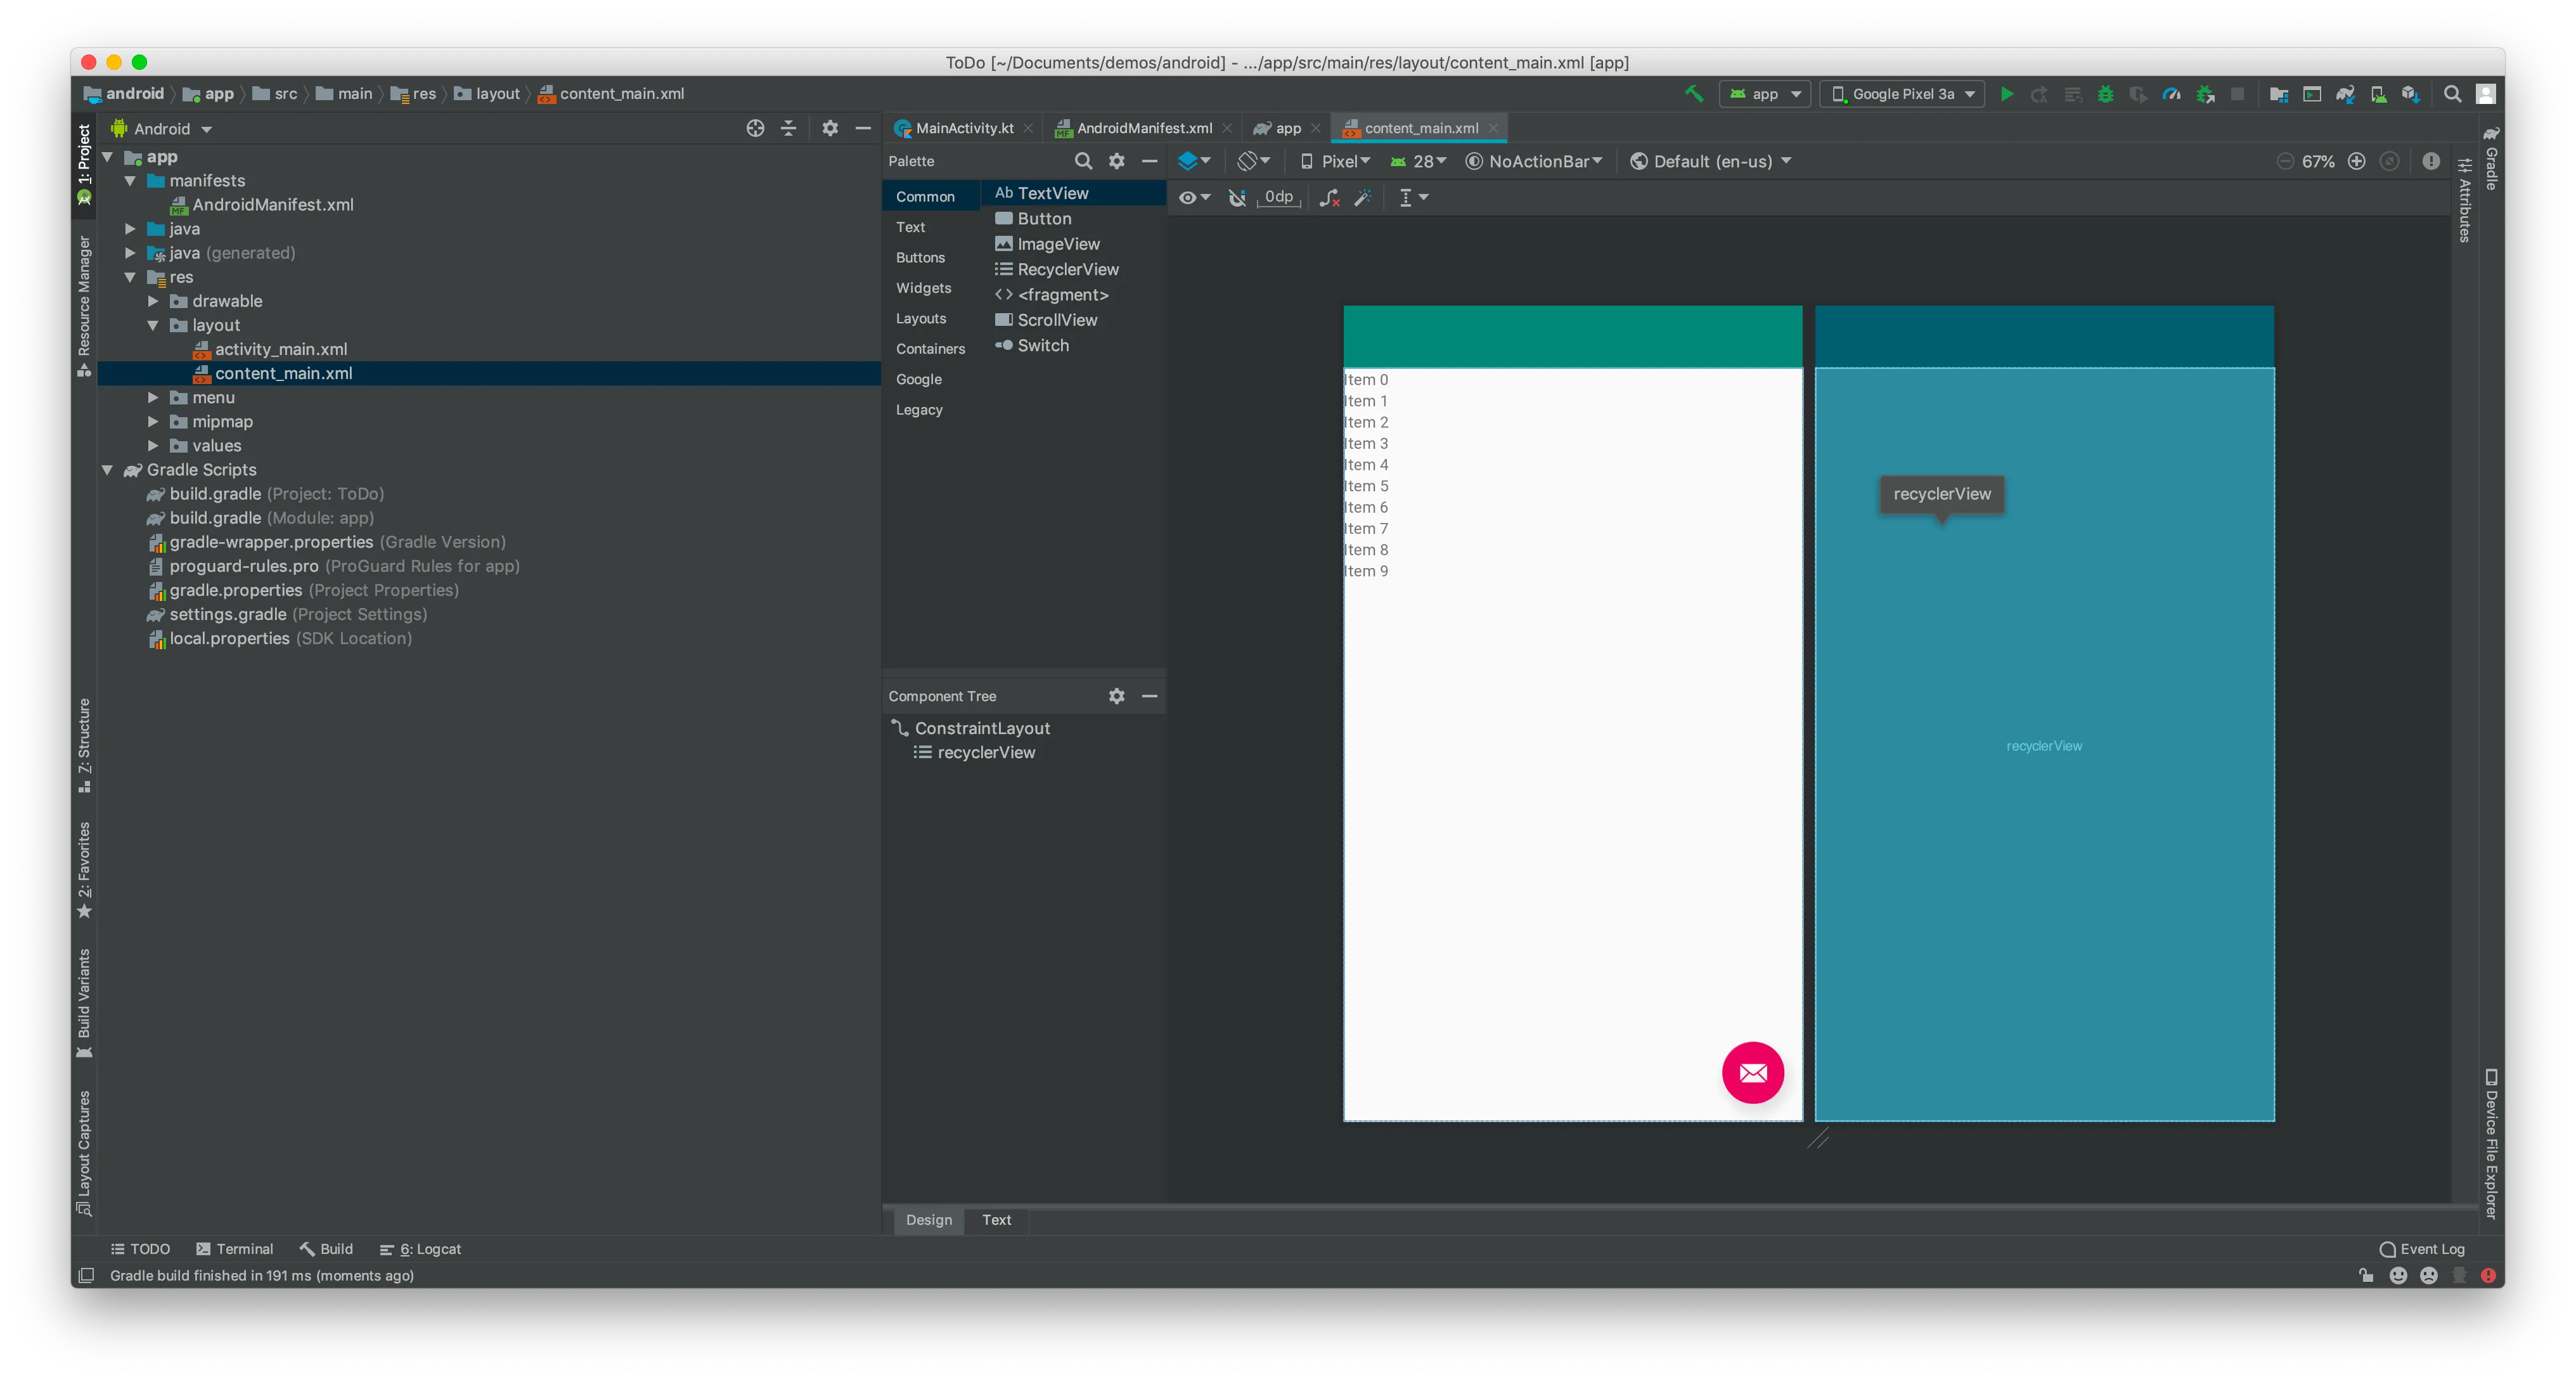
Navigate to the content_main.xml layout file and replace the XML in the text representation view. This will remove the existing text view and a recycler view that we will use to display the list of tasks:
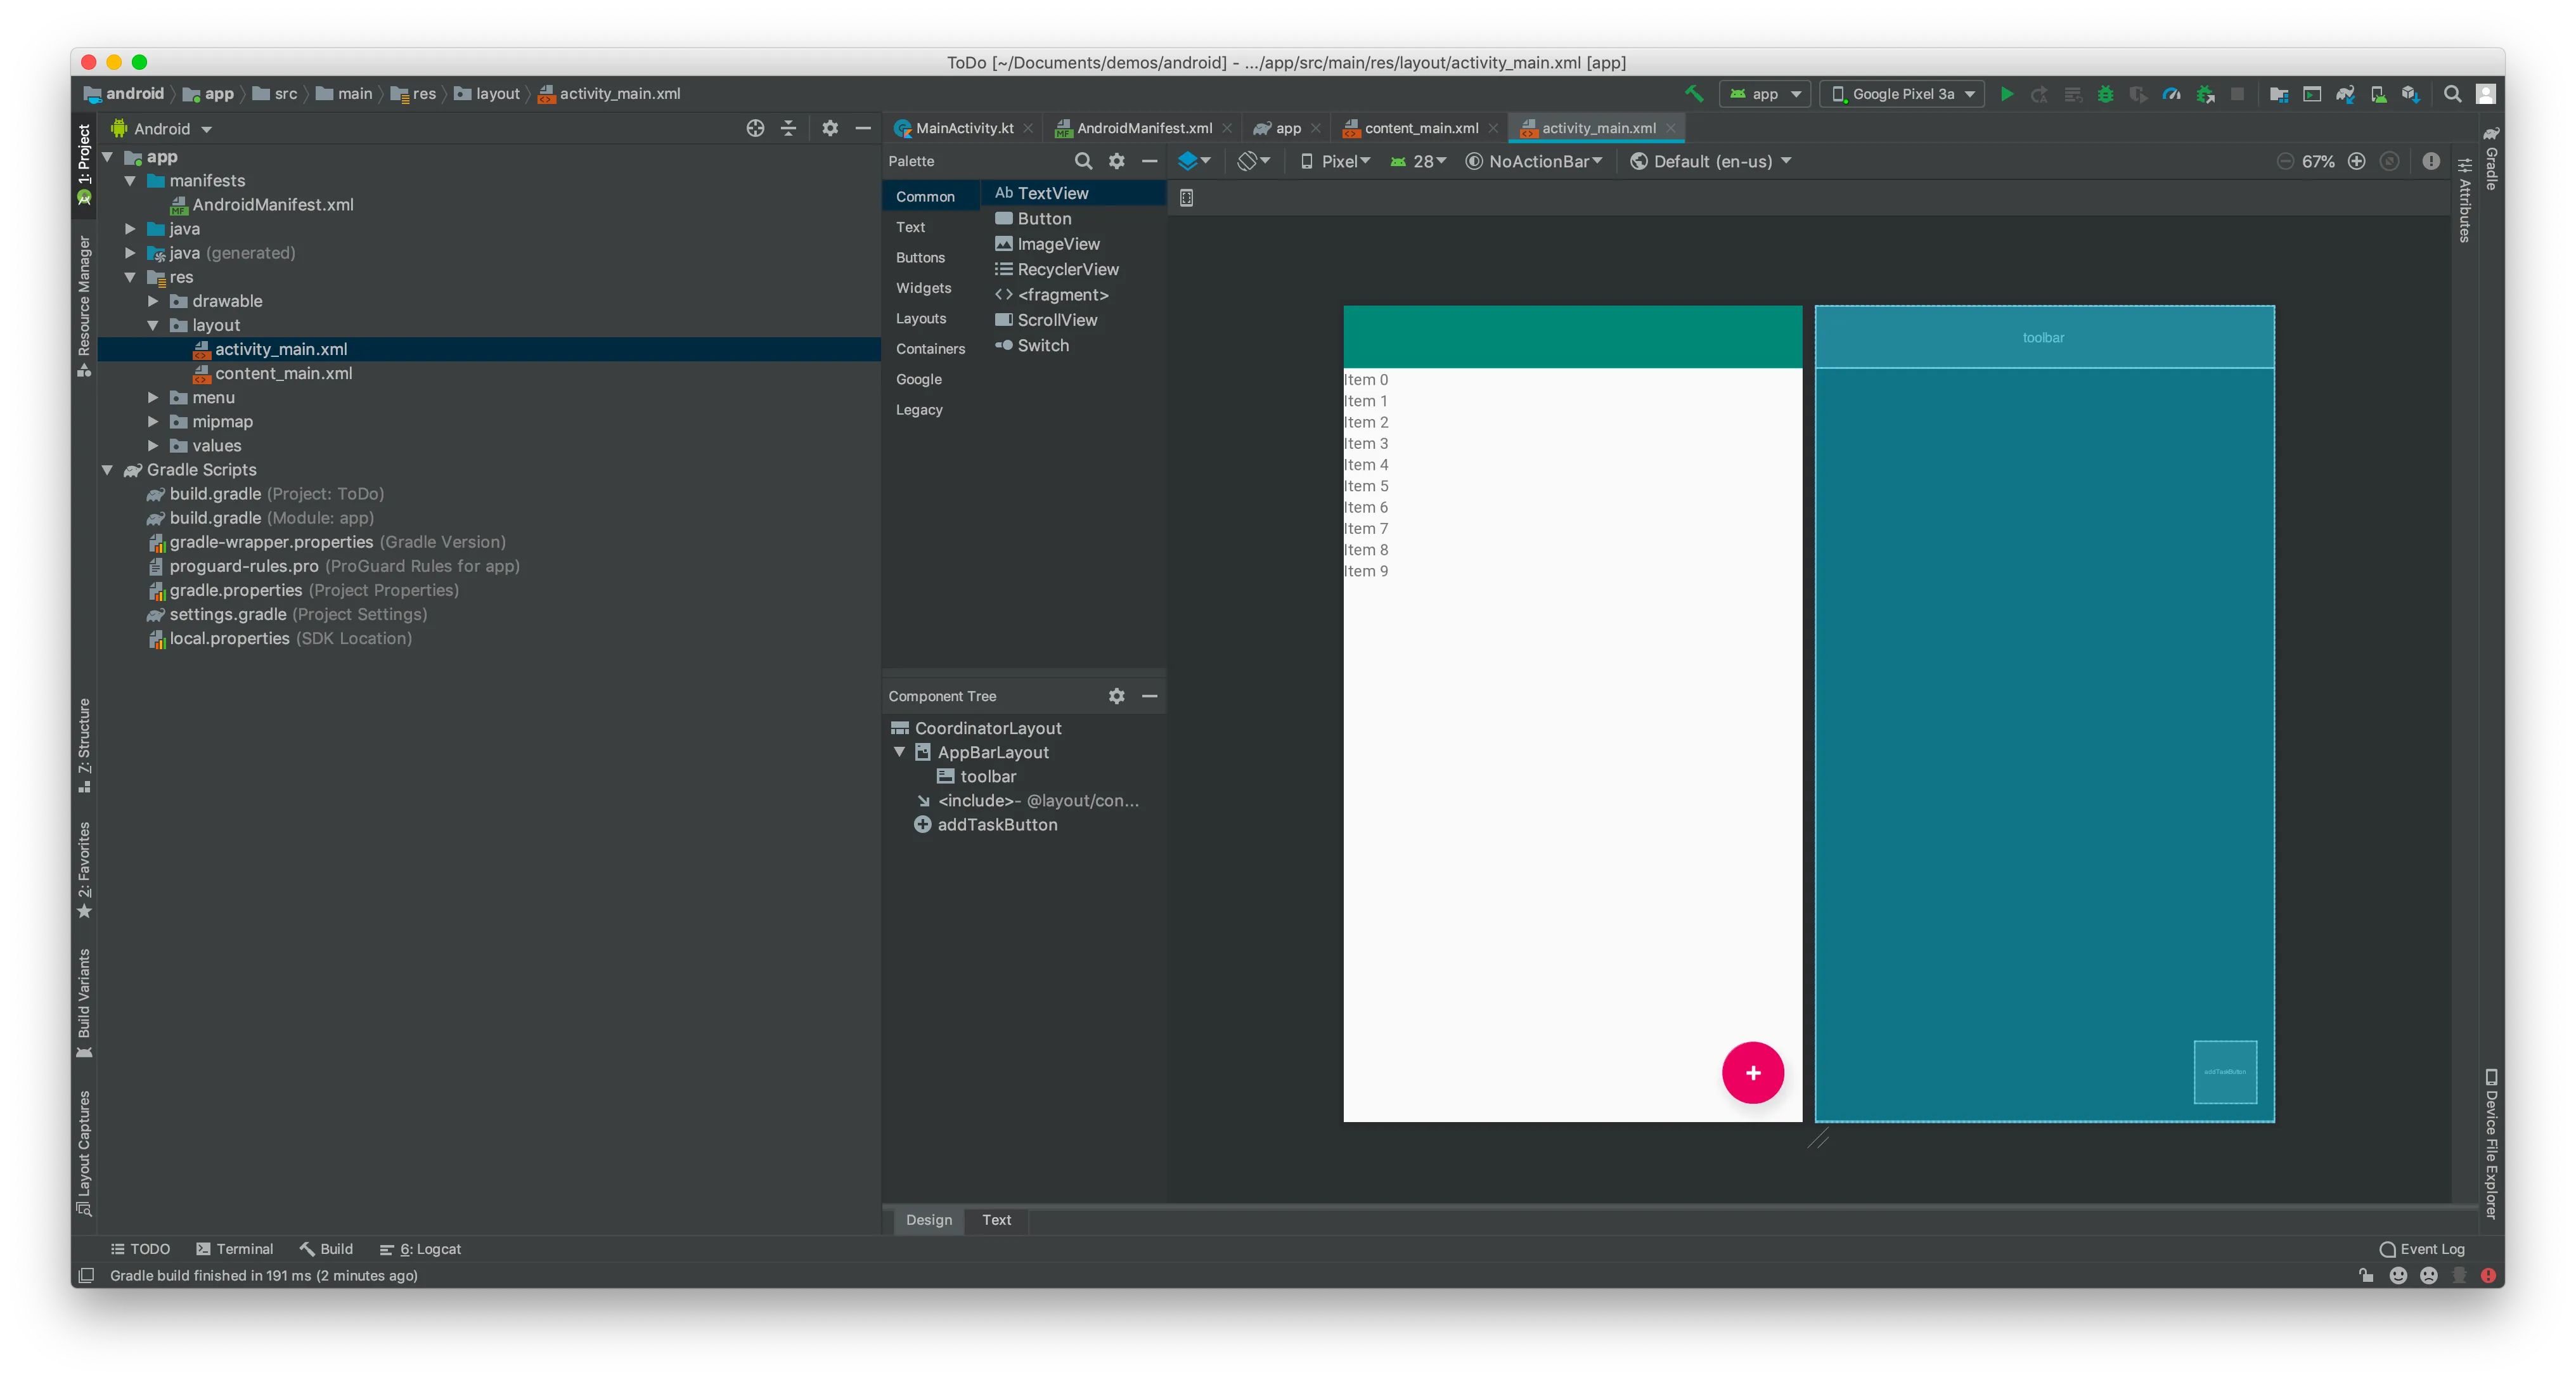
Now navigate to activity_main.xml layout file and replace the XML in the text representation view. This will adjust the floating action button to use a white add icon:
<?xml version="1.0" encoding="utf-8"?>
<androidx.constraintlayout.widget.ConstraintLayout xmlns:android="http://schemas.android.com/apk/res/android"
    xmlns:app="http://schemas.android.com/apk/res-auto"
    xmlns:tools="http://schemas.android.com/tools"
    android:layout_width="match_parent"
    android:layout_height="match_parent"
    app:layout_behavior="@string/appbar_scrolling_view_behavior"
    tools:context=".MainActivity"
    tools:showIn="@layout/activity_main">

    <androidx.recyclerview.widget.RecyclerView
        android:id="@+id/recyclerView"
        android:layout_width="match_parent"
        android:layout_height="match_parent" />
</androidx.constraintlayout.widget.ConstraintLayout>
The layout should look like this:
Now navigate to activity_main.xml layout file and replace the XML in the text representation view. This will adjust the floating action button to use a white add icon:
<?xml version="1.0" encoding="utf-8"?>
<androidx.coordinatorlayout.widget.CoordinatorLayout xmlns:android="http://schemas.android.com/apk/res/android"
    xmlns:app="http://schemas.android.com/apk/res-auto"
    xmlns:tools="http://schemas.android.com/tools"
    android:layout_width="match_parent"
    android:layout_height="match_parent"
    tools:context=".MainActivity">

    <com.google.android.material.appbar.AppBarLayout
        android:layout_width="match_parent"
        android:layout_height="wrap_content"
        android:theme="@style/Theme.Tasks.AppBarOverlay">

        <androidx.appcompat.widget.Toolbar
            android:id="@+id/toolbar"
            android:layout_width="match_parent"
            android:layout_height="?attr/actionBarSize"
            android:background="?attr/colorPrimary"
            app:popupTheme="@style/Theme.Tasks.PopupOverlay" />

    </com.google.android.material.appbar.AppBarLayout>

    <include layout="@layout/content_main" />

    <com.google.android.material.floatingactionbutton.FloatingActionButton
        android:id="@+id/addTaskButton"
        android:layout_width="wrap_content"
        android:layout_height="wrap_content"
        android:layout_gravity="bottom|end"
        android:layout_margin="@dimen/fab_margin"
        android:tint="#FFFFFF"
        app:srcCompat="@android:drawable/ic_input_add" />

</androidx.coordinatorlayout.widget.CoordinatorLayout>
Now navigate to activity_main.xml layout file and replace the XML in the text representation view. This will adjust the floating action button to use a white add icon:
<?xml version="1.0" encoding="utf-8"?>
<androidx.coordinatorlayout.widget.CoordinatorLayout xmlns:android="http://schemas.android.com/apk/res/android"
    xmlns:app="http://schemas.android.com/apk/res-auto"
    xmlns:tools="http://schemas.android.com/tools"
    android:layout_width="match_parent"
    android:layout_height="match_parent"
    tools:context=".MainActivity">

    <com.google.android.material.appbar.AppBarLayout
        android:layout_width="match_parent"
        android:layout_height="wrap_content"
        android:theme="@style/Theme.Tasks.AppBarOverlay">

        <androidx.appcompat.widget.Toolbar
            android:id="@+id/toolbar"
            android:layout_width="match_parent"
            android:layout_height="?attr/actionBarSize"
            android:background="?attr/colorPrimary"
            app:popupTheme="@style/Theme.Tasks.PopupOverlay" />

    </com.google.android.material.appbar.AppBarLayout>

    <include layout="@layout/content_main" />

    <com.google.android.material.floatingactionbutton.FloatingActionButton
        android:id="@+id/addTaskButton"
        android:layout_width="wrap_content"
        android:layout_height="wrap_content"
        android:layout_gravity="bottom|end"
        android:layout_margin="@dimen/fab_margin"
        android:tint="#FFFFFF"
        app:srcCompat="@android:drawable/ic_input_add" />

</androidx.coordinatorlayout.widget.CoordinatorLayout>
The layout should look like this now:
Create AlertDialog Layout
We now need to create a new layout resource file to define our alert dialog. Right-click on the layouts folder in the project and Go to File → New → XML → Layout XML.
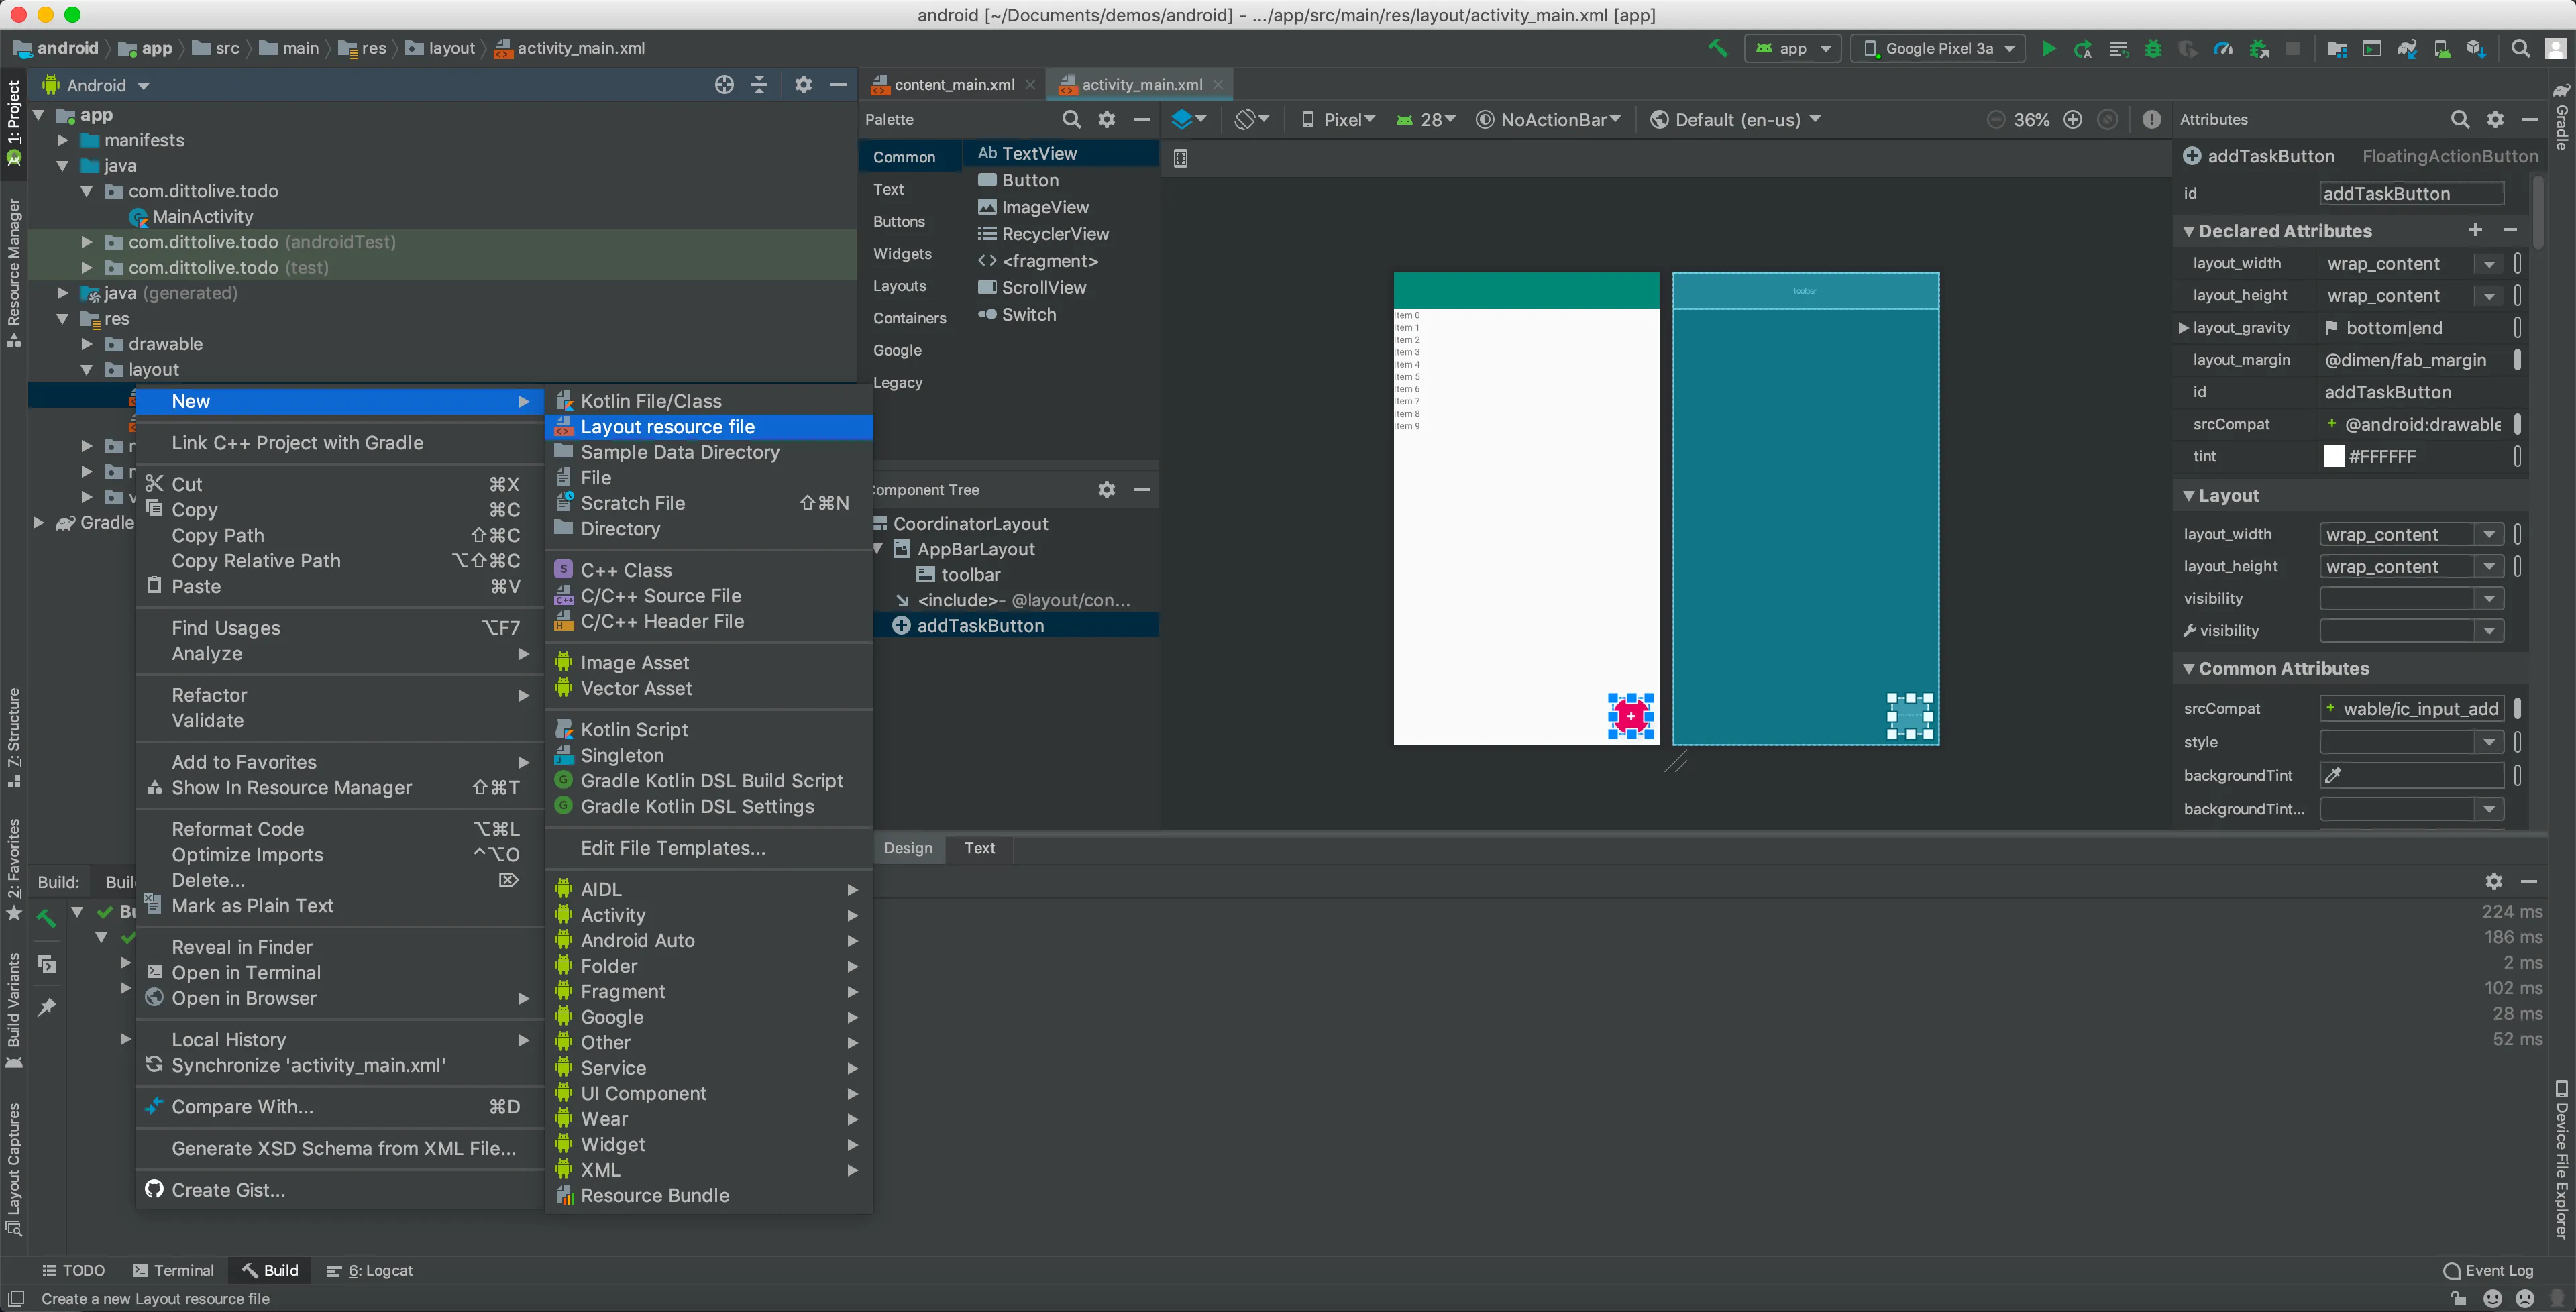
Name the resource file dialog_new_task.
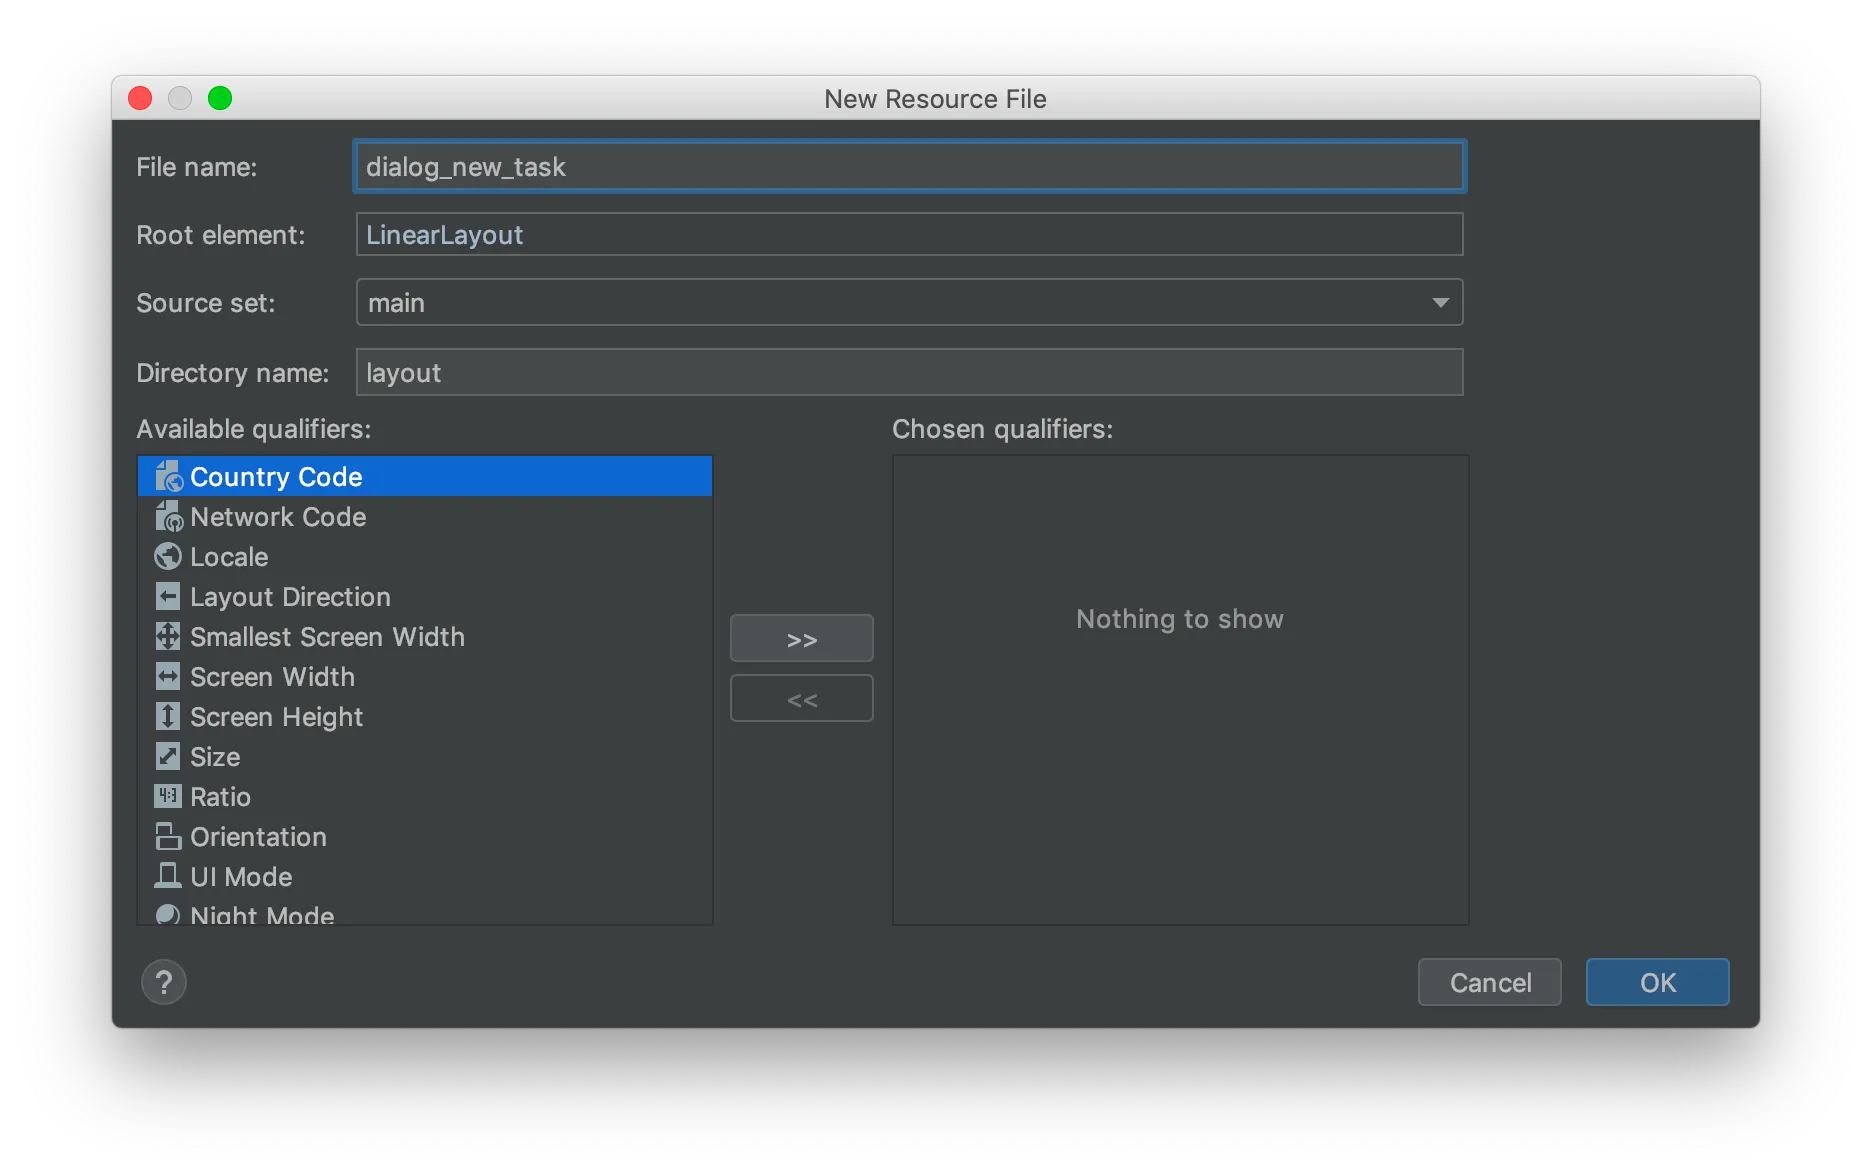
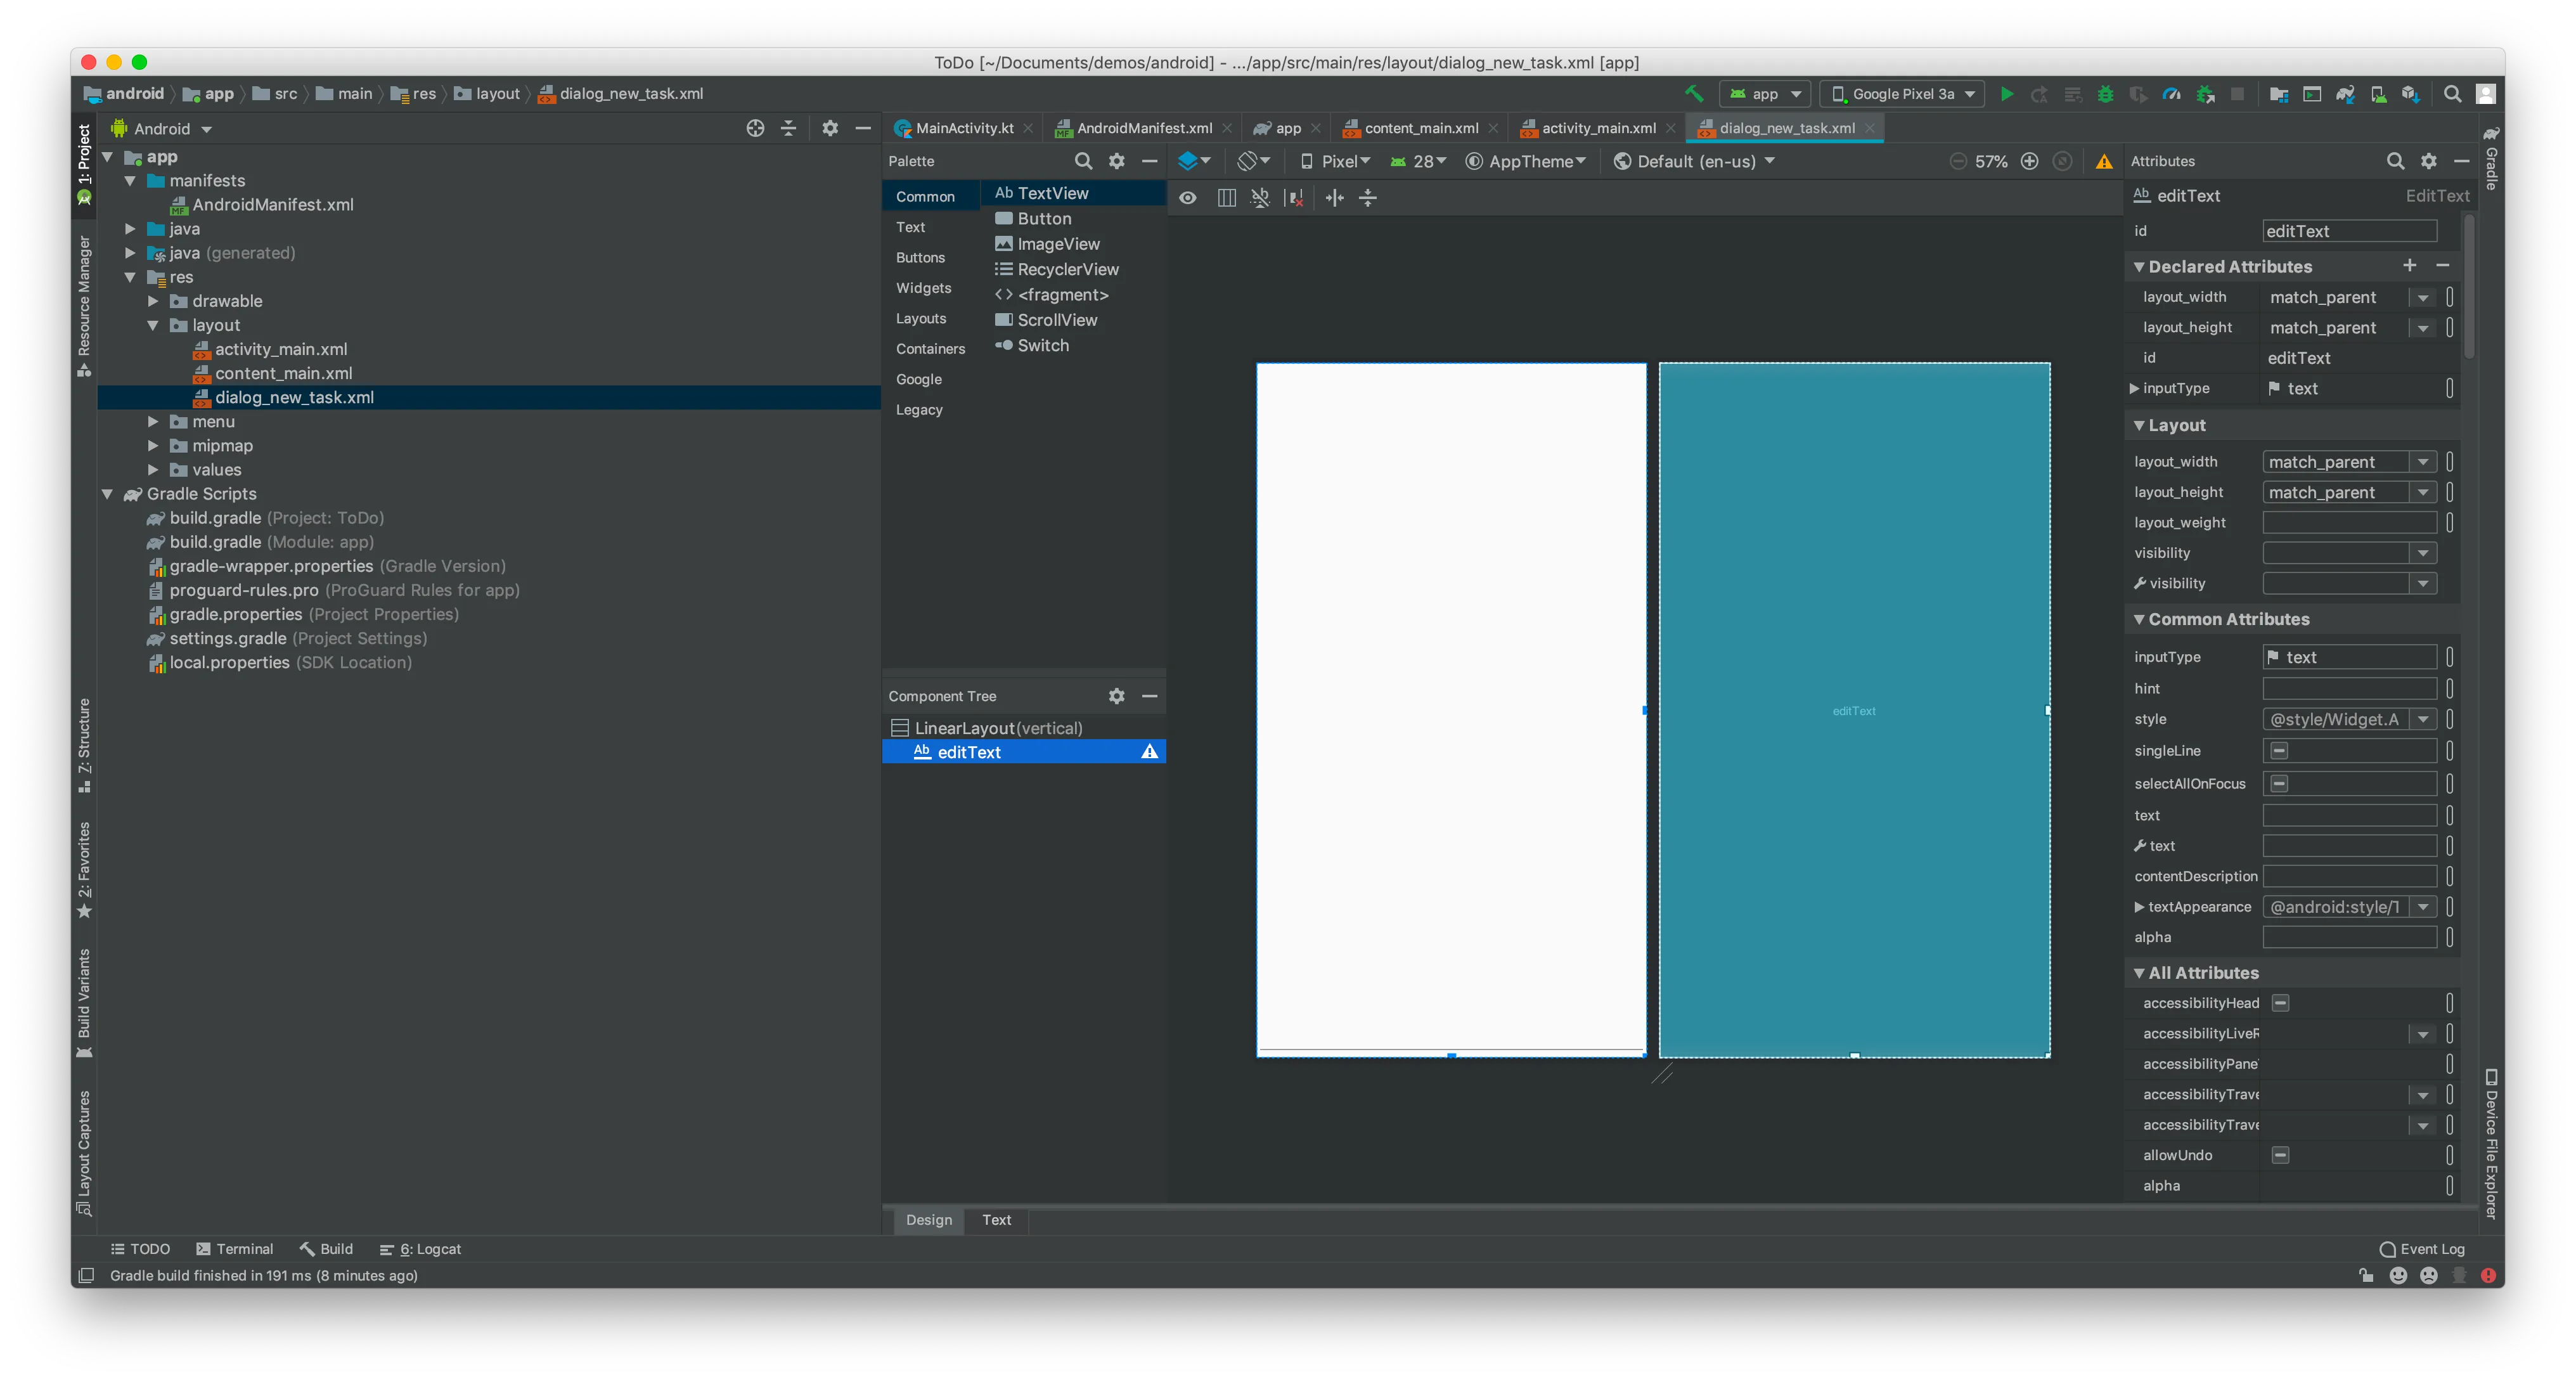
Open the new dialog_new_task.xml layout file and replace the XML in the text representation view. This will add an editable text input to allow the user to enter the task:
<?xml version="1.0" encoding="utf-8"?>
<LinearLayout xmlns:android="http://schemas.android.com/apk/res/android"
    android:orientation="vertical" android:layout_width="match_parent"
    android:layout_height="match_parent">

    <EditText
        android:id="@+id/editText"
        android:layout_width="match_parent"
        android:layout_height="match_parent"
        android:inputType="text" />
</LinearLayout>
The layout should look like this now:
Define Strings
We need to create a few string constants. Open strings.xml in the /res/values folder and replace it with this XML:
<resources>
    <string name="app_name">Tasks</string>
    <string name="action_settings">Settings</string>
    <string name="title_activity_main">Tasks</string>
    <string name="add_new_task_dialog_title">Add New Task</string>
    <string name="save">Save</string>
</resources>To use the AlertDialog we will create a DialogFragment. Create a new Kotlin class by right-clicking the app folder within Java in the project view:
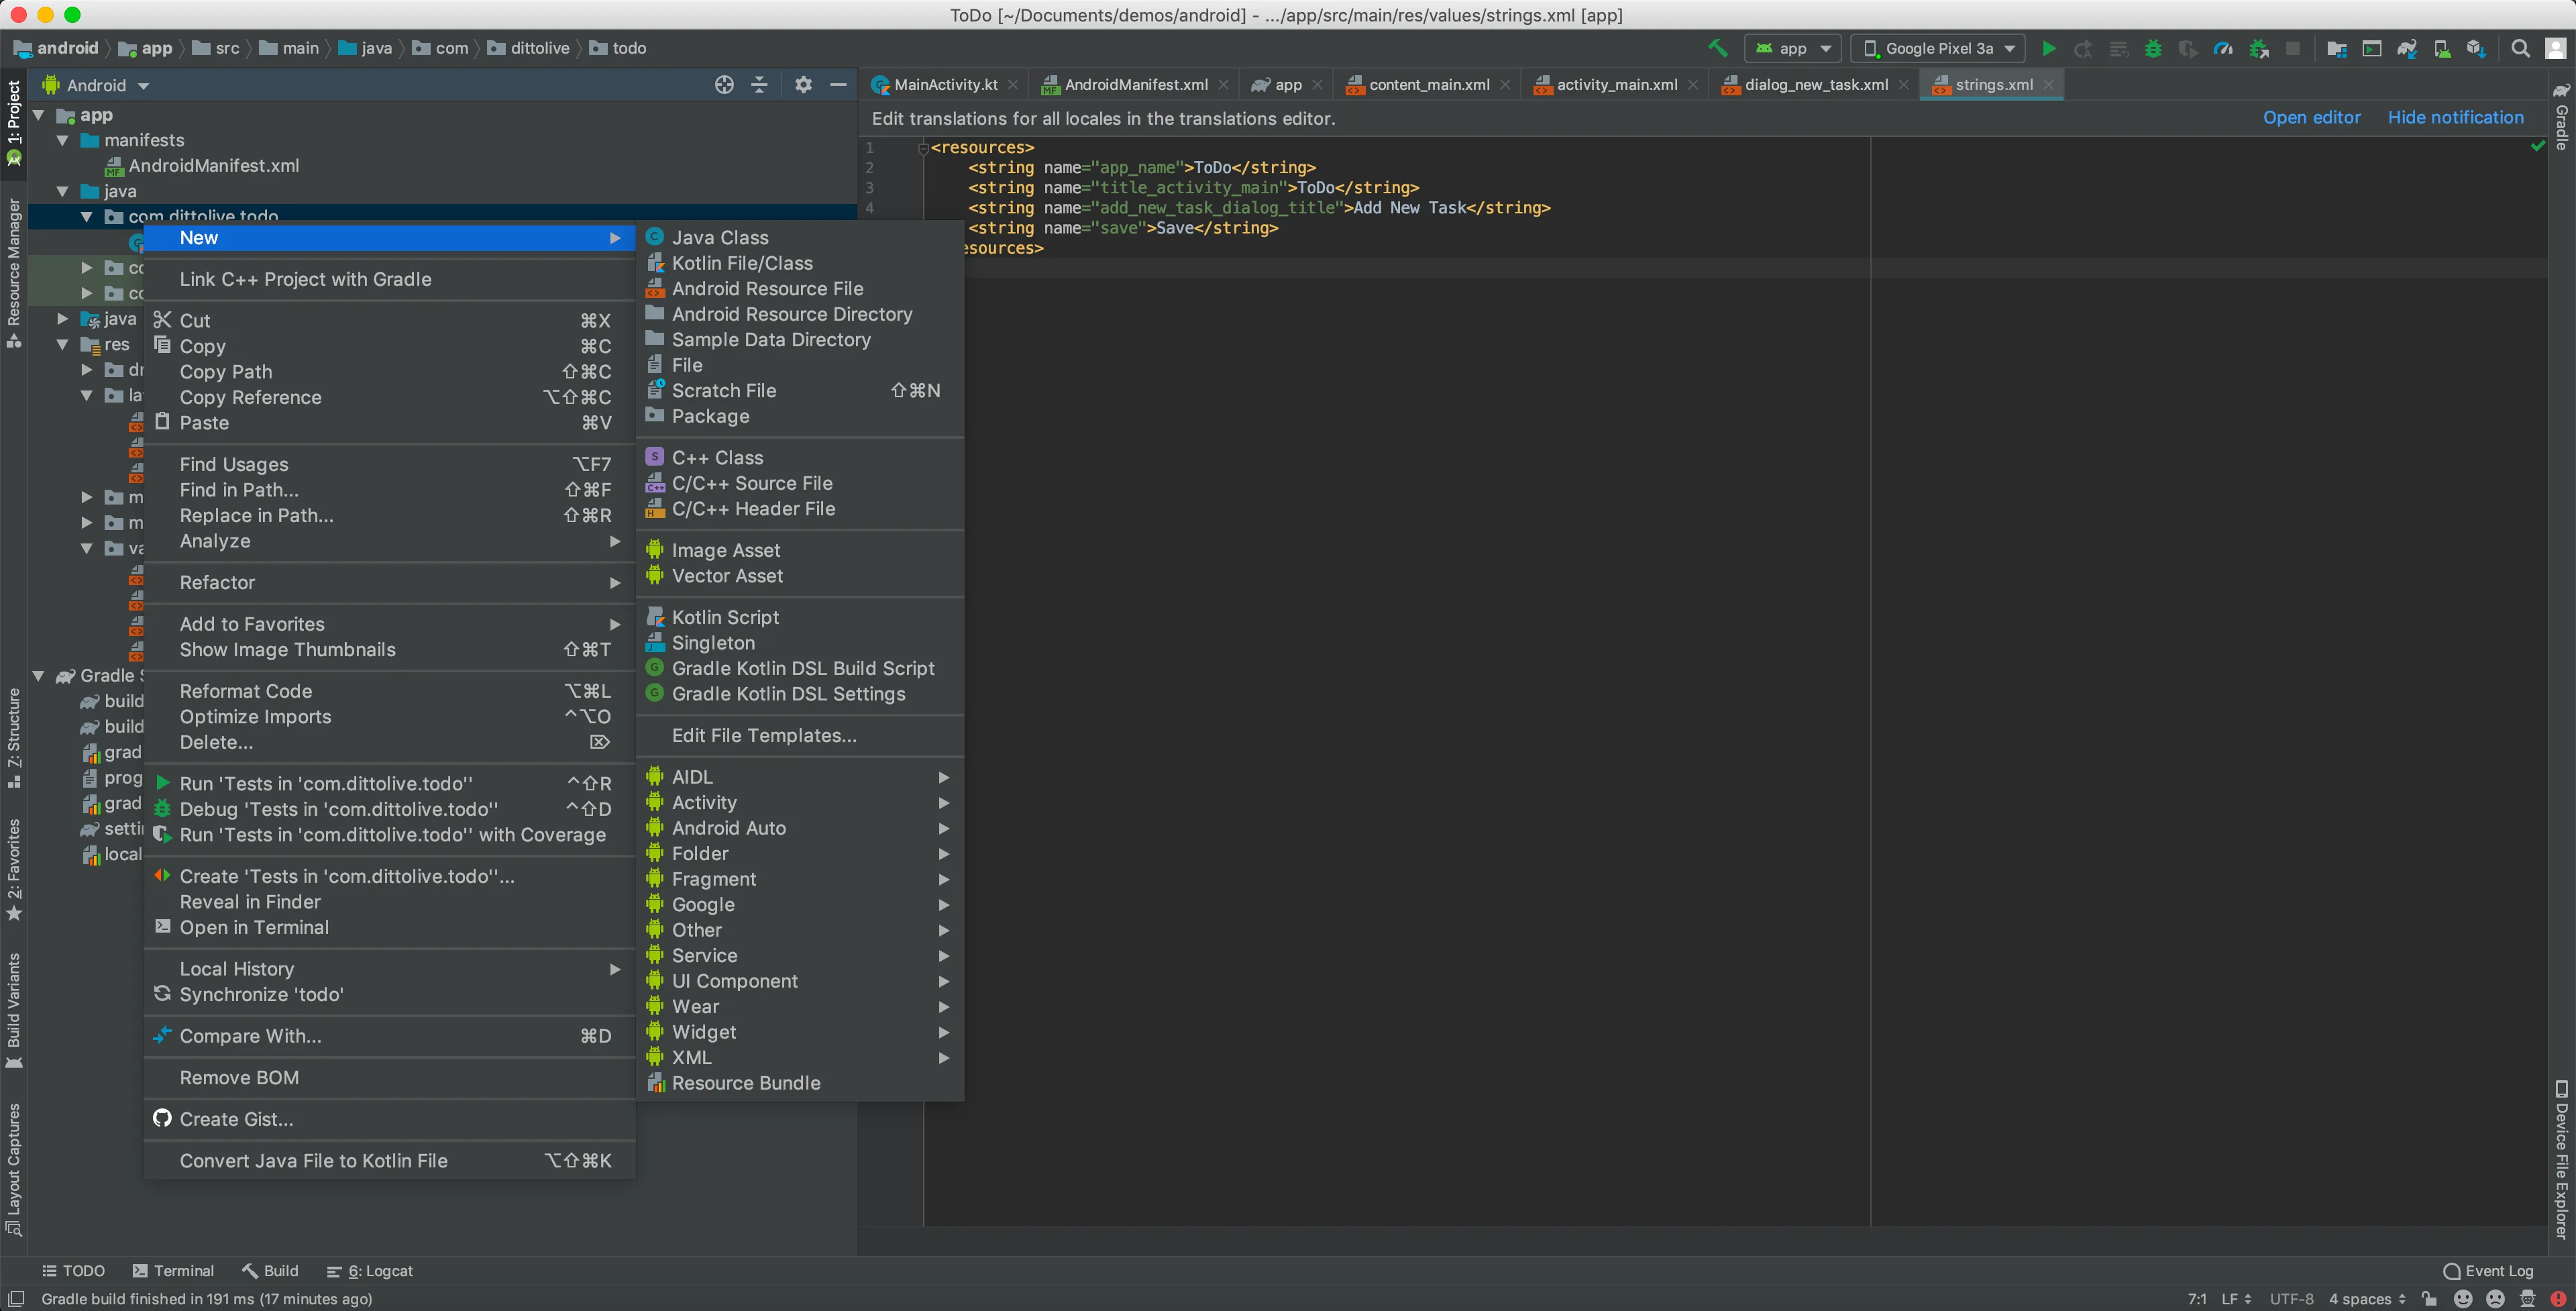
Name the new file NewTaskDialogFragment:
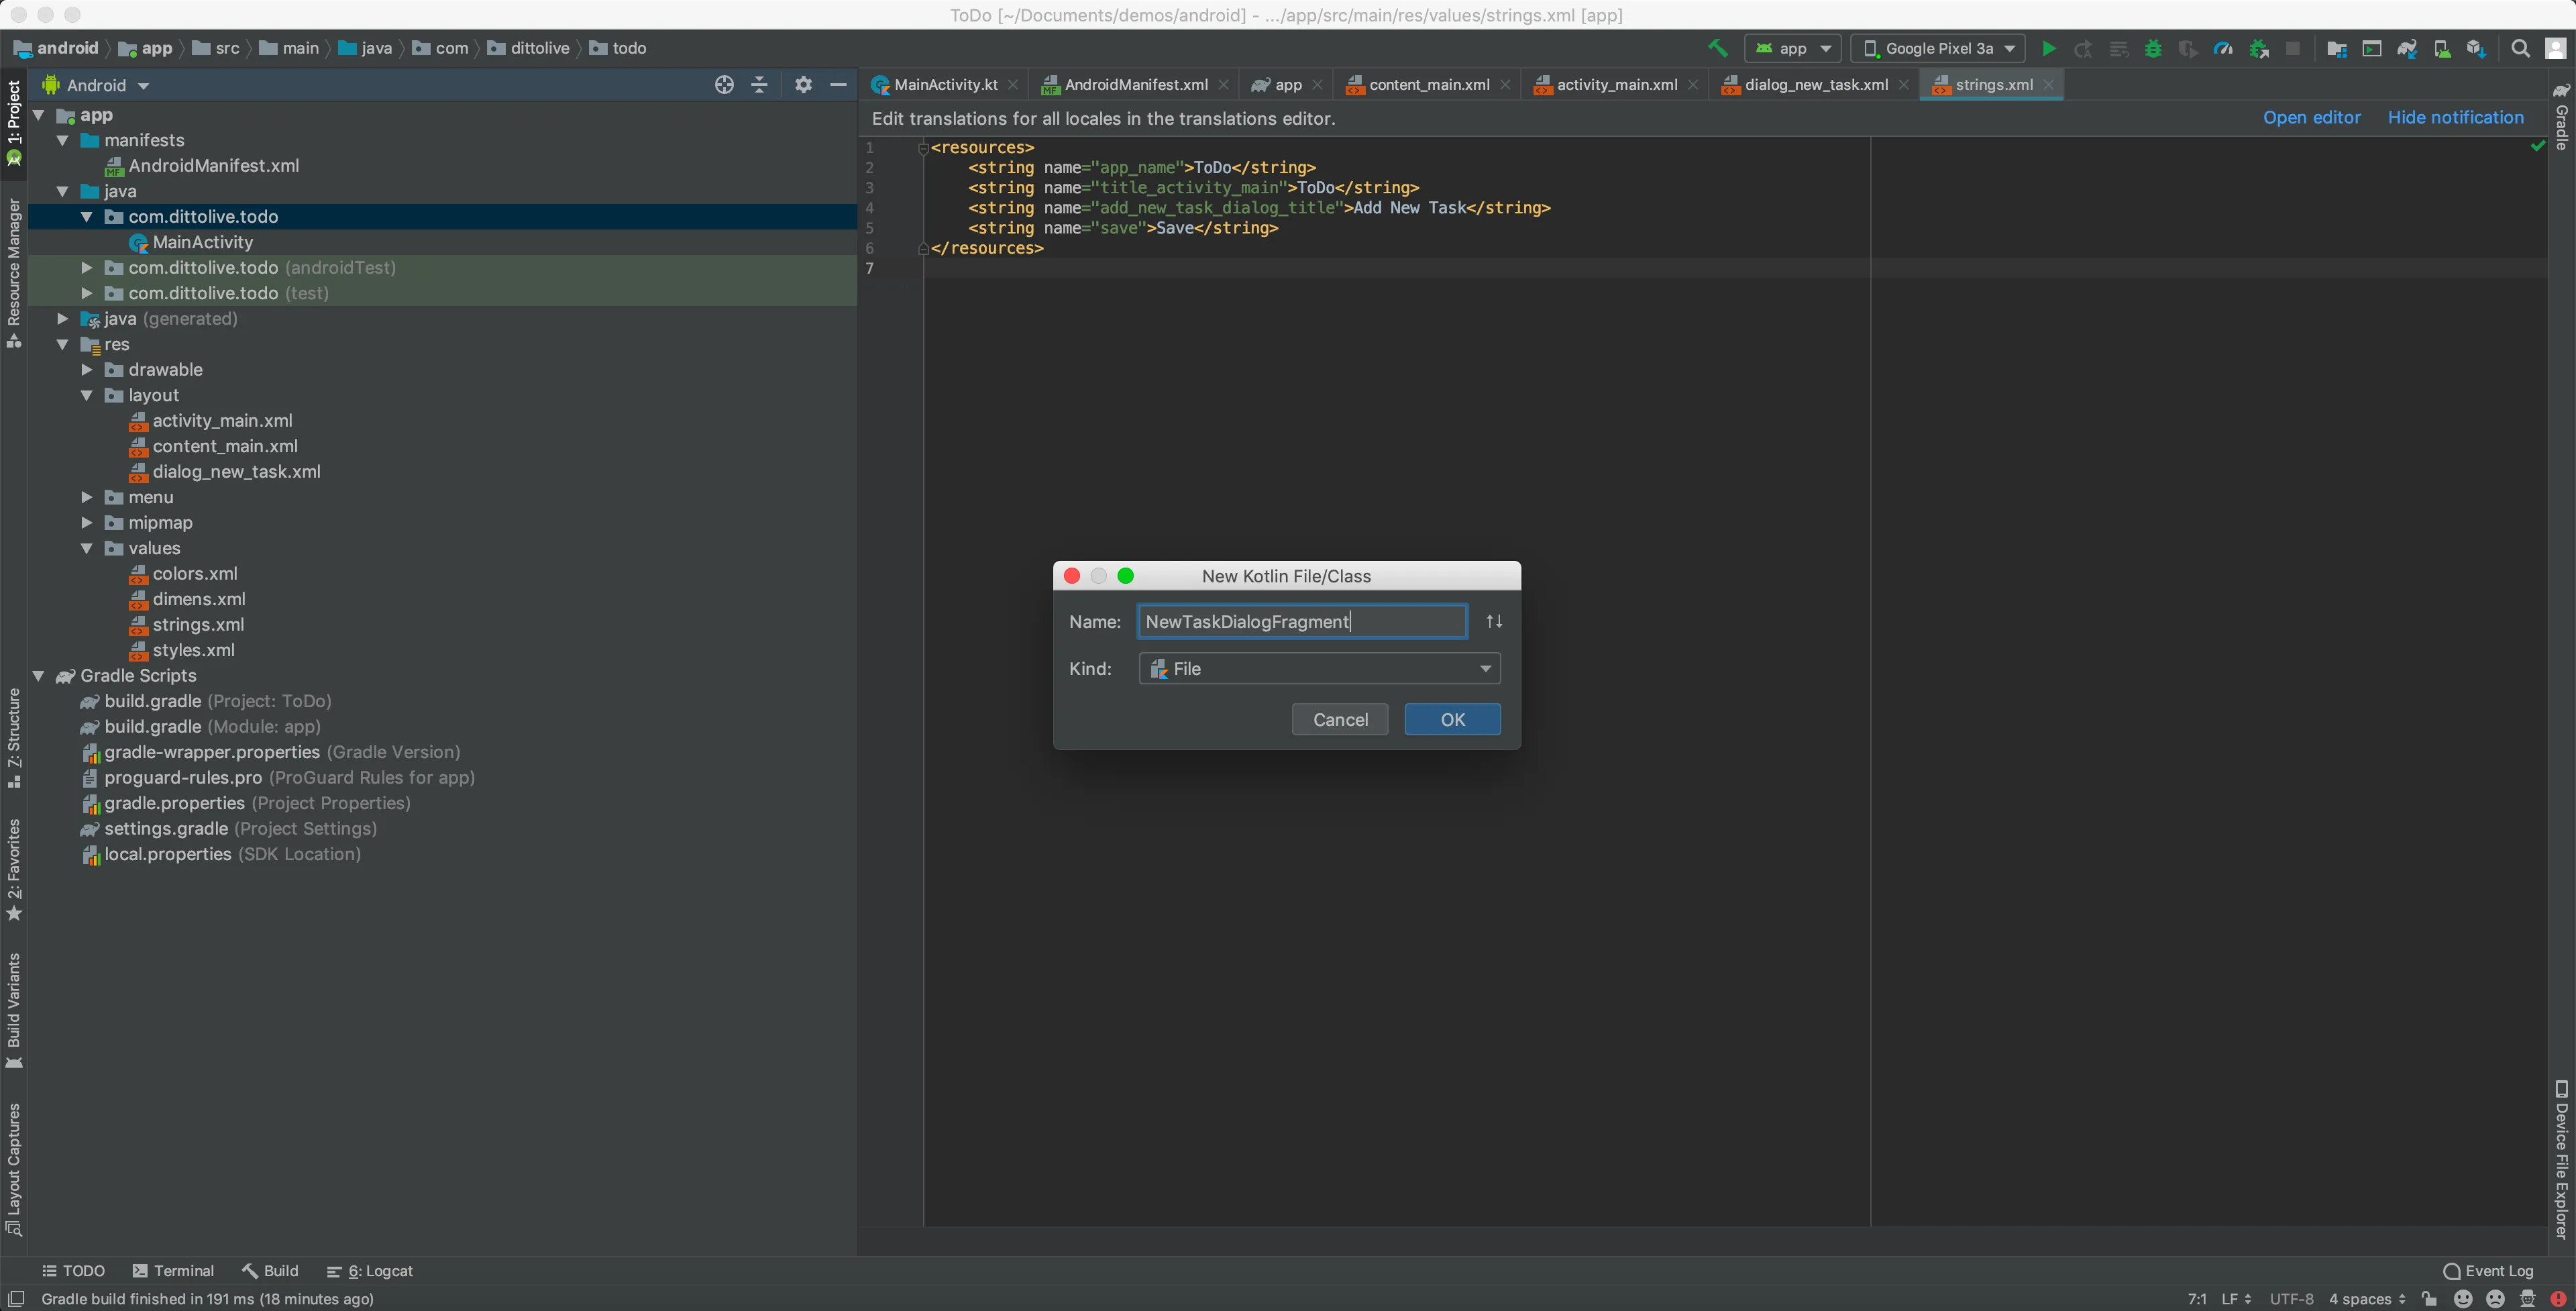
Replace the contents of NewTaskDialogFragment.kt with this:
package live.ditto.tasks

import android.app.Activity
import android.app.AlertDialog
import android.app.Dialog
import android.os.Bundle
import android.widget.TextView
import androidx.fragment.app.DialogFragment

class NewTaskDialogFragment: DialogFragment() {

    interface NewTaskDialogListener {
        fun onDialogSave(dialog: DialogFragment, task: String)
        fun onDialogCancel(dialog: DialogFragment)
    }

    var newTaskDialogListener: NewTaskDialogListener? = null

    companion object {
        fun newInstance(title: Int): NewTaskDialogFragment {
            val newTaskDialogFragment = NewTaskDialogFragment()
            val args = Bundle()
            args.putInt("dialog_title", title)
            newTaskDialogFragment.arguments = args
            return newTaskDialogFragment
        }
    }

    override fun onCreateDialog(savedInstanceState: Bundle?): Dialog { // 5
        val title = arguments!!.getInt("dialog_title")
        val builder = AlertDialog.Builder(activity)
        builder.setTitle(title)

        val dialogView = activity!!.layoutInflater.inflate(R.layout.dialog_new_task, null)
        val task = dialogView.findViewById<TextView>(R.id.editText)

        builder.setView(dialogView)
            .setPositiveButton(R.string.save) { _, _ -> newTaskDialogListener?.onDialogSave(this, task.text.toString()) }
            .setNegativeButton(android.R.string.cancel) { _, _ -> newTaskDialogListener?.onDialogCancel(this) }
        return builder.create()
    }

    @Suppress("DEPRECATION")
    override fun onAttach(activity: Activity) { // 6
        super.onAttach(activity)
        try {
            newTaskDialogListener = activity as NewTaskDialogListener
        } catch (e: ClassCastException) {
            throw ClassCastException("$activity must implement NewTaskDialogListener")
        }
    }
}
Configure Main Activity Part I
We need to import Ditto and create a few variables. Open the MainActivity file and replace the existing code with this:
package live.ditto.tasks

import android.os.Bundle
import com.google.android.material.snackbar.Snackbar
import androidx.appcompat.app.AppCompatActivity
import android.view.Menu
import android.view.MenuItem
import androidx.recyclerview.widget.RecyclerView
import androidx.fragment.app.DialogFragment
import java.time.Instant

import kotlinx.android.synthetic.main.activity_main.*

import live.ditto.*
import live.ditto.android.DefaultAndroidDittoDependencies


class MainActivity : AppCompatActivity(), NewTaskDialogFragment.NewTaskDialogListener {
    private lateinit var recyclerView: RecyclerView
    private lateinit var viewAdapter: RecyclerView.Adapter<*>
    private lateinit var viewManager: RecyclerView.LayoutManager

    private var ditto: Ditto? = null
    private var collection: DittoCollection? = null
    private var liveQuery: DittoLiveQuery? = null

    override fun onCreate(savedInstanceState: Bundle?) {
        super.onCreate(savedInstanceState)
        setContentView(R.layout.activity_main)
        setSupportActionBar(toolbar)
    }
}
If it does not run automatically, execute Sync Project with Gradle Files.
Add New Task Functions
We will add a function and override two now that MainActivity is an abstract class. Insert this code after onCreate() function in the class:
override fun onDialogSave(dialog: DialogFragment, task:String) {
    // Add the task to Ditto
    this.collection!!.upsert(mapOf("body" to task, "isCompleted" to false))
}

override fun onDialogCancel(dialog: DialogFragment) { }

fun showNewTaskUI() {
    val newFragment = NewTaskDialogFragment.newInstance(R.string.add_new_task_dialog_title)
    newFragment.show(supportFragmentManager,"newTask")
}
Create A Task View Layout
Right-click on the layouts folder in the project and Go to File → New → XML → Layout XML. Name the file task_view:
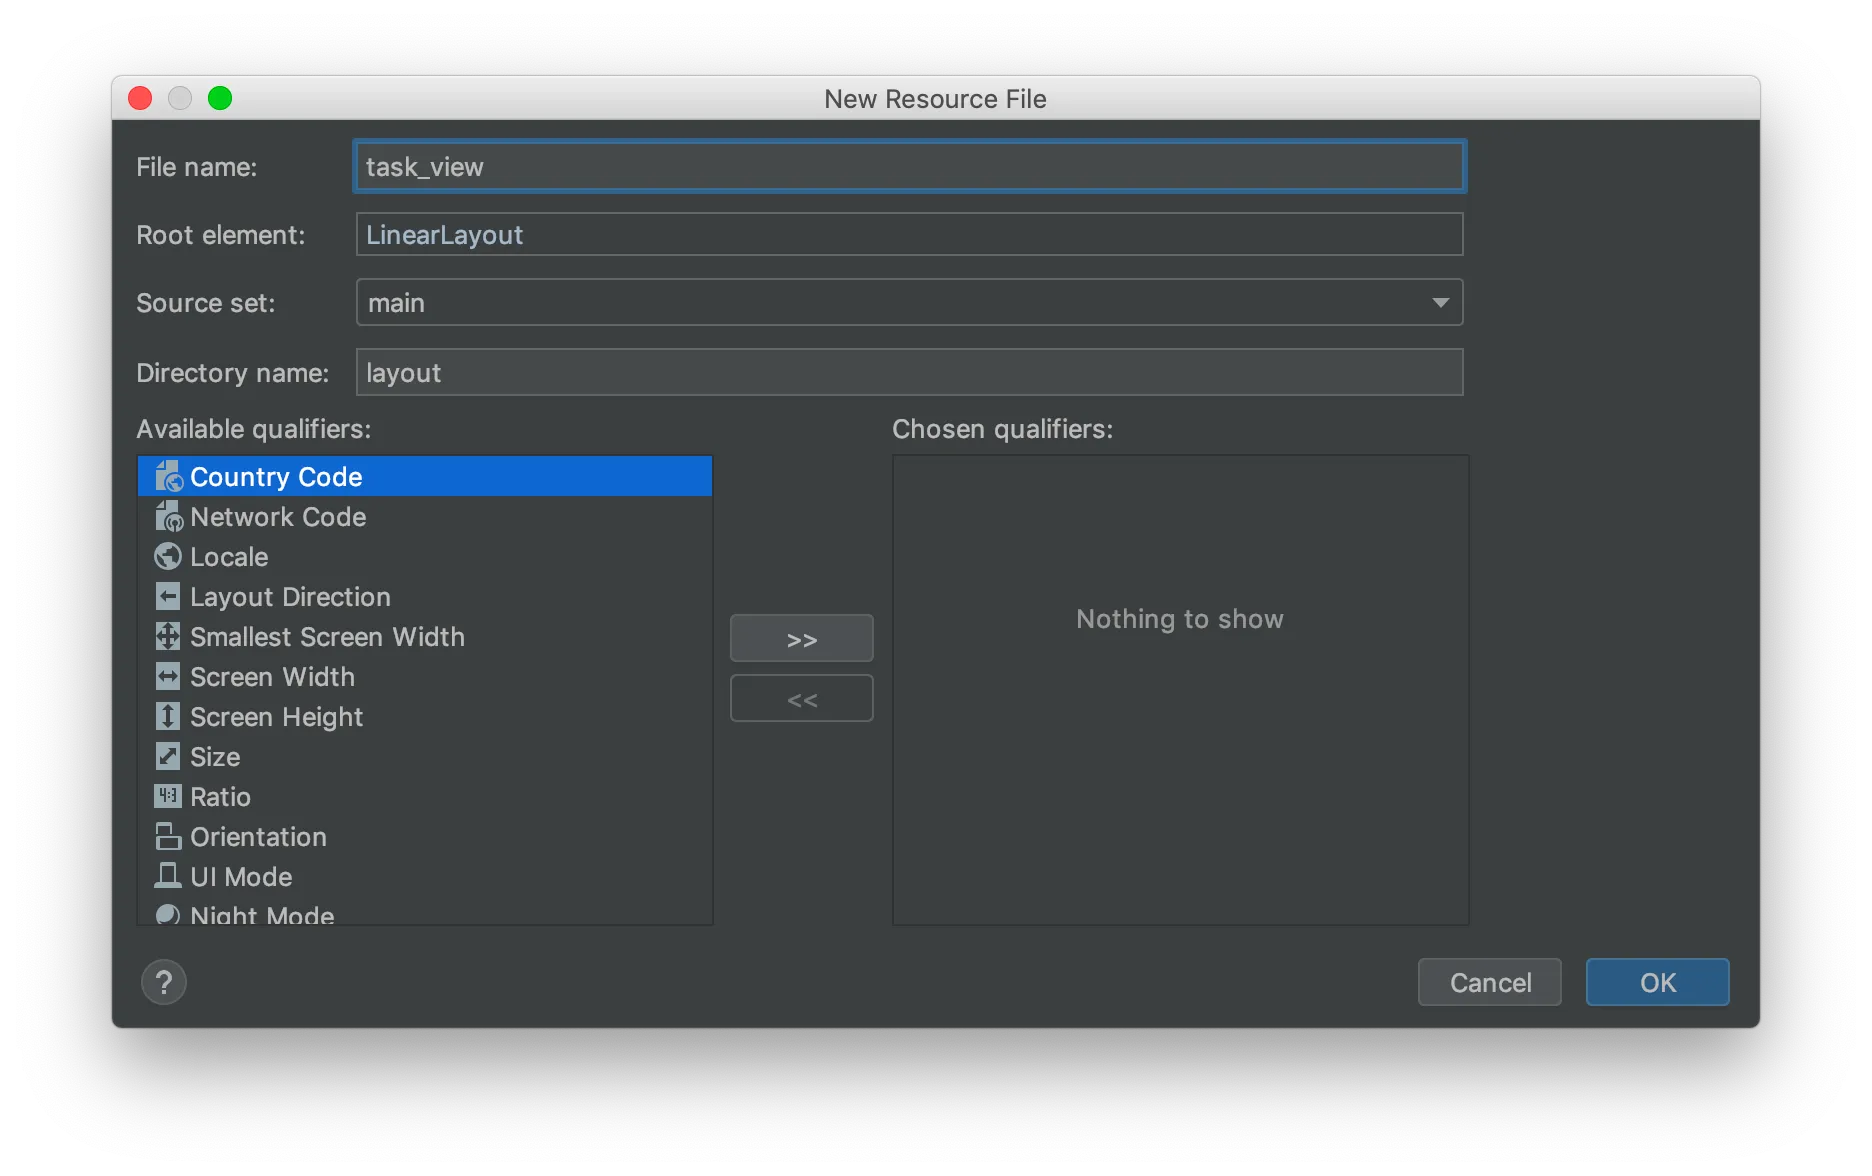
Open the task_view.xml layout file and replace the XML in the text representation view. This will add a text view and checkbox to display the task in each row of the RecyclerView:
<?xml version="1.0" encoding="utf-8"?>
<androidx.constraintlayout.widget.ConstraintLayout xmlns:android="http://schemas.android.com/apk/res/android"
    xmlns:app="http://schemas.android.com/apk/res-auto"
    xmlns:tools="http://schemas.android.com/tools"
    android:id="@+id/linearLayout"
    android:layout_width="match_parent"
    android:layout_height="wrap_content">

    <TextView
        android:id="@+id/taskTextView"
        android:layout_width="0dp"
        android:layout_height="wrap_content"
        android:layout_marginStart="8dp"
        android:layout_marginTop="8dp"
        android:layout_marginEnd="8dp"
        android:layout_marginBottom="8dp"
        android:text="TextView"
        android:textAppearance="@style/TextAppearance.AppCompat.Large"
        app:layout_constraintBottom_toBottomOf="parent"
        app:layout_constraintEnd_toStartOf="@+id/taskCheckBox"
        app:layout_constraintStart_toStartOf="parent"
        app:layout_constraintTop_toTopOf="parent" />

    <CheckBox
        android:id="@+id/taskCheckBox"
        android:layout_width="wrap_content"
        android:layout_height="wrap_content"
        android:layout_marginTop="8dp"
        android:layout_marginEnd="8dp"
        android:layout_marginBottom="8dp"
        android:backgroundTint="#FFFFFF"
        android:clickable="false"
        app:layout_constraintBottom_toBottomOf="parent"
        app:layout_constraintEnd_toEndOf="parent"
        app:layout_constraintStart_toEndOf="@+id/taskTextView"
        app:layout_constraintTop_toTopOf="parent" />
</androidx.constraintlayout.widget.ConstraintLayout>
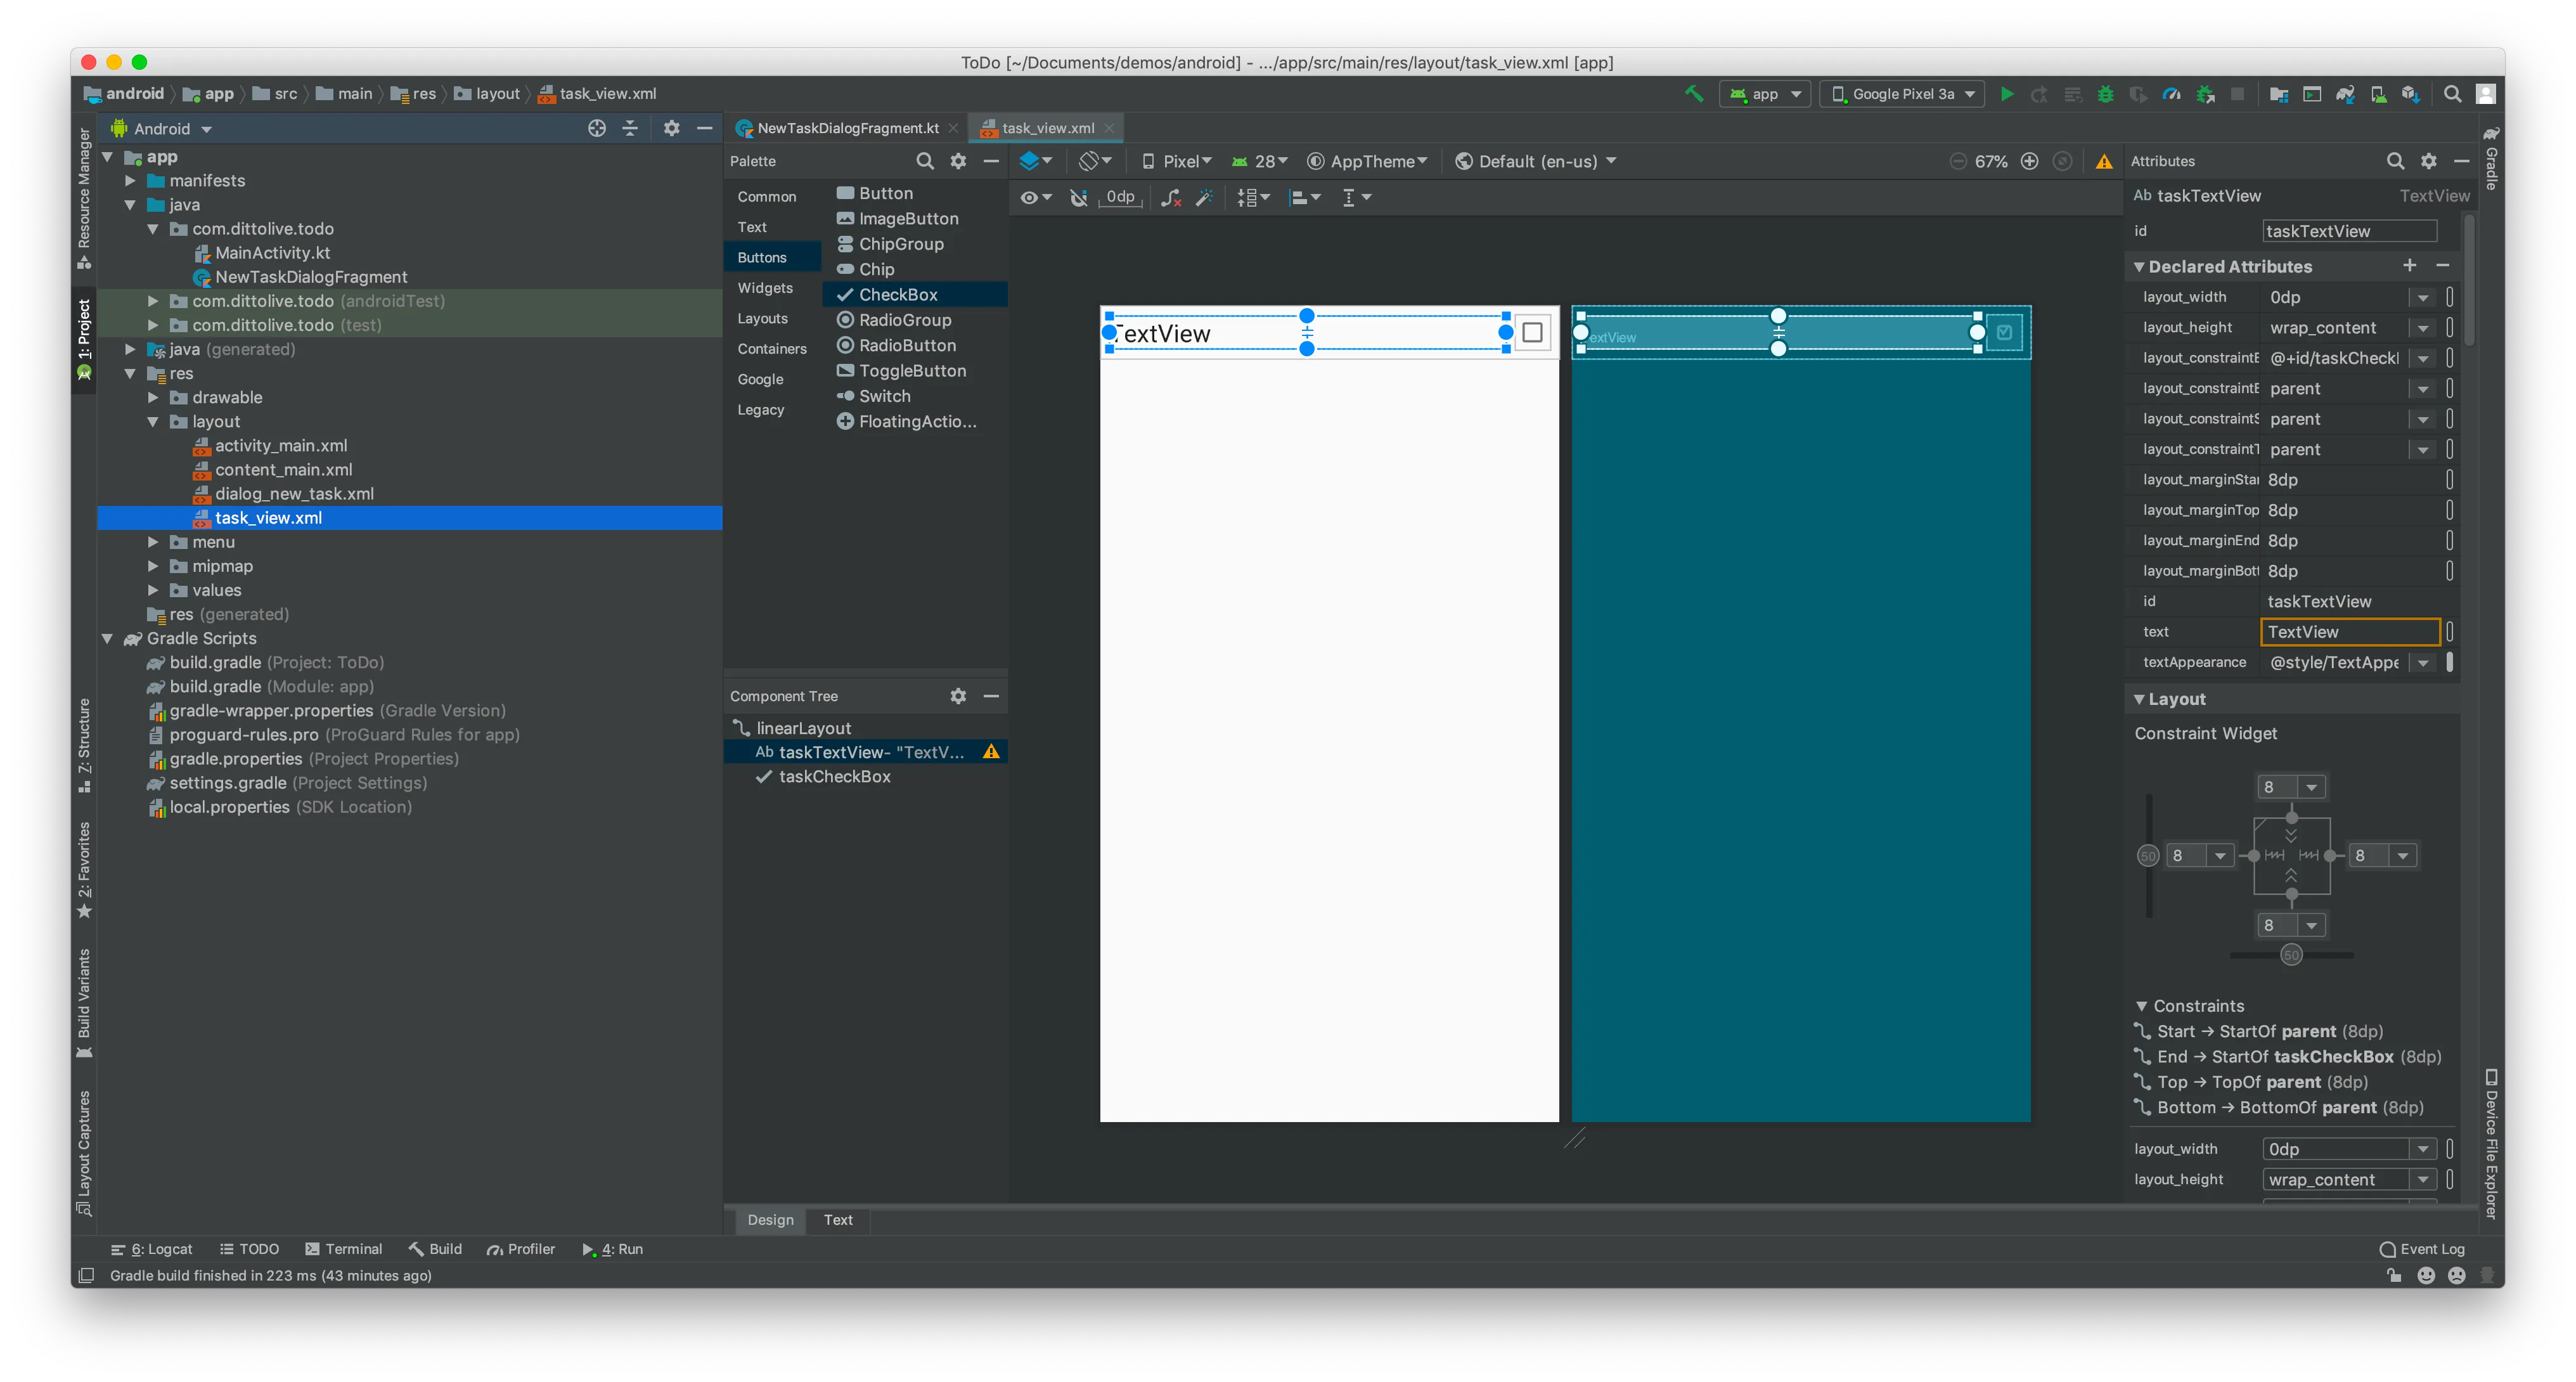
The layout should look like this now:
Configure Main Activity Part II
We now need to continue to configure the MainActivity to customize the RecyclerView, display the tasks, and add the logic for the user actions. Replace the onCreate() function with this code that will configure the recycler view:
override fun onCreate(savedInstanceState: Bundle?) {
    super.onCreate(savedInstanceState)
    setContentView(R.layout.activity_main)
    setSupportActionBar(toolbar)

    // Setup the layout
    viewManager = LinearLayoutManager(this)
    val tasksAdapter = TasksAdapter()
    viewAdapter = tasksAdapter

    recyclerView = findViewById<RecyclerView>(R.id.recyclerView).apply {
        setHasFixedSize(true)
        layoutManager = viewManager
        adapter = viewAdapter
    }

    recyclerView.addItemDecoration(DividerItemDecoration(this, DividerItemDecoration.VERTICAL))

}
We need to declare a RecyclerView.Adapter to provide a data source to the RecyclerView. Add this code to the bottom of MainActivity, as a new class within the file:
class TasksAdapter: RecyclerView.Adapter<TasksAdapter.TaskViewHolder>() {
    private val tasks = mutableListOf<DittoDocument>()

    var onItemClick: ((DittoDocument) -> Unit)? = null

    class TaskViewHolder(v: View): RecyclerView.ViewHolder(v)

    override fun onCreateViewHolder(parent: ViewGroup, viewType: Int): TaskViewHolder {
        val view = LayoutInflater.from(parent.context).inflate(R.layout.task_view, parent, false)
        return TaskViewHolder(view)
    }

    override fun onBindViewHolder(holder: TaskViewHolder, position: Int) {
        val task = tasks[position]
        holder.itemView.taskTextView.text = task["body"].stringValue
        holder.itemView.taskCheckBox.isChecked = task["isCompleted"].booleanValue
        holder.itemView.setOnClickListener {
            // NOTE: Cannot use position as this is not accurate based on async updates
            onItemClick?.invoke(tasks[holder.adapterPosition])
        }
    }

    override fun getItemCount() = this.tasks.size

    fun tasks(): List<DittoDocument> {
        return this.tasks.toList()
    }

    fun set(tasks: List<DittoDocument>): Int {
        this.tasks.clear()
        this.tasks.addAll(tasks)
        return this.tasks.size
    }

    fun inserts(indexes: List<Int>): Int {
        for (index in indexes) {
            this.notifyItemRangeInserted(index, 1)
        }
        return this.tasks.size
    }

    fun deletes(indexes: List<Int>): Int {
        for (index in indexes) {
            this.notifyItemRangeRemoved(index, 1)
        }
        return this.tasks.size
    }

    fun updates(indexes: List<Int>): Int {
        for (index in indexes) {
            this.notifyItemRangeChanged(index, 1)
        }
        return this.tasks.size
    }

    fun moves(moves: List<DittoLiveQueryMove>) {
        for (move in moves) {
            this.notifyItemMoved(move.from, move.to)
        }
    }

    fun setInitial(tasks: List<DittoDocument>): Int {
        this.tasks.addAll(tasks)
        this.notifyDataSetChanged()
        return this.tasks.size
    }
}
Add Swipe To Delete
To match the iOS getting started app, we also want to add swipe to delete functionality. Insert this code at the bottom of MainActivity as a new class:
// Swipe to delete based on https://medium.com/@kitek/recyclerview-swipe-to-delete-easier-than-you-thought-cff67ff5e5f6
abstract class SwipeToDeleteCallback(context: Context) : ItemTouchHelper.SimpleCallback(0, ItemTouchHelper.LEFT) {

    private val deleteIcon = ContextCompat.getDrawable(context, android.R.drawable.ic_menu_delete)
    private val intrinsicWidth = deleteIcon!!.intrinsicWidth
    private val intrinsicHeight = deleteIcon!!.intrinsicHeight
    private val background = ColorDrawable()
    private val backgroundColor = Color.parseColor("#f44336")
    private val clearPaint = Paint().apply { xfermode = PorterDuffXfermode(PorterDuff.Mode.CLEAR) }


    override fun onMove(recyclerView: RecyclerView, viewHolder: RecyclerView.ViewHolder, target: RecyclerView.ViewHolder): Boolean {
        return false
    }

    override fun onChildDraw(
        c: Canvas, recyclerView: RecyclerView, viewHolder: RecyclerView.ViewHolder,
        dX: Float, dY: Float, actionState: Int, isCurrentlyActive: Boolean
    ) {

        val itemView = viewHolder.itemView
        val itemHeight = itemView.bottom - itemView.top
        val isCanceled = dX == 0f && !isCurrentlyActive

        if (isCanceled) {
            clearCanvas(c, itemView.right + dX, itemView.top.toFloat(), itemView.right.toFloat(), itemView.bottom.toFloat())
            super.onChildDraw(c, recyclerView, viewHolder, dX, dY, actionState, isCurrentlyActive)
            return
        }

        // Draw the red delete background
        background.color = backgroundColor
        background.setBounds(itemView.right + dX.toInt(), itemView.top, itemView.right, itemView.bottom)
        background.draw(c)

        // Calculate position of delete icon
        val deleteIconTop = itemView.top + (itemHeight - intrinsicHeight) / 2
        val deleteIconMargin = (itemHeight - intrinsicHeight) / 2
        val deleteIconLeft = itemView.right - deleteIconMargin - intrinsicWidth
        val deleteIconRight = itemView.right - deleteIconMargin
        val deleteIconBottom = deleteIconTop + intrinsicHeight

        // Draw the delete icon
        deleteIcon!!.setBounds(deleteIconLeft, deleteIconTop, deleteIconRight, deleteIconBottom)
        deleteIcon.setTint(Color.parseColor("#ffffff"))
        deleteIcon.draw(c)

        super.onChildDraw(c, recyclerView, viewHolder, dX, dY, actionState, isCurrentlyActive)
    }

    private fun clearCanvas(c: Canvas?, left: Float, top: Float, right: Float, bottom: Float) {
        c?.drawRect(left, top, right, bottom, clearPaint)
    }
}
Almost there! At this point, we have most of the app created, but we now need to integrate Ditto!
Integrate Ditto
In order to integrate Ditto into our app we first need to create a new app on the portal. Apps created on the portal will automatically sync data between them and also to the Ditto Big Peer. For instructions, see Onboarding.
Initialize Ditto
To finish the app, we now need to integrate Ditto. We will initialize it in the onCreate() function within MainActivity. Furthermore, we will add handlers for the swipe to delete and listening for row clicks to mark a task as completed (or in-completed). Replace the existing onCreate() code with this:
override fun onCreate(savedInstanceState: Bundle?) {
    super.onCreate(savedInstanceState)
    setContentView(R.layout.activity_main)
    setSupportActionBar(toolbar)

    // Setup the layout
    viewManager = LinearLayoutManager(this)
    val tasksAdapter = TasksAdapter()
    viewAdapter = tasksAdapter

    recyclerView = findViewById<RecyclerView>(R.id.recyclerView).apply {
        setHasFixedSize(true)
        layoutManager = viewManager
        adapter = viewAdapter
    }

    recyclerView.addItemDecoration(DividerItemDecoration(this, DividerItemDecoration.VERTICAL))

    // Create an instance of Ditto
    val androidDependencies = DefaultAndroidDittoDependencies(applicationContext)
    val ditto = Ditto(androidDependencies, DittoIdentity.OnlinePlayground(androidDependencies, "REPLACE_WITH_YOUR_APP_ID", "REPLACE_WITH_TOKEN"))
    this.ditto = ditto

    // This starts Ditto's background synchronization
    ditto.startSync()

    // We will create a long-running live query to keep the database up-to-date
    this.collection = this.ditto!!.store.collection("tasks")
    this.subscription = this.collection!!.find("!isDeleted").subscribe()

    // Add swipe to delete
    val swipeHandler = object : SwipeToDeleteCallback(this) {
        override fun onSwiped(viewHolder: RecyclerView.ViewHolder, direction: Int) {
            val adapter = recyclerView.adapter as TasksAdapter
            // Retrieve the task at the row swiped
            val task = adapter.tasks()[viewHolder.adapterPosition]
            // Delete the task from Ditto
            ditto.store.collection("tasks").findByID(task.id).update { doc ->
               doc!!["isDeleted"].set(true)
            }
        }
    }

    // Configure the RecyclerView for swipe to delete
    val itemTouchHelper = ItemTouchHelper(swipeHandler)
    itemTouchHelper.attachToRecyclerView(recyclerView)

    // Respond to new task button click
    addTaskButton.setOnClickListener { _ ->
        showNewTaskUI()
    }

    // Listen for clicks to mark tasks [in]complete
    tasksAdapter.onItemClick = { task ->
        ditto.store.collection("tasks").findById(task.id).update { newTask ->
            newTask!!["isCompleted"].set(!newTask["isCompleted"].booleanValue)
        }
    }

    // This function will create a "live-query" that will update
    // our RecyclerView
    setupTaskList()

    // This will check if the app has permissions
    // to fully enable Bluetooth
    checkPermissions()
}
The important things to note is that you need an access license to use Ditto. If you do not have one yet, reach out and we can supply one. To enable background synchronization, we need to call startSync() which allows you to control when synchronization occurs. For this application we want it to run the entire time the app is in use.
Set Up Store Observer Query
Finally, we then use Ditto's key API to observe changes to the database by creating a live-query in the setupTaskList() function. This allows us to set the initial state of the RecyclerView after the query is immediately run and then subsequently get callbacks for any new data changes that occur locally or that were synced from other devices:
Note, that we are using the observeLocal API in Ditto. This sets up a local observer for data changes in the database that match the query. You also need to create a subscription for the same query that will be used to request this data from other devices.
fun setupTaskList() {
    // We use observeLocal to create a live query with a subscription to sync this query with other devices
    this.liveQuery = collection!!.find("!isDeleted").observeLocal { docs, event ->
        val adapter = (this.viewAdapter as TasksAdapter)
        when (event) {
            is DittoLiveQueryEvent.Update -> {
                runOnUiThread {
                    adapter.set(docs)
                    adapter.inserts(event.insertions)
                    adapter.deletes(event.deletions)
                    adapter.updates(event.updates)
                    adapter.moves(event.moves)
                }
            }
            is DittoLiveQueryEvent.Initial -> {
                runOnUiThread {
                    adapter.setInitial(docs)
                }
            }
        }
    }

    ditto!!.store.collection("tasks").find("isDeleted == true").evict()
}
This is a best-practice when using Ditto, since it allows your UI to simply react to data changes which can come at any time given the ad-hoc nature of how Ditto synchronizes with nearby devices.
Check For Location Permissions
Android requires you to request location permissions to fully enable Bluetooth Low Energy (since Bluetooth can be involved with location tracking). Insert this function in MainActivity:
fun checkPermissions() {
    val missing = DittoSyncPermissions(this).missingPermissions()
    if (missing.isNotEmpty()) {
        this.requestPermissions(missing, 0)
    }
}
Ensure Imports
Just in case your project did not auto import as you went along, you can replace the import statements in MainActivity with these:
import android.Manifest
import android.content.Context
import android.content.pm.PackageManager
import android.graphics.*
import android.graphics.drawable.ColorDrawable
import android.os.Bundle
import android.view.LayoutInflater
import android.view.View
import android.view.ViewGroup
import androidx.appcompat.app.AppCompatActivity
import androidx.core.app.ActivityCompat
import androidx.core.content.ContextCompat
import androidx.fragment.app.DialogFragment
import androidx.recyclerview.widget.DividerItemDecoration
import androidx.recyclerview.widget.ItemTouchHelper
import androidx.recyclerview.widget.LinearLayoutManager
import androidx.recyclerview.widget.RecyclerView
import kotlinx.android.synthetic.main.activity_main.*
import kotlinx.android.synthetic.main.task_view.view.*
import live.ditto.*
import live.ditto.transports.*
import live.ditto.android.DefaultAndroidDittoDependencies
import java.time.Instant
Build and Run!
🎉 You now have a fully functioning Tasks app. Build and run it on a device. The simulator will not show any data sync because neither Bluetooth or the necessary network system is available to allow simulators to find each other or another device.
